一、centos 安装tomcat软件包
# yum 安装
yum install tomcat
# 查看安装目录
rpm -ql tomcat

#发现 /var/lib/tomcat/webapps/  这个目录下面是空的
也就是说:centos安装的tomcat,是没有欢迎界面的。一开始打开浏览器访问,找不到tomcat的欢迎页,其实是服务器默认就没有欢迎页。
二、centos 安装tomcat源码包
Installing Apache Tomcat 9
We’ll have to create a system user and group before proceeding with the installation process of Tomcat so create a user and group named tomcat to run below-given command to do so:
groupadd tomcat useradd -s /bin/false -g tomcat -d /opt/tomcat tomcat
The options used in the above command perform the following:
-s /bin/false will disable shell access -g tomcat will assign a new user to the group tomcat -d /opt/tomcat will define the home directory for the user
Downloading and Installing Apache Tomcat
First, go to the directory /opt and download Apache Tomcat server using wgetcommand from http://tomcat.apache.org as shown below:
cd /opt/
This will change your current directory to directory /opt/
If in any case you haven’t installed wget command on your system then first of all install it using this command:
yum install wgetwget http://www-eu.apache.org/dist/tomcat/tomcat-9/v9.0.0.M15/bin/apache-tomcat-9.0.0.M15.tar.gz
Now extract using tar command as below :
tar -xzvf apache-tomcat-9.0.0.M15.tar.gz
Move all the files that are in the apache-tomcat-9.0.0.M15 directory to the tomcatdirectory to do so run following command :
mv apache-tomcat-9.0.0.M15/* tomcat/
Now change the proper ownership using the following command:
chown -hR tomcat:tomcat tomcat
Testing Tomcat
We recommend you to run a short testing on Tomcat to make sure that there is no error and it is installed successfully so follow the below-given process.
Run below given command :
cd /opt/tomcat/bin/ ./startup.sh
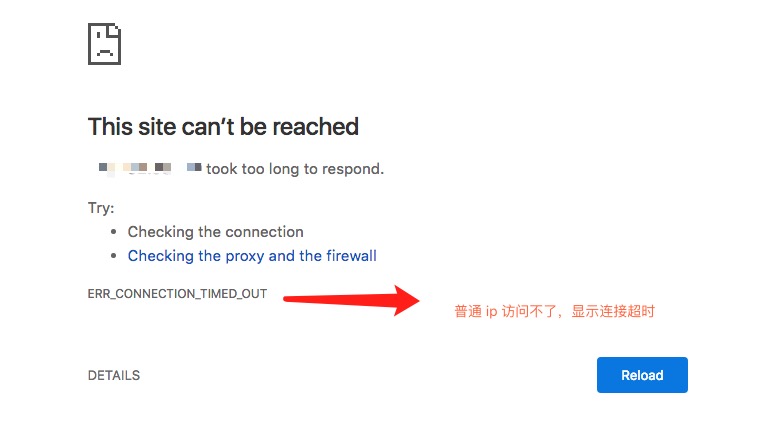
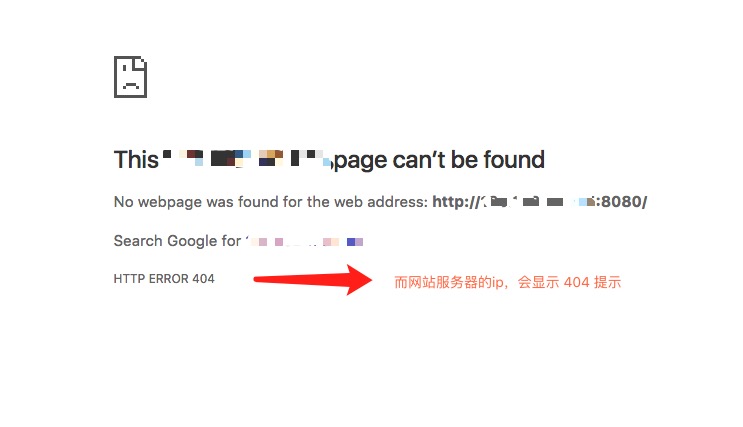
Currently, Tomcat is using port number 8080 so check the open port using netstat command as shown:
netstat -plntu
You can check this using a web browser with http://yourserver_IP:8080 then you’ll see the homepage of Apache Tomcat Server but we recommend you to use browser later at final testing because we will run Tomcat with a systemd service file in the final configuration.
Now run following commands :
cd /opt/tomcat/bin/./shutdown.shchown -hR tomcat:tomcat /opt/tomcat/
Creating a systemd Service File
Now you’ll need to create a systemd service file to run Apache Tomcat as a tomcat user. Creation of a systemd service file is recommended for easy starting and stopping the service.
Run following command :
nano /etc/systemd/system/tomcat.service
Add the content below into nano text editor, you can simply copy/paste this into the file:
[Unit]
Description=Apache Tomcat 8 Servlet Container
After=syslog.target network.target[Service]
User=tomcat
Group=tomcat
Type=forking
Environment=CATALINA_PID=/opt/tomcat/tomcat.pid
Environment=CATALINA_HOME=/opt/tomcat
Environment=CATALINA_BASE=/opt/tomcat
ExecStart=/opt/tomcat/bin/startup.sh
ExecStop=/opt/tomcat/bin/shutdown.sh
Restart=on-failure
[Install] WantedBy=multi-user.target
Save and close the file then run the following commands to start the Tomcat service and enable Tomcat service to start on boot:
systemctl daemon-reload systemctl start tomcat systemctl enable tomcat
Once again check for the open port using netstat command shown below:
netstat -plntu
Now run the command below and make sure that service is active as shown below:
systemctl status tomcat
Configure Tomcat Users
Run following command to edit tomcat-users.xml file using any text editor here we are using nano :
cd /opt/tomcat/conf/ nano tomcat-users.xml
Create a new line under line 43 and add following content, again you can simply copy-paste this into file like you’ve done before:
<role rolename="manager-gui"/>
<user username="admin" password="password" roles="manager-gui,admin-gui"/>
Save the file and exit text editor.
Now you’ll have to edit context.xml file using following commands:
cd /opt/tomcat/webapps/manager/META-INF/nano context.xml
Now you’ll have to comment out line 19 and 20 as shown below:
   <Context antiResourceLocking="false" privileged="true" >
    <!--  <Valve className="org.apache.catalina.valves.RemoteAddrValve"
         allow="127\.\d+\.\d+\.\d+|::1|0:0:0:0:0:0:0:1" /> -->
    </Context>
Save the file and exit nano text editor .
Now once again edit the context.xml file but this time it is in host-manager directory so run below given commands :
cd /opt/tomcat/webapps/host-manager/META-INF/nano context.xml
Comment out again line 19 and 20.
  <Context antiResourceLocking="false" privileged="true" >
    <!--  <Valve className="org.apache.catalina.valves.RemoteAddrValve"
         allow="127\.\d+\.\d+\.\d+|::1|0:0:0:0:0:0:0:1" /> -->
    </Context>
Save the file and exit nano text editor .
Now you’ll have to restart the tomcat and to do so run following command:
systemctl restart tomcat
Configure Firewalld
If in any case you haven’t installed firewalld on your system then install it first using yum command as shown below:
yum install firewalld
You’ll have to start firewalld and add it to start at boot time, to do so run following command:
systemctl start firewalldsystemctl enable firewalld
Now you’ll have to use firewall-cmd command to add apache tomcat port number 8080 to the firewall so simply enter below-given command:
firewall-cmd --zone=public --permanent --add-port=8080/tcp
You’ll see a result as “success”.
Now reload the firewall service using the following command:
firewall-cmd --reload
We recommend you to check for all service available and port 8080 is open and there is no error, to do so run following command:
firewall-cmd --list-portsfirewall-cmd --list-services
参考: