简单设置SSH代理:
如果 由于网络和谐,SSH 无法连接到远程服务器(time out 神马的),可以设置代理服务器。
找到ssh的配置文件。(可能需要自己手动创建txt文件,文件全名:config)

socket 代理 软件 配置
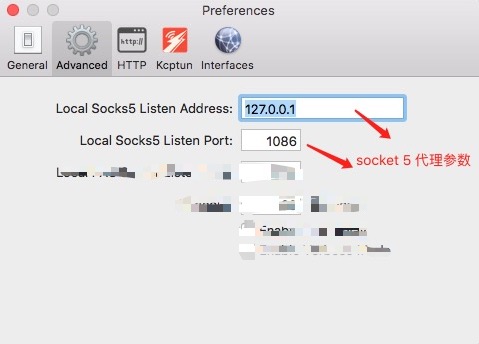
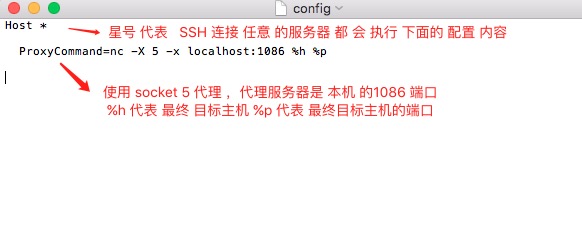
可复制以下代码到文件 ~/.ssh/config
Host *
  ProxyCommand=nc -X 5 -x localhost:1086 %h %p
SSH设置代理详解:
配置: ProxyCommand ,总得来说代理 方式 大致可分为两种。 参数 %h 指最终目标主机 %p 指最终目标主机端口
一、在客户端主机 和 中间人主机 上面 建立起 SSH隧道,然后通过操作中间人主机 通过SSH 远程登录目标主机。
举例:
     +-------+       +----------+      +-----------+
     | Laptop| <---> | Jumphost | <--> | FooServer |
     +-------+       +----------+      +-----------+


               OR

     +-------+       +----------+      +-----------+
     | Laptop| <---> | Firewall | <--> | FooServer |
     +-------+       +----------+      +-----------+
	192.168.1.5      121.1.2.3         10.10.29.68
直接尝试 连续登录 两个服务器。
I can can only access a remote server named ‘FooServer’ via ssh by first login into an intermediary server called ‘Jumphost’.
First, login to Jumphost:
$ ssh vivek@Jumphost
Next, I must ssh through the intermediary system as follows:
$ ssh vivek@FooServer
Passing through a gateway or two
Instead of typing two ssh command, I can type the following all-in-one command. This is useful for connecting to FooServer via firewall called ‘Jumphost’ as the jump host:
$ ssh -tt Jumphost ssh -tt FooServer
$ ssh -tt vivek@Jumphost ssh -tt vivek@FooServer
# 下面这句 command1 代表的是 登录终端服务器后,就直接进行的 shell 命令 command1
$ ssh -tt vivek@Jumphost ssh -tt vivek@FooServer command1 arg1 arg2

# Run htop over ssh via single command
# ssh [email protected] 'htop'
# Error opening terminal: unknown.

# Use the -t flag with SSH; test OK !
# This will force a TTY allocation (ssh doesn't allocate a TTY if it's not necessary, normally only for interactive shells).
# ssh [email protected] -t 'htop'

$ ssh -tt vivek@Jumphost ssh -tt vivek@FooServer htop
$ ssh -tt vivek@Jumphost ssh -tt vivek@FooServer screen -dR
 -t option passed to the ssh command force pseudo-tty allocation. This can be used to execute arbitrary screen-based programs on a remote machine. Multiple -tt options force tty allocation, even if ssh has no local tty.
 -t 强制分配伪终端. 可以在远程机器上执行任何全屏幕(screen-based)程序, 所以非常有用, 例如菜单服务. 并联的 -t 选项强制分配终端, 即使 没有本地终端.
更好的办法是 调用 命令 ProxyCommand
$ ssh -o ProxyCommand='ssh vivek@Jumphost nc FooServer 22' vivek@FooServer
##########################################
## -t option is needed to run commands ###
##########################################
$ ssh -t -o ProxyCommand='ssh vivek@Jumphost nc FooServer 22' vivek@FooServer htop
The netcat (nc) command is needed to set and establish a TCP pipe between Jumphost (or firewall) and FooServer. Now, my laptop (local system) is connected to Jumphost it now connected FooServer. In this example, the utility netcat (nc) is for reading and writing network connections directly. It can be used to pass connections to a 2nd server such as FooServer.
或者使用 配置文件
# Edit the $HOME/.ssh/config file using a text editor such as vim, enter:
$ vim ~/.ssh/config
# Append the following configuration:
Host fooserver   #(随便取一个[昵称名] , 用户 客户端 直接 ssh [昵称名])
HostName FooServer  #(远程目标主机)
User vivek  #(远程目标主机登入用户名)
ProxyCommand ssh vivek@Jumphost nc %h %p
Save and close the file. Where,
1.Host fooserver : Set nickname of your choice.
2.HostName FooServer : Set the real remote server/host name.
3.User vivek : Set the real user name for remote server/host.
4.ProxyCommand ssh vivek@Jumphost nc %h %p : Specifies the command to use to connect to the server. In this example, I’m using nc command. Any occurrence of %h will be substituted by the host name to connect, %p by the port, and %r by the remote user name.
To test enter:
$ ssh fooserver
To see the details, pass the -v option to the ssh command. Here is another snippet:
Host server1
HostName v.server1
User root
Port 22
ProxyCommand ssh [email protected] nc %h %p %r
Now, run:
$ ssh -v server1
Sample outputs:
OpenSSH_6.2p2, OSSLShim 0.9.8r 8 Dec 2011
debug1: Reading configuration data /Users/veryv/.ssh/config
debug1: /Users/veryv/.ssh/config line 1: Applying options for server1
debug1: Reading configuration data /etc/ssh_config
debug1: /etc/ssh_config line 20: Applying options for *
debug1: /etc/ssh_config line 102: Applying options for *
debug1: Executing proxy command: exec ssh [email protected] nc v.server1 22 root
................
On the outside (ssh -W uses a special channel rather than using a normal session channel), it is equivalent to ssh’ing to the ssh_jump_host and calling netcat:
  # 下面的两条命令 其实是 差不多的 ,只是 -W 建立的隧道不是普通的 SSH 隧道罢了
  ProxyCommand ssh ssh_jump_host "nc %h %p"
  ProxyCommand ssh -W %h:%p ssh_jump_host
其他补充:
ProxyCommand 选项值形式为
ssh -W C:CPort -l USER -i PRIVATE_KEY -p BPort B
原理:ssh命令自提供的代理机制,在机器A上 建立与B的SSH连接
(使用”-l USER -i PRIVATE_KEY -p BPort B”这些参数)
该SSH连接的B端侧与机器C上的SSH Server端口(即“C:CPort”)建立连接,
该SSH连接的A端侧与机器A上的SSH Client
(即“最终欲建立‘间接SSH连接’在机器A上的SSH Client”)建立连接。
假定A上ssh_config配置文件内容如下:
Host B
    HostName %h
    User dsl
    Port 1046
    IdentityFile ~/.ssh/id_dsa
Host C
    HostName %h
    User dsl
    Port 1046
    IdentityFile ~/.ssh/id_rsa
    ProxyCommand ssh -W %h:%p B
在A上执行ssh C命令,发现A与C成功建立SSH连接。根据以上所述,此时在A上应该有两个SSH进程,一个对应于“A与B的SSH连接”,另外一个对应于“A与C的SSH连接”。在A上执行ps -ef | grep ‘ssh’命令,得到如下结果,得证。
7851  7689 15:55 S pts/10   ssh C
7852  7851 15:55 S pts/10   ssh -W C:1046 B
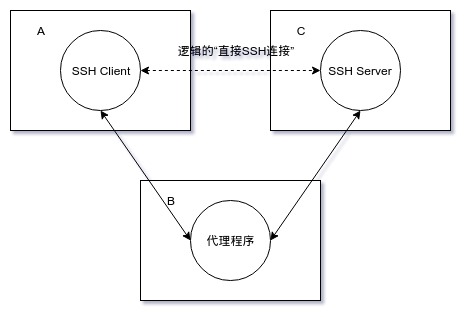
二、利用外界现有的代理服务器。
“ProxyCommand”选项值形式为“nc -X 5 -x B:BPort C CPort”,
原理:利用“nc”命令,在机器A上使用“nc”命令与代理服务器
(即“-x B:BPort”,通过“-X 5”参数来指定与代理服务器的通信协议为“SOCKS4/SOCKS5/HTTPS”)建立代理连接,
该代理服务器连接的B端侧与机器C上的SSH Server端口(即“C CPort”)建立连接,
该代理服务器连接的A端侧与机器A上的SSH Client
(即“最终欲建立‘间接SSH连接’在机器A上的SSH Client”)建立连接。
假定A上ssh_config配置文件内容如下:
Host C
    HostName %h
    User dsl
    Port 1046
    IdentityFile ~/.ssh/id_rsa
    ProxyCommand nc -X 5 -x B:8989 %h %p
在A上执行ssh C命令,发现A与C成功建立SSH连接。根据以上所述,此时在A上应该有一个NC进程和一个SSH进程,前者对应于“A与B的代理连接”,后者对应于“A与C的SSH连接”。在A上执行ps -ef | grep -e ‘ssh’ -e ‘nc’命令,得到如下结果,得证。
8816  8089 16:08 S pts/10   ssh C
8817  8816 16:08 S pts/10   nc -X 5 -x B:8989 C 1046
ProxyCommand -X 参数含义 -x 参数含义 :
-X proxy_protocol
Requests that nc should use the specified protocol when talking to the proxy server.
Supported protocols are “4” (SOCKS v.4), “5” (SOCKS v.5) and “connect” (HTTPS proxy).
If the protocol is not specified, SOCKS version 5 is used.

-x proxy_address[:port]
Requests that nc should connect to destination using a proxy at proxy_address and port.
If port is not specified, the well-known port for the proxy protocol is used (1080 for SOCKS, 3128 for HTTPS).
 An IPv6 address can be specified unambiguously by enclosing proxy_address in square brackets.
补充:关于SSH配置的问题:
ssh_config(5)
~/.ssh/config
This is the per-user configuration file. The file format and configuration options are described in ssh_config(5).
Because of the potential for abuse, this file must have strict permissions: read/write for the user, and not writable by others.

/etc/ssh/ssh_config
Systemwide configuration file. The file format and configuration options are described in ssh_config(5).