一、VNC简介
VNC (Virtual Network Console)是虚拟网络控制台的缩写。它 是一款优秀的远程控制工具软件,由著名的 AT&T 的欧洲研究实验室开发的。VNC 是在基于 UNIX 和 Linux 操作系统的免费的开源软件,远程控制能力强大,高效实用,其性能可以和 Windows 和 MAC 中的任何远程控制软件媲美。 在 Linux 中,VNC 包括以下四个命令:vncserver,vncviewer,vncpasswd,和 vncconnect。大多数情况下用户只需要其中的两个命令:vncserver 和 vncviewer。
VNC基本上是由两部分组成:一部分是客户端的应用程序(vncviewer);另外一部分是服务器端的应用程序(vncserver)。VNC的基本运行原理和一些Windows下的远程控制软件很相像。VNC的服务器端应用程序在UNIX和Linux操作系统中适应性很强,图形用户界面十分友好,看上去和Windows下的软件界面也很类似。在任何安装了客户端的应用程序(vncviewer)的Linux平台的计算机都能十分方便地和安装了服务器端的应用程序(vncserver)的计算机相互连接。另外,服务器端 (vncserver)还内建了Java Web接口,这样用户通过服务器端对其他计算机的操作就能通过Netscape显示出来了,这样的操作过程和显示方式比较直观方便。
二、配置vnc客户端
楼主下载的是:VNC Viewer
https://www.realvnc.com/en/connect/download/viewer/
下载完,直接安装就行了。
三、centos7配置vnc服务器端
# 1、下载linux桌面环境
yum groupinstall "GNOME Desktop"

# 2、安装tigervnc 服务端软件
yum install tigervnc-server

# 3、拷贝 vnc 配置文件
# In CentOS 7.0 there is change in the vncserver configuration file.
# Before ContOS 7.0 it was  /etc/sysconfig/vncservers and now
# it have changed in /lib/systemd/system/[email protected].
# Next I will use the original file and create the configuration file as shown:

cp /lib/systemd/system/[email protected] /etc/systemd/system/vncserver@:1.service
重点步骤:
# 4、编辑vnc配置文件
# Replace the string <USER> with appropriate vncuser’s username.
# In my case I will be using the user root:
vi /etc/systemd/system/vncserver@:1.service
旧版 vnc 配置文件:
# ... 前面一大堆文字

[Service]
Type=forking
# Clean any existing files in /tmp/.X11-unix environment
ExecStartPre=/bin/sh -c '/usr/bin/vncserver -kill %i > /dev/null 2>&1 || :'
#ExecStart=/sbin/runuser -l  -c "/usr/bin/vncserver %i"
#PIDFile=/home//.vnc/%H%i.pid
ExecStart=/sbin/runuser -l srijan -c "/usr/bin/vncserver %i"
PIDFile=/home/srijan/.vnc/%H%i.pid
ExecStop=/bin/sh -c '/usr/bin/vncserver -kill %i > /dev/null 2>&1 || :'
新版 VNC 配置文件:
# The vncserver service unit file
#
# Quick HowTo:
# 1. Copy this file to /etc/systemd/system/[email protected]
# 2. Replace  with the actual user name and edit vncserver
#    parameters appropriately
#   ("User=" and "/home//.vnc/%H%i.pid")
# 3. Run `systemctl daemon-reload`
# 4. Run `systemctl enable vncserver@:.service`
#
# DO NOT RUN THIS SERVICE if your local area network is
# untrusted!  For a secure way of using VNC, you should
# limit connections to the local host and then tunnel from
# the machine you want to view VNC on (host A) to the machine
# whose VNC output you want to view (host B)
#
# [user@hostA ~]$ ssh -v -C -L 590N:localhost:590M hostB
#
# this will open a connection on port 590N of your hostA to hostB's port 590M
# (in fact, it ssh-connects to hostB and then connects to localhost (on hostB).
# See the ssh man page for details on port forwarding)
#
# You can then point a VNC client on hostA at vncdisplay N of localhost and with
# the help of ssh, you end up seeing what hostB makes available on port 590M
#
# Use "-nolisten tcp" to prevent X connections to your VNC server via TCP.
#
# Use "-localhost" to prevent remote VNC clients connecting except when
# doing so through a secure tunnel.  See the "-via" option in the
# `man vncviewer' manual page.

[Unit]
Description=Remote desktop service (VNC)
After=syslog.target network.target

[Service]
Type=forking
User=

# Clean any existing files in /tmp/.X11-unix environment
ExecStartPre=-/usr/bin/vncserver -kill %i
ExecStart=/usr/bin/vncserver %i
PIDFile=/home//.vnc/%H%i.pid
ExecStop=-/usr/bin/vncserver -kill %i

[Install]
WantedBy=multi-user.target
新版vnc配置文件,有一个坑
User=
#改成 User=root

PIDFile=/home//.vnc/%H%i.pid
# 改成 PIDFile=/root/.vnc/%H%i.pid
# 普通用户的话,目录都是 /home/用户名
# root 用户的目录是 /root
# 注意啊 这个是坑爹 的地方
5、配置防火墙
firewall-cmd --permanent --zone=public --add-service vnc-server
firewall-cmd --reload
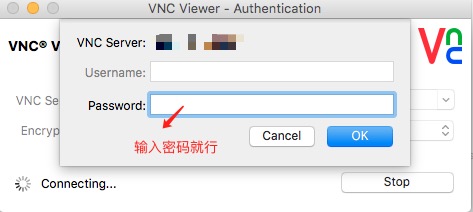
6、启动 vncserver ;就是开启 VNC 服务器,开启的同时,先让你设置个密码(这个密码是客户端需要输入的记住)
[root@server1 ~]# vncserver

You will require a password to access your desktops.

Password:<--yourvncpassword
Verify:<--yourvncpassword
xauth:  file /home/srijan/.Xauthority does not exist

New 'server1.example.com:1 (srijan)' desktop is server1.example.com:1

Creating default startup script /home/kishore/.vnc/xstartup
Starting applications specified in /home/kishore/.vnc/xstartup
Log file is /home/srijan/.vnc/server1.example.com:1.log

[root@server1 ~]#
其实这个时候,vnc服务器 已经可以运行了。
这里的配置的数字1,其实就是 从 VNC 端口 5900开始的,数字1 代表 5901端口,可接收远程连接请求。
7、设置开机自启动
Now make the service enabled on after every reboot with root credentials:
systemctl daemon-reload
systemctl enable vncserver@:1.service
reboot
systemctl start vncserver@:1.service
8、常见报错问题:(网上的解答,不靠谱,尝试了很多,最终看文档,明白了)
[root@localhost system]# systemctl start vncserver@:1.service
Job for vncserver@:1.service failed. See ‘systemctl status vncserver@:1.service’ and ‘journ
alctl -xn’ for details.[root@localhost system]# systemctl status vncserver@:1.service
vncserver@:1.service - Remote desktop service (VNC)
Loaded: loaded (/etc/systemd/system/vncserver@:1.service; enabled)
Active: failed (Result: exit-code) since Thu 2015-04-23 16:04:58 CST; 14s ago
Process: 24764 ExecStart=/sbin/runuser -l root -c /usr/bin/vncserver :1 -geometry 1280x10
24 -depth 24 (code=exited, status=98) Process: 24760 ExecStartPre=/bin/sh -c /usr/bin/vncserver -kill %1 > /dev/null 2>&1 || :
(code=exited, status=0/SUCCESS)
Apr 23 16:04:58 localhost.localdomain systemd[1]: vncserver@:1.service: control proces…98
Apr 23 16:04:58 localhost.localdomain systemd[1]: Failed to start Remote desktop servi…).
Apr 23 16:04:58 localhost.localdomain systemd[1]: Unit vncserver@:1.service entered fa…e.
Hint: Some lines were ellipsized, use -l to show in full.
[root@localhost system]#
解决方法:
1、可能是 临时文件 问题。
rm -rf /tmp/.X11-unix
2、可能是端口被占用问题,或者死锁了。
[root@testdb ~]# lsof -i:5901
COMMAND   PID USER   FD   TYPE DEVICE SIZE/OFF NODE NAME
Xvnc    17513 root    9u  IPv4 365529      0t0  TCP localhost:5901 (LISTEN)
Xvnc    17513 root   10u  IPv6 365530      0t0  TCP localhost:5901 (LISTEN)
[root@testdb ~]# kill 17513
[root@testdb ~]#
重新启动系统,就可以啦。
其实直接用命令行启动VNC服务端最方便,使用了很多次,没有报错过
[root@testdb ~]# vncserver -h

usage: vncserver [:<number>] [-name <desktop-name>] [-depth <depth>]
                 [-geometry <width>x<height>]
                 [-pixelformat rgbNNN|bgrNNN]
                 [-fp <font-path>]
                 [-cc <visual>]
                 [-fg]
                 [-autokill]
                 [-noxstartup]
                 [-xstartup <file>]
                 <Xvnc-options>...

       vncserver -kill <X-display>

       vncserver -list

[root@testdb ~]#
# 启动 vnc 服务端 5901端口(分配一个窗口) 命令
vncserver :1
# 关闭 vnc 服务端 5901 端口(一个窗口) 命令
vncserver -kill :1
# 查看 当前 有 多少个 vnc 窗口 命令
vncserver -list
##########   下面就是命令行 能看到的结果
#  TigerVNC server sessions:
#
#   X DISPLAY #	  PROCESS ID
#    :1		    18936
##################################
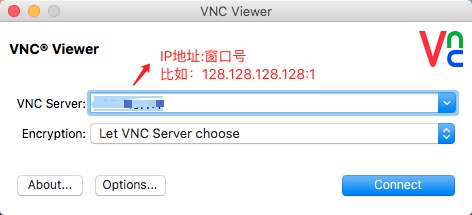
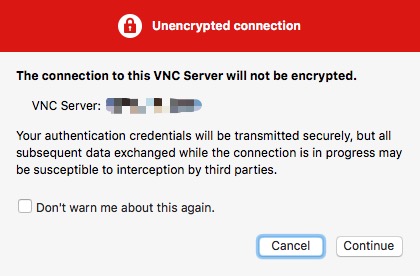
四、客户端连接操作

五、VNC安全加固,使用ssh隧道连接登录
利用ssh 登入centos7系统,或者用vnc登录也行。
[root@testdb ~]# ls -a
.                Downloads                                   Pictures
..               .esd_auth                                   .pki
anaconda-ks.cfg  Firefox_wallpaper.png                       Public
.bash_history    get-pip.py                                  .ssh
.bash_logout     .gvfs                                       .tcshrc
.bash_profile    html.tar.gz                                 Templates
.bashrc          .ICEauthority                               Videos
.cache           .local                                      .viminfo
.config          .mozilla                                    .vnc
.cshrc           Music                                       .Xauthority
Desktop          mysql57-community-release-el7-8.noarch.rpm
Documents        .mysql_history
[root@li1582-175 ~]# cd .vnc
[root@li1582-175 .vnc]# ls -a
.       li1582-175.members.linode.com:1.log  passwd
..      li1582-175.members.linode.com:2.log  xstartup
config  localhost.localdomain:1.log
[root@testdb .vnc]# vim config
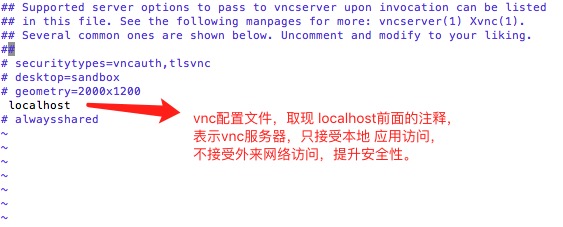
vim编辑完文件后,保存并重启VNC服务端。
#关闭vnc服务器,
vncserver -kill :1
#重启vnc服务器
vncserver :1
客户端操作如下:
1、SSH本地端口转发。VNC远程连接过程中需要保持一直在后台运行。
假定服务器ip 是 128.128.128.128
假定服务器SSH 端口是 8888
ssh -v -C -L 5901:localhost:5901 [email protected] -p 8888
2、登录vnc客户端:
只需将vnc服务器填本机即可。
VNC SERVER:127.0.0.1:1
部分内容参考自:https://www.howtoforge.com/vnc-server-installation-on-centos-7