在spring mvc的单元测试中,就是src/test目录下,我写了一个main方法类。这个代码没有任何错误。但是运行时,就报错了。
1、我试着将代码中,添加一行,然后删除一行,保存后,还是报错。
2、我将这个类放到了别的包目录下,单独运行,发现是OK的。
3、我最后将报错的类,改了名字,保存后,发现可以正常运行,没有报错。
4、我将名字又改了回来,这次发现可以正常运行了。
记录一下,奇怪的坑爹。
当你年老时,你是否常常想,要是年轻时多努力下该好。
在spring mvc的单元测试中,就是src/test目录下,我写了一个main方法类。这个代码没有任何错误。但是运行时,就报错了。
1、我试着将代码中,添加一行,然后删除一行,保存后,还是报错。
2、我将这个类放到了别的包目录下,单独运行,发现是OK的。
3、我最后将报错的类,改了名字,保存后,发现可以正常运行,没有报错。
4、我将名字又改了回来,这次发现可以正常运行了。
记录一下,奇怪的坑爹。
在centos下,默认装的是openjdk的 jre版本。
可以使用java 但不能使用 javac
[root@superguy ~]# rpm -qa | grep jdk
java-1.8.0-openjdk-1.8.0.181-3.b13.el7_5.x86_64
java-1.7.0-openjdk-headless-1.7.0.191-2.6.15.4.el7_5.x86_64
copy-jdk-configs-3.3-10.el7_5.noarch
java-1.7.0-openjdk-1.7.0.191-2.6.15.4.el7_5.x86_64
java-1.8.0-openjdk-headless-1.8.0.181-3.b13.el7_5.x86_64
[root@superguy ~]# java -version
openjdk version "1.8.0_181"
OpenJDK Runtime Environment (build 1.8.0_181-b13)
OpenJDK 64-Bit Server VM (build 25.181-b13, mixed mode)
[root@superguy ~]# javac
bash: javac: command not found...
Similar command is: 'java'
[root@superguy ~]# java
Usage: java [-options] class [args...]
           (to execute a class)
   or  java [-options] -jar jarfile [args...]
           (to execute a jar file)
where options include:
    -d32	  use a 32-bit data model if available
    -d64	  use a 64-bit data model if available
    -server	  to select the "server" VM
                  The default VM is server.

    -cp <class search path of directories and zip/jar files>
    -classpath <class search path of directories and zip/jar files>
                  A : separated list of directories, JAR archives,
                  and ZIP archives to search for class files.
    -D<name>=<value>
                  set a system property
    -verbose:[class|gc|jni]
                  enable verbose output
    -version      print product version and exit
    -version:<value>
                  Warning: this feature is deprecated and will be removed
                  in a future release.
                  require the specified version to run
    -showversion  print product version and continue
    -jre-restrict-search | -no-jre-restrict-search
                  Warning: this feature is deprecated and will be removed
                  in a future release.
                  include/exclude user private JREs in the version search
    -? -help      print this help message
    -X            print help on non-standard options
    -ea[:<packagename>...|:<classname>]
    -enableassertions[:<packagename>...|:<classname>]
                  enable assertions with specified granularity
    -da[:<packagename>...|:<classname>]
    -disableassertions[:<packagename>...|:<classname>]
                  disable assertions with specified granularity
    -esa | -enablesystemassertions
                  enable system assertions
    -dsa | -disablesystemassertions
                  disable system assertions
    -agentlib:<libname>[=<options>]
                  load native agent library <libname>, e.g. -agentlib:hprof
                  see also, -agentlib:jdwp=help and -agentlib:hprof=help
    -agentpath:<pathname>[=<options>]
                  load native agent library by full pathname
    -javaagent:<jarpath>[=<options>]
                  load Java programming language agent, see java.lang.instrument
    -splash:<imagepath>
                  show splash screen with specified image
See http://www.oracle.com/technetwork/java/javase/documentation/index.html for more details.
[root@superguy ~]#
后来查询发现需要装 openjdk 的devel 版本
[root@superguy ~]# yum list |grep jdk
copy-jdk-configs.noarch                  3.3-10.el7_5                   @updates
java-1.7.0-openjdk.x86_64                1:1.7.0.191-2.6.15.4.el7_5     @updates
java-1.7.0-openjdk-headless.x86_64       1:1.7.0.191-2.6.15.4.el7_5     @updates
java-1.8.0-openjdk.x86_64                1:1.8.0.191.b12-0.el7_5        @updates
java-1.8.0-openjdk-headless.x86_64       1:1.8.0.191.b12-0.el7_5        @updates
java-1.6.0-openjdk.x86_64                1:1.6.0.41-1.13.13.1.el7_3     base
java-1.6.0-openjdk-demo.x86_64           1:1.6.0.41-1.13.13.1.el7_3     base
java-1.6.0-openjdk-devel.x86_64          1:1.6.0.41-1.13.13.1.el7_3     base
java-1.6.0-openjdk-javadoc.x86_64        1:1.6.0.41-1.13.13.1.el7_3     base
java-1.6.0-openjdk-src.x86_64            1:1.6.0.41-1.13.13.1.el7_3     base
java-1.7.0-openjdk-accessibility.x86_64  1:1.7.0.191-2.6.15.4.el7_5     updates
java-1.7.0-openjdk-demo.x86_64           1:1.7.0.191-2.6.15.4.el7_5     updates
java-1.7.0-openjdk-devel.x86_64          1:1.7.0.191-2.6.15.4.el7_5     updates
java-1.7.0-openjdk-javadoc.noarch        1:1.7.0.191-2.6.15.4.el7_5     updates
java-1.7.0-openjdk-src.x86_64            1:1.7.0.191-2.6.15.4.el7_5     updates
java-1.8.0-openjdk.i686                  1:1.8.0.191.b12-0.el7_5        updates
java-1.8.0-openjdk-accessibility.i686    1:1.8.0.191.b12-0.el7_5        updates
java-1.8.0-openjdk-accessibility.x86_64  1:1.8.0.191.b12-0.el7_5        updates
java-1.8.0-openjdk-accessibility-debug.i686
java-1.8.0-openjdk-accessibility-debug.x86_64
java-1.8.0-openjdk-debug.i686            1:1.8.0.191.b12-0.el7_5        updates
java-1.8.0-openjdk-debug.x86_64          1:1.8.0.191.b12-0.el7_5        updates
java-1.8.0-openjdk-demo.i686             1:1.8.0.191.b12-0.el7_5        updates
java-1.8.0-openjdk-demo.x86_64           1:1.8.0.191.b12-0.el7_5        updates
java-1.8.0-openjdk-demo-debug.i686       1:1.8.0.191.b12-0.el7_5        updates
java-1.8.0-openjdk-demo-debug.x86_64     1:1.8.0.191.b12-0.el7_5        updates
java-1.8.0-openjdk-devel.i686            1:1.8.0.191.b12-0.el7_5        updates
java-1.8.0-openjdk-devel.x86_64          1:1.8.0.191.b12-0.el7_5        updates
先更新 openjdk的jre版本,然后下载最新的 openjdk的devel版本。这个版本可以运行 javac
yum install java-1.8.0-openjdk-devel
Before installing Tomcat we will have to install Java Development Kit (JDK) on our system but it is recommended that you update the system and available packages before installing JDK. Run the following command to update system.
yum -y update
Now once the system is updated install JDK and to do so run following command:
yum -y install java-1.8.0-openjdk.x86_64 java-1.8.0-openjdk-devel.x86_64
The above command will take some time to install JDK so you should wait until the installation process has finished.
When Java is installed check the java version with the following command:
java -version
You’ll see a result similar to this :
[root@ip-172-31-16-36 ~]# java -version
openjdk version "1.8.0_111"
OpenJDK Runtime Environment (build 1.8.0_111-b15)
OpenJDK 64-Bit Server VM (build 25.111-b15, mixed mode)
[root@ip-172-31-16-36 ~]#
Before you configure Java Home Environment we recommend you to check where the Java directory is and to do so run following command:
sudo update-alternatives --config java
Now edit the environment file with any text editor here we are using nano editor but you can choose anyone you wish.
nano /etc/environment
Now add the Java Home Environment variable as shown below :
JAVA_HOME="/usr/lib/jvm/java-1.8.0-openjdk-1.8.0.111-1.b15.el7_2.x86_64/jre"
You can simply copy/paste this to your file.
After adding Java Home Environment save and exit from the editor.
Now we’ll have to edit the .bash_profile so run the command given below:
nano ~/.bash_profile
Now add the Home Environment variable as shown below:
export JAVA_HOME=/usr/lib/jvm/java-1.8.0-openjdk-1.8.0.111-1.b15.el7_2.x86_64/jre export PATH=$JAVA_HOME/bin:$PATH
Save file and exit from the editor.
We recommend you reload the .bash_profile, to do so run following command:
source ~/.bash_profile
We recommend you make sure there is no error in configuring Home Environment variable and also check the Java Home environment variable :
echo $JAVA_HOME
You will see output similar to this containing the path to java directory :
[root@ip-172-31-16-36 ~]# nano ~/.bash_profile
[root@ip-172-31-16-36 ~]# source ~/.bash_profile
[root@ip-172-31-16-36 ~]# echo $JAVA_HOME
/usr/lib/jvm/java-1.8.0-openjdk-1.8.0.111-1.b15.el7_2.x86_64/jre
[root@ip-172-31-16-36 ~]#
String path = Test.class.getResource("/").toString();
System.out.println("path = " + path);
此方法在tomcat下面没有问题,可以取到WEB-INF/classes
path = file:/home/ngidm_db2/AS_Tomcat7_0_29/webapps/NGIDM/WEB-INF/classes/
但换weblogic之后,取到的为
path = file:/oracle/weblogic/Oracle/Middleware/Oracle_Home/user_projects/domains/base_domain/
在weblogic下面,没能拿到classes路径。
String path2 = Thread.currentThread().getContextClassLoader().getResource("/").getPath();
System.out.println("path2 = " + path2);
在tomcat和weblogic下面均可取到classes路径
path2 = /oracle/weblogic/Oracle/Middleware/user_apps/NGIDM/WEB-INF/classes/
path2 = /home/ngidm_db2/AS_Tomcat7_0_29/webapps/NGIDM/WEB-INF/classes/
故建议大家多使用
Thread.currentThread().getContextClassLoader().getResource("/").getPath();
获取classpath路径,且方法2 取到的classpath不含file:前缀,可以直接使用。
但是方法二,在JDK 7 和JDK8中会报错 返回 null ,所以要稍微改一下:
要么改成:Thread.currentThread().getContextClassLoader().getResource(".").getPath()
要么改成:Thread.currentThread().getContextClassLoader().getResource("").getPath()
当我用 eclipse 构建 Maven 的Web项目时,然后用Junit 单元测试,调用如下方法获取路径
Thread.currentThread().getContextClassLoader().getResource("").getPath()
获取到的路径是 :xxx/target/test-classes/ 而期望的是 xxx/target/classes/ 所以有问题。
因为test-classes文件夹内没有存放任何 class 文件,所有class 文件和配置文件都存放在classes文件夹内。所以正在执行的测试类,应该是在 classes 文件夹中。
原因是maven项目的目录问题:src/main/java/目录下的代码会存放到target/classes 文件夹下,src/test/java/目录下的代码会存放到target/test-classes文件夹下。同理:src/main/resources 目录下的文件也会存放到 target/classes 文件夹下。
@Test
	public void testCRUD() throws IOException{

        //下面这句话,加载的配置文件路径是   xxx/target/test-classes/log4j.xml  结果 找不到, 因为真正的路径是  xxx/target/classes/log4j.xml
        //PropertyConfigurator.configure(Thread.currentThread().getContextClassLoader().getResource("").getPath()+"log4j.xml");
        //因为无法正确加载路径,所以采取了 另一种 路径方法
        String config=System.getProperty("user.dir");//获取程序的当前路径
        System.out.println("config="+config);
	PropertyConfigurator.configure(config+"/target/classes/log4j.xml");


//     Log4j的 调用方法,版本是 1.X 的,  因为 log4j 2.x 的版本 ,配置文件和调用方法 都变不同了。
//	Logger logger = Logger.getLogger(MapperTest.class);
//      // 记录debug级别的信息
//      logger.error("This is debug message.");

	//1、创建SpringIOC容器  ,这个地方 却可以 正确加载 路径 xxx/target/classes/springIOC.xml
	ApplicationContext ioc = new ClassPathXmlApplicationContext("springIOC.xml");
	//2、从容器中获取mapper
	EmployeeMapper bean = ioc.getBean(EmployeeMapper.class);

	System.out.println(bean.selectByPrimaryKey(1));

}
参考自:https://blog.csdn.net/magi1201/article/details/18731581
跟任何编程语言一样,Java 语言拥有自己的结构、语法规则和编程范例。Java 语言的编程范例基于面向对象编程 (OOP) 的概念,该语言的特性支持这一概念。
Java 语言是 C 语言的一种衍生语言,所以它的语法规则与 C 语言的语法规则非常相似。例如,方法使代码模块化并使用花括号({ 和 })分隔,变量需要在使用之前声明。
在结构上,Java 语言以包 作为开头。包是 Java 语言的命名空间机制。包中包含类,而类中包含方法、变量、常量等。您将在本学习路径中了解 Java 语言的各个部分。
在 Java 平台编写程序时,您会在 .java 文件中编写源代码,然后编译它们。编译器针对语言的语法规则来检查代码,然后将字节码 写出到 .class 文件中。字节码是一组需要在 Java 虚拟机 (JVM) 上运行的指令。添加了这一抽象级别后,Java 编译器不同于其他语言编译器,其他编译器会写出适合运行程序的 CPU 芯片集的汇编语言指令。
在运行时,JVM 读取并解释 .class 文件,在编写的 JVM 的目标原生硬件平台上执行程序的指令。JVM 解释字节码就像 CPU 解释汇编语言指令一样。不同之处在于,JVM 是一个专为特定平台编写的软件。JVM 是 Java 语言的 “编写一次、随处运行” 原则的核心。您的代码可在任何拥有合适的 JVM 实现的芯片集上运行。JVM 可用于 Linux 和 Windows 等主要平台,在针对移动电话和爱好者芯片的 JVM 中也已实现了 Java 语言的子集。
Java 平台不会强制您时刻关注内存分配(或使用第三方库来完成此工作),它提供了开箱即用的内存管理功能。当您的 Java 应用程序在运行时创建一个对象实例时,JVM 会自动从堆 中为该对象分配内存空间— 堆是一个专门留给您的程序使用的内存池。Java 垃圾收集器 在后台运行,跟踪记录应用程序不再需要哪些对象并从它们回收内存。这种内存处理方法称为隐式内存管理,因为它不需要您编写任何内存处理代码。垃圾收集是 Java 平台性能的基本特征之一。
下载 Java 开发工具包 (JDK),您会获得 — 包括编译器和其他工具 — 包含预构建的实用程序的完整类库,以帮助您完成最常见的应用程序开发任务。了解 JDK 包和库的范围的最佳方式是查阅 官方在线 Java API 文档— 也称为 Javadoc。可观看这个快速演示,了解如何浏览 Javadoc。
Java 运行时环境(JRE;也称为 Java 运行时)包含 JVM、代码库和运行以 Java 语言编写的程序所必要的组件。JRE 可用于多种平台。您可依据 JRE 许可条款,在您的应用程序中自由地重新分发 JRE,为应用程序的用户提供一个运行您的软件的平台。JRE 包含在 JDK 中。
建议《Effective Java》、《Java编程思想》以及《重构:改善既有代码质量》是Java程序员必看书籍
1、java 值传递与 引用传递。【 深拷贝 与 浅拷贝 问题】
2、String 类问题
3、java 访问权限问题。【类的权限 和 类方法类变量的权限】
来自:https://www.ibm.com/developerworks/cn/java/j-perry-java-platform-overview/index.html
参考百度百科的解释如下:
http://baike.baidu.com/item/MANIFEST.MF
MANIFEST.MF:这个 manifest 文件定义了与扩展和包相关的数据。单词“manifest”的意思是“显示”
打开Java的JAR文件我们经常可以看到文件中包含着一个META-INF目录,这个目录下会有一些文件,其中必有一个MANIFEST.MF,这个文件描述了该Jar文件的很多信息,下面将详细介绍MANIFEST.MF文件的内容,先来看struts.jar中包含的MANIFEST.MF文件内容:
Manifest-Version: 1.0
Created-By: Apache Ant 1.5.1
Extension-Name: Struts Framework
Specification-Title: Struts Framework
Specification-Vendor: Apache Software Foundation
Specification-Version: 1.1
Implementation-Title: Struts Framework
Implementation-Vendor: Apache Software Foundation
Implementation-Vendor-Id: org.apache
Implementation-Version: 1.1
Class-Path: commons-beanutils.jar commons-collections.jar commons-digester.jar commons-logging.jar commons-validator.jar jakarta-oro.jar struts-legacy.jar
如果我们把MANIFEST中的配置信息进行分类,可以归纳出下面几个大类:
一. 一般属性
1. Manifest-Version
用来定义manifest文件的版本,例如:Manifest-Version: 1.0
2. Created-By
声明该文件的生成者,一般该属性是由jar命令行工具生成的,例如:Created-By: Apache Ant 1.5.1
3. Signature-Version
定义jar文件的签名版本
4. Class-Path
应用程序或者类装载器使用该值来构建内部的类搜索路径
二. 应用程序相关属性
1. Main-Class
定义jar文件的入口类,该类必须是一个可执行的类,一旦定义了该属性即可通过 java -jar x.jar来运行该jar文件。
三. 小程序(Applet)相关属性
1. Extendsion-List
该属性指定了小程序需要的扩展信息列表,列表中的每个名字对应以下的属性
2. <extension>-Extension-Name
3. <extension>-Specification-Version
4. <extension>-Implementation-Version
5. <extension>-Implementation-Vendor-Id
5. <extension>-Implementation-URL
四. 扩展标识属性
1. Extension-Name
该属性定义了jar文件的标识,例如Extension-Name: Struts Framework
五. 包扩展属性
1. Implementation-Title 定义了扩展实现的标题
2. Implementation-Version 定义扩展实现的版本
3. Implementation-Vendor 定义扩展实现的组织
4. Implementation-Vendor-Id 定义扩展实现的组织的标识
5. Implementation-URL : 定义该扩展包的下载地址(URL)
6. Specification-Title 定义扩展规范的标题
7. Specification-Version 定义扩展规范的版本
8. Specification-Vendor 声明了维护该规范的组织
9. Sealed 定义jar文件是否封存,值可以是true或者false (这点我还不是很理解)
六. 签名相关属性
签名方面的属性我们可以来参照JavaMail所提供的mail.jar中的一段
Name: javax/mail/Address.class
Digest-Algorithms: SHA MD5
SHA-Digest: AjR7RqnN//cdYGouxbd06mSVfI4=
MD5-Digest: ZnTIQ2aQAtSNIOWXI1pQpw==
这段内容定义类签名的类名、计算摘要的算法名以及对应的摘要内容(使用BASE64方法进行编码)
七.自定义属性
除了前面提到的一些属性外,你也可以在MANIFEST.MF中增加自己的属性以及响应的值,例如J2ME程序jar包中就可能包含着如下信息
MicroEdition-Configuration: CLDC-1.0
MIDlet-Name: J2ME_MOBBER Midlet Suite
MIDlet-Info-URL: http://www.javayou.com/
MIDlet-Icon: /icon.png
MIDlet-Vendor: Midlet Suite Vendor
MIDlet-1: mobber,/icon.png,mobber
MIDlet-Version: 1.0.0
MicroEdition-Profile: MIDP-1.0
MIDlet-Description: Communicator
关键在于我们怎么来读取这些信息呢?其实很简单,JDK给我们提供了用于处理这些信息的API,详细的信息请见java.util.jar包中,我们可以通过给JarFile传递一个jar文件的路径,然后调用JarFile的getManifest方法来获取Manifest信息。
备注:更详细的说明,参考oracle提供的文档:http://docs.oracle.com/javase/1.5.0/docs/guide/jar/jar.html(这个地址其实是有规律的,试下后面的版本号更新到特定的)
编写MANIFEST.MF文件时的注意事项:
说明:一般编写MANIFEST.MF文件只需要用到Manifest-Version(MF文件版本号)、Main-Class(包含main方法的类)、Class-Path(执行这个jar包时的ClassPath,第三方依赖)
比如以下的例子:
Manifest-Version: 1.0
Main-Class: test.Main
Class-Path: ./ ./lib/commons-collections-3.2.jar ./lib/commons-dbcp-1.2.2.jar ./lib/commons-lang-2.3.jar ./lib/commons-logging-1.1.jar
以下是需要注意的各个要点:
0. 最后一样一定要回车,空一行,不然无法识别最后一行的配置。
1. Manifest-Version、Main-Class和Class-Path后面跟着一个英文的冒号,冒号后面必须跟着一个空格,然后才是版本号、类和ClassPath。
2. Class-Path中的各项应使用空格分隔,不是逗号或分号。
3. Class-Path中如果有很多项,写成一行打包的时候会报错line too long,这时需要把Class-Path分多行写。注意:从第二行开始,必须以两个空格开头,三个以上我没试过,不过不用空格开头和一个空格开头都是不行的,我已经试过了。
4. Class-Path写完之后最后一定要有一个空行。
5. jar包内有些配置文件想放在jar包外面,比如文件config.properties:如果这个文件是以路径方式载入的,比如new file(“./config/config.properties”),那么将config.properties放在jar包相同目录下的config目录下即可,也就是说“./”路径等价于jar包所在目录;如果这个文件是以ClassPath下的文件这种方式载入的,比如在Spring中载入classpath:config.properties,则在MF文件的配置文件的ClassPath中添加“./”,然后将这个配置文件与jar包放在同一个目录即可,当然也可以在MF文件的配置文件的ClassPath中添加“./config/”,然后把配置文件都放在jar包相同目录下的config目录下。
在java web 开发 和 安卓开发中,我们在打包文件的时候,经常能看到 META-INF文件夹。里面也存放了一些文件,那这个到底是干什么的呢。我们来了解一下:
首先查看 java 官方api 文档:
https://docs.oracle.com/javase/7/docs/technotes/guides/jar/jar.html#The_META-INF_directory
参考连接:
https://stackoverflow.com/questions/70216/whats-the-purpose-of-meta-inf
The META-INF directory
The following files/directories in the META-INF directory are recognized and interpreted by the Java 2 Platform to configure applications, extensions, class loaders and services:
MANIFEST.MF
The manifest file that is used to define extension and package related data.
INDEX.LIST
This file is generated by the new “-i” option of the jar tool, which contains location information for packages defined in an application or extension. It is part of the JarIndex implementation and used by class loaders to speed up their class loading process.
x.SF
The signature file for the JAR file. ‘x’ stands for the base file name.
x.DSA
The signature block file associated with the signature file with the same base file name. This file stores the digital signature of the corresponding signature file.
services/
This directory stores all the service provider configuration files.
百度知道解释:
常常在网上看到有人询问:如何把 java 程序编译成 .exe 文件。通常回答只有两种,一种是制作一个可执行的 JAR 文件包,然后就可以像.chm 文档一样双击运行了;而另一种是使用 JET 来进行 编译。但是 JET 是要用钱买的,而且据说 JET 也不是能把所有的 Java 程序都编译成执行文件,性能也要打些折扣。所以,使用制作可执行 JAR 文件包的方法就是最佳选择了,何况它还能保持 Java 的跨平台特性。
下面就来看看什么是 JAR 文件包吧:
1. JAR 文件包
JAR 文件就是 Java Archive File,顾名思意,它的应用是与 Java 息息相关的,是 Java 的一种文档格式。JAR 文件非常类似 ZIP 文件——准确的说,它就是 ZIP 文件,所以叫它文件包。JAR 文件与 ZIP 文件唯一的区别就是在 JAR 文件的内容中,包含了一个 META-INF/MANIFEST.MF 文件,这个文件是在生成 JAR 文件的时候自动创建的。举个例子,如果我们具有如下目录结构的一些文件:
==
`– test
`– Test.class
把它压缩成 ZIP 文件 test.zip,则这个 ZIP 文件的内部目录结构为:
test.zip
`– test
`– Test.class
如果我们使用 JDK 的 jar 命令把它打成 JAR 文件包 test.jar,则这个 JAR 文件的内部目录结构为:
test.jar
|– META-INF
| `– MANIFEST.MF
`– test
`–Test.class
2. 创建可执行的 JAR 文件包
制作一个可执行的 JAR 文件包来发布你的程序是 JAR 文件包最典型的用法。
Java 程序是由若干个 .class 文件组成的。这些 .class 文件必须根据它们所属的包不同而分级分目录存放;运行前需要把所有用到的包的根目录指定给 CLASSPATH 环境变量或者 java 命令的 -cp 参数;运行时还要到控制台下去使用 java 命令来运行,如果需要直接双击运行必须写 Windows 的批处理文件 (.bat) 或者 Linux 的 Shell 程序。因此,许多人说,Java 是一种方便开发者苦了用户的程序设计语言。
其实不然,如果开发者能够制作一个可执行的 JAR 文件包交给用户,那么用户使用起来就方便了。在 Windows 下安装 JRE (Java Runtime Environment) 的时候,安装文件会将 .jar 文件映射给 javaw.exe 打开。那么,对于一个可执行的 JAR 文件包,用户只需要双击它就可以运行程序了,和阅读 .chm 文档一样方便 (.chm 文档默认是由 hh.exe 打开的)。那么,现在的关键,就是如何来创建这个可执行的 JAR 文件包。
创建可执行的 JAR 文件包,需要使用带 cvfm 参数的 jar 命令,同样以上述 test 目录为例,命令如下:
jar cvfm test.jar manifest.mf test
这里 test.jar 和 manifest.mf 两个文件,分别是对应的参数 f 和 m,其重头戏在 manifest.mf。因为要创建可执行的 JAR 文件包,光靠指定一个 manifest.mf 文件是不够的,因为 MANIFEST 是 JAR 文件包的特征,可执行的 JAR 文件包和不可执行的 JAR 文件包都包含 MANIFEST。关键在于可执行 JAR 文件包的 MANIFEST,其内容包含了 Main-Class 一项。这在 MANIFEST 中书写格式如下:
Main-Class: 可执行主类全名(包含包名)
例如,假设上例中的 Test.class 是属于 test 包的,而且是可执行的类 (定义了 public static void main(String[]) 方法),那么这个 manifest.mf 可以编辑如下:
Main-Class: test.Test <回车>;
这个 manifest.mf 可以放在任何位置,也可以是其它的文件名,只需要有 Main-Class: test.Test 一行,且该行以一个回车符结束即可。创建了 manifest.mf 文件之后,我们的目录结构变为:
==
|– test
| `– Test.class
`– manifest.mf
这时候,需要到 test 目录的上级目录中去使用 jar 命令来创建 JAR 文件包。也就是在目录树中使用“==”表示的那个目录中,使用如下命令:
jar cvfm test.jar manifest.mf test
之后在“==”目录中创建了 test.jar,这个 test.jar 就是执行的 JAR 文件包。运行时只需要使用 java -jar test.jar 命令即可。
需要注意的是,创建的 JAR 文件包中需要包含完整的、与 Java 程序的包结构对应的目录结构,就像上例一样。而 Main-Class 指定的类,也必须是完整的、包含包路径的类名,如上例的 test.Test;而且在没有打成 JAR 文件包之前可以使用 java <类名>; 来运行这个类,即在上例中 java test.Test 是可以正确运行的 (当然要在 CLASSPATH 正确的情况下)。
3. jar 命令详解
jar 是随 JDK 安装的,在 JDK 安装目录下的 bin 目录中,Windows 下文件名为 jar.exe,Linux 下文件名为 jar。它的运行需要用到 JDK 安装目录下 lib 目录中的 tools.jar 文件。不过我们除了安装 JDK 什么也不需要做,因为 SUN 已经帮我们做好了。我们甚至不需要将 tools.jar 放到 CLASSPATH 中。
使用不带任何的 jar 命令我们可以看到 jar 命令的用法如下:
jar {ctxu}[vfm0M] [jar-文件] [manifest-文件] [-C 目录] 文件名 …
其中 {ctxu} 是 jar 命令的子命令,每次 jar 命令只能包含 ctxu 中的一个,它们分别表示:
-c 创建新的 JAR 文件包
-t 列出 JAR 文件包的内容列表
-x 展开 JAR 文件包的指定文件或者所有文件
-u 更新已存在的 JAR 文件包 (添加文件到 JAR 文件包中)
[vfm0M] 中的选项可以任选,也可以不选,它们是 jar 命令的选项参数
-v 生成详细报告并打印到标准输出
-f 指定 JAR 文件名,通常这个参数是必须的
-m 指定需要包含的 MANIFEST 清单文件
-0 只存储,不压缩,这样产生的 JAR 文件包会比不用该参数产生的体积大,但速度更快
-M 不产生所有项的清单(MANIFEST〕文件,此参数会忽略 -m 参数
[jar-文件] 即需要生成、查看、更新或者解开的 JAR 文件包,它是 -f 参数的附属参数
[manifest-文件] 即 MANIFEST 清单文件,它是 -m 参数的附属参数
[-C 目录] 表示转到指定目录下去执行这个 jar 命令的操作。它相当于先使用 cd 命令转该目录下再执行不带 -C 参数的 jar 命令,它只能在创建和更新 JAR 文件包的时候可用。
文件名 … 指定一个文件/目录列表,这些文件/目录就是要添加到 JAR 文件包中的文件/目录。如果指定了目录,那么 jar 命令打包的时候会自动把该目录中的所有文件和子目录打入包中。
下面举一些例子来说明 jar 命令的用法:
1) jar cf test.jar test
该命令没有执行过程的显示,执行结果是在当前目录生成了 test.jar 文件。如果当前目录已经存在 test.jar,那么该文件将被覆盖。
2) jar cvf test.jar test
该命令与上例中的结果相同,但是由于 v 参数的作用,显示出了打包过程,如下:
标明清单(manifest)
增加:test/(读入= 0) (写出= 0)(存储了 0%)
增加:test/Test.class(读入= 7) (写出= 6)(压缩了 14%)
3) jar cvfM test.jar test
该命令与 2) 结果类似,但在生成的 test.jar 中没有包含 META-INF/MANIFEST 文件,打包过程的信息也略有差别:
增加:test/(读入= 0) (写出= 0)(存储了 0%)
增加:test/Test.class(读入= 7) (写出= 6)(压缩了 14%)
4) jar cvfm test.jar manifest.mf test
运行结果与 2) 相似,显示信息也相同,只是生成 JAR 包中的 META-INF/MANIFEST 内容不同,是包含了 manifest.mf 的内容
5) jar tf test.jar
在 test.jar 已经存在的情况下,可以查看 test.jar 中的内容,如对于 2) 和 3) 生成的 test.jar 分别应该此命令,结果如下;
对于 2)
META-INF/
META-INF/MANIFEST.MF
test/
test/Test.class
对于 3)
test/
test/Test.class
6) jar tvf test.jar
除显示 5) 中显示的内容外,还包括包内文件的详细信息,如:
0 Wed Jun 19 15:39:06 GMT 2002 META-INF/
86 Wed Jun 19 15:39:06 GMT 2002 META-INF/MANIFEST.MF
0 Wed Jun 19 15:33:04 GMT 2002 test/
7 Wed Jun 19 15:33:04 GMT 2002 test/Test.class
7) jar xf test.jar
解开 test.jar 到当前目录,不显示任何信息,对于 2) 生成的 test.jar,解开后的目录结构如下:
==
|– META-INF
| `– MANIFEST
`– test
`–Test.class
8) jar xvf test.jar
运行结果与 7) 相同,对于解压过程有详细信息显示,如:
创建:META-INF/
展开:META-INF/MANIFEST.MF
创建:test/
展开:test/Test.class
9) jar uf test.jar manifest.mf
在 test.jar 中添加了文件 manifest.mf,此使用 jar tf 来查看 test.jar 可以发现 test.jar 中比原来多了一个 manifest。这里顺便提一下,如果使用 -m 参数并指定 manifest.mf 文件,那么 manifest.mf 是作为清单文件 MANIFEST 来使用的,它的内容会被添加到 MANIFEST 中;但是,如果作为一般文件添加到 JAR 文件包中,它跟一般文件无异。
10) jar uvf test.jar manifest.mf
与 9) 结果相同,同时有详细信息显示,如:
增加:manifest.mf(读入= 17) (写出= 19)(压缩了 -11%)
4. 关于 JAR 文件包的一些技巧
1) 使用 unzip 来解压 JAR 文件
在介绍 JAR 文件的时候就已经说过了,JAR 文件实际上就是 ZIP 文件,所以可以使用常见的一些解压 ZIP 文件的工具来解压 JAR 文件,如 Windows 下的 WinZip、WinRAR 等和 Linux 下的 unzip 等。使用 WinZip 和 WinRAR 等来解压是因为它们解压比较直观,方便。而使用 unzip,则是因为它解压时可以使用 -d 参数指定目标目录。
在解压一个 JAR 文件的时候是不能使用 jar 的 -C 参数来指定解压的目标的,因为 -C 参数只在创建或者更新包的时候可用。那么需要将文件解压到某个指定目录下的时候就需要先将这具 JAR 文件拷贝到目标目录下,再进行解压,比较麻烦。如果使用 unzip,就不需要这么麻烦了,只需要指定一个 -d 参数即可。如:
unzip test.jar -d dest/
2) 使用 WinZip 或者 WinRAR 等工具创建 JAR 文件
上面提到 JAR 文件就是包含了 META-INF/MANIFEST 的 ZIP 文件,所以,只需要使用 WinZip、WinRAR 等工具创建所需要 ZIP 压缩包,再往这个 ZIP 压缩包中添加一个包含 MANIFEST 文件的 META-INF 目录即可。对于使用 jar 命令的 -m 参数指定清单文件的情况,只需要将这个 MANIFEST 按需要修改即可。
3) 使用 jar 命令创建 ZIP 文件
有些 Linux 下提供了 unzip 命令,但没有 zip 命令,所以需要可以对 ZIP 文件进行解压,即不能创建 ZIP 文件。如要创建一个 ZIP 文件,使用带 -M 参数的 jar 命令即可,因为 -M 参数表示制作 JAR 包的时候不添加 MANIFEST 清单,那么只需要在指定目标 JAR 文件的地方将 .jar 扩展名改为 .zip 扩展名,创建的就是一个不折不扣的 ZIP 文件了,如将上一节的第 3) 个例子略作改动:
jar cvfM test.zip test
spring-core-4.1.2.RELEASE-javadoc.jar      API

spring-core-4.1.2.RELEASE-sources.jar    源码

spring-core-4.1.2.RELEASE.jar     运行jar包
在使用Java语言开发的过程中,开发人员经常需要用到一些开源的工具包。在使用别人的jar包的时候,为了保证正常调用包内的方法需要把jar包添加到Referenced Libraries中。由于jar中通常只打包了类的二进制文件,其JavaDoc文件仍需要以浏览器或chm帮助文档的方式查看。Eclipse开发环境中提供了将JavaDoc文档附加到jar包中的功能,使开发者不再需要人工查找类或方法的JavaDoc注释,省时又省力。
①右键目标jar包,选择Properties
②选择Java Source Attachment,配置好sources的路径,然后点击OK
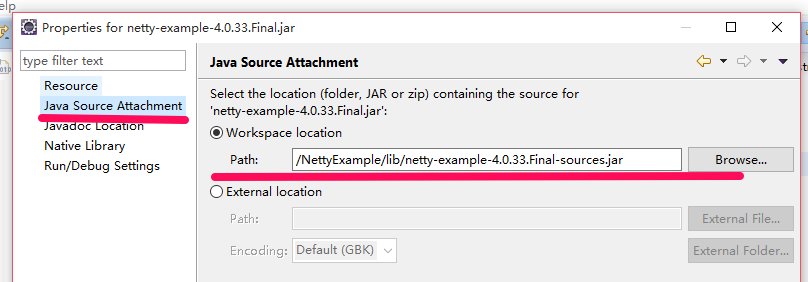
③再选择JavaDoc Location,配置好doc的路径,然后点击OK
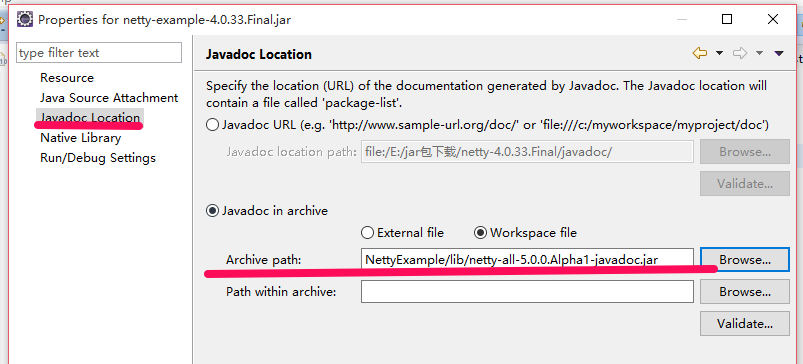
完成以上步骤后,就可以轻松查看相应的源码和帮助文档了
查看源码,选中目标class,快捷键shift+f2
查看帮助文档,选中目标class,快捷键f3
参考:https://blog.csdn.net/u011998957/article/details/50592573
| 标签 | 说明 | JDK 1.1 doclet | 标准doclet | 标签类型 |
| @author 作者 | 作者标识 | √ | √ | 包、 类、接口 |
| @version 版本号 | 版本号 | √ | √ | 包、 类、接口 |
| @param 参数名 描述 | 方法的入参名及描述信息,如入参有特别要求,可在此注释。 | √ | √ | 构造函数、 方法 |
| @return 描述 | 对函数返回值的注释 | √ | √ | 方法 |
| @deprecated 过期文本 | 标识随着程序版本的提升,当前API已经过期,仅为了保证兼容性依然存在,以此告之开发者不应再用这个API。 | √ | √ | 包、类、接口、值域、构造函数、 方法 |
| @throws异常类名 | 构造函数或方法所会抛出的异常。 | √ | 构造函数、 方法 | |
| @exception 异常类名 | 同@throws。 | √ | √ | 构造函数、 方法 |
| @see 引用 | 查看相关内容,如类、方法、变量等。 | √ | √ | 包、类、接口、值域、构造函数、 方法 |
| @since 描述文本 | API在什么程序的什么版本后开发支持。 | √ | √ | 包、类、接口、值域、构造函数、 方法 |
| {@link包.类#成员 标签} | 链接到某个特定的成员对应的文档中。 | √ | 包、类、接口、值域、构造函数、 方法 | |
| {@value} | 当对常量进行注释时,如果想将其值包含在文档中,则通过该标签来引用常量的值。 | √(JDK1.4) | 静态值域 |
javadoc -d 文档存放目录 -author -version 源文件名.java
这条命令编译一个名为 “源文件名.java”的 java 源文件,并将生成的文档存放在“文档存放目录”指定的目录下,生成的文档中 index.html 就是文档的首页。-author 和 -version 两个选项可以省略。
二. 文档注释的格式
1. 文档和文档注释的格式化
生成的文档是 HTML 格式,而这些 HTML 格式的标识符并不是 javadoc 加的,而是我们在写注释的时候写上去的。
比如,需要换行时,不是敲入一个回车符,而是写入 <br>,如果要分段,就应该在段前写入 <p>。
文档注释的正文并不是直接复制到输出文件 (文档的 HTML 文件),而是读取每一行后,删掉前导的 * 号及 * 号以前的空格,再输入到文档的。如
/**
* This is first line. <br>
***** This is second line. <br>
This is third line.
*/
2. 文档注释的三部分
先举例如下
/**
* show 方法的简述.
* <p>show 方法的详细说明第一行<br>
* show 方法的详细说明第二行
* @param b true 表示显示,false 表示隐藏
* @return 没有返回值
*/
public void show(boolean b) {
frame.show(b);
}
第一部分是简述。文档中,对于属性和方法都是先有一个列表,然后才在后面一个一个的详细的说明
简述部分写在一段文档注释的最前面,第一个点号 (.) 之前 (包括点号)。换句话说,就是用第一个点号分隔文档注释,之前是简述,之后是第二部分和第三部分。
第二部分是详细说明部分。该部分对属性或者方法进行详细的说明,在格式上没有什么特殊的要求,可以包含若干个点号。
* show 方法的简述.
* <p>show 方法的详细说明第一行<br>
* show 方法的详细说明第二行
简述也在其中。这一点要记住了
第三部分是特殊说明部分。这部分包括版本说明、参数说明、返回值说明等。
* @param b true 表示显示,false 表示隐藏
* @return 没有返回值
三. 使用 javadoc 标记
javadoc 标记由“@”及其后所跟的标记类型和专用注释引用组成
javadoc 标记有如下一些:
@author 标明开发该类模块的作者
@version 标明该类模块的版本
@see 参考转向,也就是相关主题
@param 对方法中某参数的说明
@return 对方法返回值的说明
@exception 对方法可能抛出的异常进行说明
@author 作者名
@version 版本号
其中,@author 可以多次使用,以指明多个作者,生成的文档中每个作者之间使用逗号 (,) 隔开。@version 也可以使用多次,只有第一次有效
使用 @param、@return 和 @exception 说明方法
这三个标记都是只用于方法的。@param 描述方法的参数,@return 描述方法的返回值,@exception 描述方法可能抛出的异常。它们的句法如下:
@param 参数名 参数说明
@return 返回值说明
@exception 异常类名 说明
四. javadoc 命令
用法:
javadoc [options] [packagenames] [sourcefiles]
选项:
-public 仅显示 public 类和成员
-protected 显示 protected/public 类和成员 (缺省)
-package 显示 package/protected/public 类和成员
-private 显示所有类和成员
-d <directory> 输出文件的目标目录
-version 包含 @version 段
-author 包含 @author 段
-splitindex 将索引分为每个字母对应一个文件
-windowtitle <text> 文档的浏览器窗口标题
javadoc 编译文档时可以给定包列表,也可以给出源程序文件列表。例如在 CLASSPATH 下有两个包若干类如下:
fancy.Editor
fancy.Test
fancy.editor.ECommand
fancy.editor.EDocument
fancy.editor.EView
可以直接编译类:
javadoc fancy\Test.java fancy\Editor.java fancy\editor\ECommand.java fancy\editor\EDocument.java fancy\editor\EView.java
也可以是给出包名作为编译参数,如:javadoc fancy fancy.editor
可以自己看看这两种方法的区别
到此为止javadoc就简单介绍完了,想要用好她还是要多用,多参考标准java代码
Java代码规范
–注释
@author LEI
@version 1.10 2005-09-01
1 注释文档的格式
注释文档将用来生成HTML格式的代码报告,所以注释文档必须书写在类、域、构造函数、方法、定义之前。注释文档由两部分组成——描述、块标记。
例如:
/**
* The doGet method of the servlet.
* This method is called when a form has its tag value method equals to get.
*
* @param request
* the request send by the client to the server
* @param response
* the response send by the server to the client
* @throws ServletException
* if an error occurred
* @throws IOException
* if an error occurred
*/
public void doGet (HttpServletRequest request, HttpServletResponse response)
throws ServletException, IOException {
doPost(request, response);
}
前两行为描述,描述完毕后,由@符号起头为块标记注视。
2 注释的种类
2.1 文件头注释
文件头注释以 /*开始,以*/结束,需要注明该文件创建时间,文件名,命名空间信息。
例如:
/*
* Created on 2005-7-2
* /
2.2 类、接口注释
类、接口的注释采用 /** … */,描述部分用来书写该类的作用或者相关信息,块标记部分必须注明作者和版本。
例如:
/**Title: XXXX DRIVER 3.0
*Description: XXXX DRIVER 3.0
*Copyright: Copyright (c) 2003
*Company:XXXX有限公司
*
* @author Java Development Group
* @version 3.0
*/
例如:
/**
* A class representing a window on the screen.
* For example:
*
* Window win = new Window(parent);
* win.show();
*
*
* @author Sami Shaio
* @version %I%, %G%
* @see java.awt.BaseWindow
* @see java.awt.Button
*/
class Window extends BaseWindow {
…
}
2.3 构造函数注释
构造函数注释采用 /** … */,描述部分注明构造函数的作用,不一定有块标记部分。
例如:
/**
* 默认构造函数
*/
有例如:
/**
* 带参数构造函数,初始化模式名,名称和数据源类型
*
* @param schema
* Ref 模式名
* @param name
* Ref 名称
* @param type
* byVal 数据源类型
*/
2.4 域注释
域注释可以出现在注释文档里面,也可以不出现在注释文档里面。用/** … */的域注释将会被认为是注释文档热出现在最终生成的HTML报告里面,而使用/* … */的注释会被忽略。
例如:
/* 由于triger和表用一个DMSource,所以要区分和表的迁移成功标记 */
boolean isTrigerSuccess = false;
又例如:
/** 由于triger和表用一个DMSource,所以要区分和表的迁移成功标记 */
boolean isTrigerSuccess = false;
再例如:
/**
* The X-coordinate of the component.
*
* @see #getLocation()
*/
int x = 1263732;
2.5 方法注释
方法注释采用 /** … */,描述部分注明方法的功能,块标记部分注明方法的参数,返回值,异常等信息。例如:
/**
* 设置是否有外码约束
*
* @param conn
* Connection 与数据库的连接
*/
2.6 定义注释
规则同域注释。
3 注释块标记
3.1 标记的顺序
块标记将采用如下顺序:
…
*
* @param (classes, interfaces, methods and constructors only)
* @return (methods only)
* @exception (@throws is a synonym added in Javadoc 1.2)
* @author (classes and interfaces only, required)
* @version (classes and interfaces only, required. See footnote 1)
* @see
* @since
* @serial (or @serialField or @serialData)
* @deprecated (see How and When To Deprecate APIs)
* …
一个块标记可以根据需要重复出现多次,多次出现的标记按照如下顺序:
@author 按照时间先后顺序(chronological)
@param 按照参数定义顺序(declaration)
@throws 按照异常名字的字母顺序(alphabetically)
@see 按照如下顺序:
@see #field
@see #Constructor(Type, Type…)
@see #Constructor(Type id, Type id…)
@see #method(Type, Type,…)
@see #method(Type id, Type, id…)
@see Class
@see Class#field
@see Class#Constructor(Type, Type…)
@see Class#Constructor(Type id, Type id)
@see Class#method(Type, Type,…)
@see Class#method(Type id, Type id,…)
@see package.Class
@see package.Class#field
@see package.Class#Constructor(Type, Type…)
@see package.Class#Constructor(Type id, Type id)
@see package.Class#method(Type, Type,…)
@see package.Class#method(Type id, Type, id)
@see package
3.2 标记介绍
3.2.1 @param标记
@param后面空格后跟着参数的变量名字(不是类型),空格后跟着对该参数的描述。
在描述中第一个名字为该变量的数据类型,表示数据类型的名次前面可以有一个冠词如:a,an,the。如果是int类型的参数则不需要注明数据类型。例如:
…
* @param ch the char 用用来……
* @param _image the image 用来……
* @param _num 一个数字……
…
对于参数的描述如果只是一短语,最好不要首字母大写,结尾也不要句号。
对于参数的描述是一个句子,最好不要首字母大写,如果出现了句号这说明你的描述不止一句话。如果非要首字母大写的话,必须用句号来结束句子。(英文的句号)
公司内部添加ByRef和ByVal两个标记,例如:
* @param _image the image ByRef 用来……
说明该参数是引用传递(指针),ByVal可以省略,表示是值传递。
3.2.2 @return标记
返回为空(void)的构造函数或者函数,@return可以省略。
如果返回值就是输入参数,必须用与输入参数的@param相同的描述信息。
必要的时候注明特殊条件写的返回值。
3.2.3 @throws 标记
@throws以前使用的是@exception。
@throws的内容必须在函数的throws部分定义。
3.2.4 @author标记
类注释标记。
函数注释里面可以不出现@author。
3.2.5 @version
类注释标记。
函数注释里面可以不出现@version
3.2.6 @since
类注释标记。
标明该类可以运行的JDK版本
例如:
@since JDK1.2
3.2.7 @deprecated
由于某种原因而被宣布将要被废弃的方法。
/**
* @deprecated As of JDK 1.1, replaced by
* setBounds
* @see #setBounds(int,int,int,int)
*/
3.2.8 @link标记
语法:{@link package.class#member label}
Label为链接文字。
package.class#member将被自动转换成指向package.class的member文件的URL。
4 HTML代码的使用
在注释描述部分可以使用HTML代码。
…
表示段落
* ….
表示自动标号
5 注释示例
/**
* Graphics is the abstract base class for all graphics contexts
* which allow an application to draw onto components realized on
* various devices or onto off-screen images.
* A Graphics object encapsulates the state information needed
* for the various rendering operations that Java supports. This
* state information includes:
*
# * The Component to draw on
# * A translation origin for rendering and clipping coordinates
# * The current clip
# * The current color
# * The current font
# * The current logical pixel operation function (XOR or Paint)
# * The current XOR alternation color
* (see setXORMode)
*
*
* Coordinates are infinitely thin and lie between the pixels of the
* output device.
* Operations which draw the outline of a figure operate by traversing
* along the infinitely thin path with a pixel-sized pen that hangs
* down and to the right of the anchor point on the path.
* Operations which fill a figure operate by filling the interior
* of the infinitely thin path.
* Operations which render horizontal text render the ascending
* portion of the characters entirely above the baseline coordinate.
*
* Some important points to consider are that drawing a figure that
* covers a given rectangle will occupy one extra row of pixels on
* the right and bottom edges compared to filling a figure that is
* bounded by that same rectangle.
* Also, drawing a horizontal line along the same y coordinate as
* the baseline of a line of text will draw the line entirely below
* the text except for any descenders.
* Both of these properties are due to the pen hanging down and to
* the right from the path that it traverses.
*
* All coordinates which appear as arguments to the methods of this
* Graphics object are considered relative to the translation origin
* of this Graphics object prior to the invocation of the method.
* All rendering operations modify only pixels which lie within the
* area bounded by both the current clip of the graphics context
* and the extents of the Component used to create the Graphics object.
*
* @author Sami Shaio
* @author Arthur van Hoff
* @version %I%, %G%
* @since 1.0
*/
public abstract class Graphics {
/**
* Draws as much of the specified image as is currently available
* with its northwest corner at the specified coordinate (x, y).
* This method will return immediately in all cases, even if the
* entire image has not yet been scaled, dithered and converted
* for the current output device.
*
* If the current output representation is not yet complete then
* the method will return false and the indicated
* {@link ImageObserver} object will be notified as the
* conversion process progresses.
*
* @param img the image to be drawn
* @param x the x-coordinate of the northwest corner
* of the destination rectangle in pixels
* @param y the y-coordinate of the northwest corner
* of the destination rectangle in pixels
* @param observer the image observer to be notified as more
* of the image is converted. May be
* null
* @return true if the image is completely
* loaded and was painted successfully;
* false otherwise.
* @see Image
* @see ImageObserver
* @since 1.0
*/
public abstract boolean drawImage(Image img, int x, int y,
ImageObserver observer);
/**
* Dispose of the system resources used by this graphics context.
* The Graphics context cannot be used after being disposed of.
* While the finalization process of the garbage collector will
* also dispose of the same system resources, due to the number
* of Graphics objects that can be created in short time frames
* it is preferable to manually free the associated resources
* using this method rather than to rely on a finalization
* process which may not happen for a long period of time.
*
* Graphics objects which are provided as arguments to the paint
* and update methods of Components are automatically disposed
* by the system when those methods return. Programmers should,
* for efficiency, call the dispose method when finished using
* a Graphics object only if it was created directly from a
* Component or another Graphics object.
*
* @see #create(int, int, int, int)
* @see #finalize()
* @see Component#getGraphics()
* @see Component#paint(Graphics)
* @see Component#update(Graphics)
* @since 1.0
*/
public abstract void dispose();
/**
* Disposes of this graphics context once it is no longer
* referenced.
*
* @see #dispose()
* @since 1.0
*/
public void finalize() {
dispose();
}
}
ClassLoader翻译过来就是类加载器,普通的java开发者其实用到的不多,但对于某些框架开发者来说却非常常见。理解ClassLoader的加载机制,也有利于我们编写出更高效的代码。ClassLoader的具体作用就是将class文件加载到jvm虚拟机中去,程序就可以正确运行了。但是,jvm启动的时候,并不会一次性加载所有的class文件,而是根据需要去动态加载。想想也是的,一次性加载那么多jar包那么多class,那内存不崩溃。本文的目的也是学习ClassLoader这种加载机制。
备注:本文篇幅比较长,但内容简单,大家不要恐慌,安静地耐心翻阅就是。
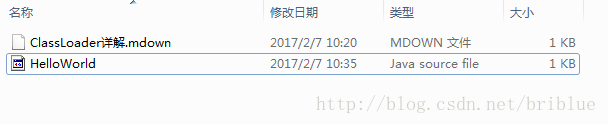
我们都知道在Java中程序是运行在虚拟机中,我们平常用文本编辑器或者是IDE编写的程序都是.java格式的文件,这是最基础的源码,但这类文件是不能直接运行的。如我们编写一个简单的程序HelloWorld.java
public class HelloWorld{

    public static void main(String[] args){
        System.out.println("Hello world!");
    }
}
如图:
然后,我们需要在命令行中进行java文件的编译
[bash]javac HelloWorld.java[/bash]

可以看到目录下生成了.class文件
我们再从命令行中执行命令:
java HelloWorld
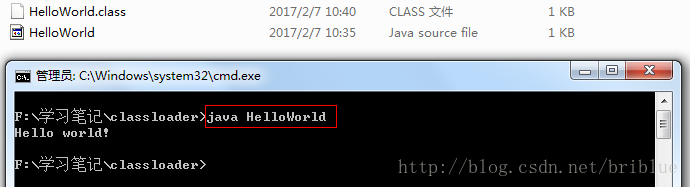
上面是基本代码示例,是所有入门JAVA语言时都学过的东西,这里重新拿出来是想让大家将焦点回到class文件上,class文件是字节码格式文件,java虚拟机并不能直接识别我们平常编写的.java源文件,所以需要javac这个命令转换成.class文件。另外,如果用C或者PYTHON编写的程序正确转换成.class文件后,java虚拟机也是可以识别运行的。更多信息大家可以参考这篇。
了解了.class文件后,我们再来思考下,我们平常在Eclipse中编写的java程序是如何运行的,也就是我们自己编写的各种类是如何被加载到jvm(java虚拟机)中去的。
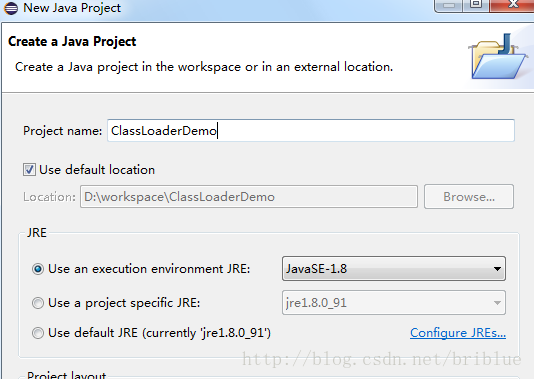
初学java的时候,最害怕的就是下载JDK后要配置环境变量了,关键是当时不理解,所以战战兢兢地照着书籍上或者是网络上的介绍进行操作。然后下次再弄的时候,又忘记了而且是必忘。当时,心里的想法很气愤的,想着是–这东西一点也不人性化,为什么非要自己配置环境变量呢?太不照顾菜鸟和新手了,很多菜鸟就是因为卡在环境变量的配置上,遭受了太多的挫败感。
因为我是在Windows下编程的,所以只讲Window平台上的环境变量,主要有3个:JAVA_HOME、PATH、CLASSPATH。
指的是你JDK安装的位置,一般默认安装在C盘,如
C:\Program Files\Java\jdk1.8.0_91
PATH
将程序路径包含在PATH当中后,在命令行窗口就可以直接键入它的名字了,而不再需要键入它的全路径,比如上面代码中我用的到javac和java两个命令。
一般的
PATH=%JAVA_HOME%\bin;%JAVA_HOME%\jre\bin;%PATH%;
也就是在原来的PATH路径上添加JDK目录下的bin目录和jre目录的bin.
CLASSPATH
CLASSPATH=.;%JAVA_HOME%\lib;%JAVA_HOME%\lib\tools.jar
一看就是指向jar包路径。
需要注意的是前面的.;,.代表当前目录。
环境变量的设置与查看
设置可以右击我的电脑,然后点击属性,再点击高级,然后点击环境变量,具体不明白的自行查阅文档。
查看的话可以打开命令行窗口
echo %JAVA_HOME%

echo %PATH%

echo %CLASSPATH%
好了,扯远了,知道了环境变量,特别是CLASSPATH时,我们进入今天的主题Classloader.
Java语言系统自带有三个类加载器:
– Bootstrap ClassLoader 最顶层的加载类,主要加载核心类库,%JRE_HOME%\lib下的rt.jar、resources.jar、charsets.jar和class等。另外需要注意的是可以通过启动jvm时指定-Xbootclasspath和路径来改变Bootstrap ClassLoader的加载目录。比如java -Xbootclasspath/a:path被指定的文件追加到默认的bootstrap路径中。我们可以打开我的电脑,在上面的目录下查看,看看这些jar包是不是存在于这个目录。
– Extention ClassLoader 扩展的类加载器,加载目录%JRE_HOME%\lib\ext目录下的jar包和class文件。还可以加载-D java.ext.dirs选项指定的目录。
– Appclass Loader也称为SystemAppClass 加载当前应用的classpath的所有类。
我们上面简单介绍了3个ClassLoader。说明了它们加载的路径。并且还提到了-Xbootclasspath和-D java.ext.dirs这两个虚拟机参数选项。
我们看到了系统的3个类加载器,但我们可能不知道具体哪个先行呢?
我可以先告诉你答案
1. Bootstrap CLassloder
2. Extention ClassLoader
3. AppClassLoader
为了更好的理解,我们可以查看源码。
看sun.misc.Launcher,它是一个java虚拟机的入口应用。
public class Launcher {
    private static Launcher launcher = new Launcher();
    private static String bootClassPath =
        System.getProperty("sun.boot.class.path");

    public static Launcher getLauncher() {
        return launcher;
    }

    private ClassLoader loader;

    public Launcher() {
        // Create the extension class loader
        ClassLoader extcl;
        try {
            extcl = ExtClassLoader.getExtClassLoader();
        } catch (IOException e) {
            throw new InternalError(
                "Could not create extension class loader", e);
        }

        // Now create the class loader to use to launch the application
        try {
            loader = AppClassLoader.getAppClassLoader(extcl);
        } catch (IOException e) {
            throw new InternalError(
                "Could not create application class loader", e);
        }

        //设置AppClassLoader为线程上下文类加载器,这个文章后面部分讲解
        Thread.currentThread().setContextClassLoader(loader);
    }

    /*
     * Returns the class loader used to launch the main application.
     */
    public ClassLoader getClassLoader() {
        return loader;
    }
    /*
     * The class loader used for loading installed extensions.
     */
    static class ExtClassLoader extends URLClassLoader {}

/**
     * The class loader used for loading from java.class.path.
     * runs in a restricted security context.
     */
    static class AppClassLoader extends URLClassLoader {}
源码有精简,我们可以得到相关的信息。
1. Launcher初始化了ExtClassLoader和AppClassLoader。
2. Launcher中并没有看见BootstrapClassLoader,但通过System.getProperty("sun.boot.class.path")得到了字符串bootClassPath,这个应该就是BootstrapClassLoader加载的jar包路径。
我们可以先代码测试一下sun.boot.class.path是什么内容。
System.out.println(System.getProperty("sun.boot.class.path"));
得到的结果是:
C:\Program Files\Java\jre1.8.0_91\lib\resources.jar;
C:\Program Files\Java\jre1.8.0_91\lib\rt.jar;
C:\Program Files\Java\jre1.8.0_91\lib\sunrsasign.jar;
C:\Program Files\Java\jre1.8.0_91\lib\jsse.jar;
C:\Program Files\Java\jre1.8.0_91\lib\jce.jar;
C:\Program Files\Java\jre1.8.0_91\lib\charsets.jar;
C:\Program Files\Java\jre1.8.0_91\lib\jfr.jar;
C:\Program Files\Java\jre1.8.0_91\classes
可以看到,这些全是JRE目录下的jar包或者是class文件。
如果你有足够的好奇心,你应该会对它的源码感兴趣
/*
     * The class loader used for loading installed extensions.
     */
    static class ExtClassLoader extends URLClassLoader {

        static {
            ClassLoader.registerAsParallelCapable();
        }

        /**
         * create an ExtClassLoader. The ExtClassLoader is created
         * within a context that limits which files it can read
         */
        public static ExtClassLoader getExtClassLoader() throws IOException
        {
            final File[] dirs = getExtDirs();

            try {
                // Prior implementations of this doPrivileged() block supplied
                // aa synthesized ACC via a call to the private method
                // ExtClassLoader.getContext().

                return AccessController.doPrivileged(
                    new PrivilegedExceptionAction() {
                        public ExtClassLoader run() throws IOException {
                            int len = dirs.length;
                            for (int i = 0; i < len; i++) {
                                MetaIndex.registerDirectory(dirs[i]);
                            }
                            return new ExtClassLoader(dirs);
                        }
                    });
            } catch (java.security.PrivilegedActionException e) {
                throw (IOException) e.getException();
            }
        }

        private static File[] getExtDirs() {
            String s = System.getProperty("java.ext.dirs");
            File[] dirs;
            if (s != null) {
                StringTokenizer st =
                    new StringTokenizer(s, File.pathSeparator);
                int count = st.countTokens();
                dirs = new File[count];
                for (int i = 0; i < count; i++) {
                    dirs[i] = new File(st.nextToken());
                }
            } else {
                dirs = new File[0];
            }
            return dirs;
        }

......
    }
我们先前的内容有说过,可以指定-D java.ext.dirs参数来添加和改变ExtClassLoader的加载路径。这里我们通过可以编写测试代码。
System.out.println(System.getProperty("java.ext.dirs"));
结果如下:
C:\Program Files\Java\jre1.8.0_91\lib\ext;C:\Windows\Sun\Java\lib\ext
AppClassLoader源码
/**
     * The class loader used for loading from java.class.path.
     * runs in a restricted security context.
     */
    static class AppClassLoader extends URLClassLoader {


        public static ClassLoader getAppClassLoader(final ClassLoader extcl)
            throws IOException
        {
            final String s = System.getProperty("java.class.path");
            final File[] path = (s == null) ? new File[0] : getClassPath(s);


            return AccessController.doPrivileged(
                new PrivilegedAction() {
                    public AppClassLoader run() {
                    URL[] urls =
                        (s == null) ? new URL[0] : pathToURLs(path);
                    return new AppClassLoader(urls, extcl);
                }
            });
        }

        ......
    }
可以看到AppClassLoader加载的就是java.class.path下的路径。我们同样打印它的值。
System.out.println(System.getProperty("java.class.path"));
结果:
D:\workspace\ClassLoaderDemo\bin
这个路径其实就是当前java工程目录bin,里面存放的是编译生成的class文件。
好了,自此我们已经知道了BootstrapClassLoader、ExtClassLoader、AppClassLoader实际是查阅相应的环境属性sun.boot.class.path、java.ext.dirs和java.class.path来加载资源文件的。
接下来我们探讨它们的加载顺序,我们先用Eclipse建立一个java工程。
然后创建一个Test.java文件。
public class Test{}
然后,编写一个ClassLoaderTest.java文件。
public class ClassLoaderTest {

    public static void main(String[] args) {
        // TODO Auto-generated method stub

        ClassLoader cl = Test.class.getClassLoader();

        System.out.println("ClassLoader is:"+cl.toString());

    }

}
我们获取到了Test.class文件的类加载器,然后打印出来。结果是:
ClassLoader is:sun.misc.Launcher$AppClassLoader@73d16e93
也就是说明Test.class文件是由AppClassLoader加载的。
这个Test类是我们自己编写的,那么int.class或者是String.class的加载是由谁完成的呢?
我们可以在代码中尝试
public class ClassLoaderTest {

    public static void main(String[] args) {
        // TODO Auto-generated method stub

        ClassLoader cl = Test.class.getClassLoader();

        System.out.println("ClassLoader is:"+cl.toString());

        cl = int.class.getClassLoader();

        System.out.println("ClassLoader is:"+cl.toString());

    }

}
运行一下,却报错了
ClassLoader is:sun.misc.Launcher$AppClassLoader@73d16e93
Exception in thread "main" java.lang.NullPointerException
    at ClassLoaderTest.main(ClassLoaderTest.java:15)
提示的是空指针,意思是int.class这类基础类没有类加载器加载?
当然不是!
int.class是由Bootstrap ClassLoader加载的。要想弄明白这些,我们首先得知道一个前提。
每个类加载器都有一个父加载器,比如加载Test.class是由AppClassLoader完成,那么AppClassLoader也有一个父加载器,怎么样获取呢?很简单,通过getParent方法。比如代码可以这样编写:
ClassLoader cl = Test.class.getClassLoader();
System.out.println("ClassLoader is:"+cl.toString());
System.out.println("ClassLoader\'s parent is:"+cl.getParent().toString());
运行结果如下:
ClassLoader is:sun.misc.Launcher$AppClassLoader@73d16e93
ClassLoader's parent is:sun.misc.Launcher$ExtClassLoader@15db9742
这个说明,AppClassLoader的父加载器是ExtClassLoader。那么ExtClassLoader的父加载器又是谁呢?
System.out.println("ClassLoader is:"+cl.toString());
System.out.println("ClassLoader\'s parent is:"+cl.getParent().toString());
System.out.println("ClassLoader\'s grand father is:"+cl.getParent().getParent().toString());
运行如果:
ClassLoader is:sun.misc.Launcher$AppClassLoader@73d16e93
Exception in thread "main" ClassLoader's parent is:sun.misc.Launcher$ExtClassLoader@15db9742
java.lang.NullPointerException
    at ClassLoaderTest.main(ClassLoaderTest.java:13)
又是一个空指针异常,这表明ExtClassLoader也没有父加载器。那么,为什么标题又是每一个加载器都有一个父加载器呢?这不矛盾吗?为了解释这一点,我们还需要看下面的一个基础前提。
我们先前已经粘贴了ExtClassLoader和AppClassLoader的代码。
static class ExtClassLoader extends URLClassLoader {}
static class AppClassLoader extends URLClassLoader {}
可以看见ExtClassLoader和AppClassLoader同样继承自URLClassLoader,但上面一小节代码中,为什么调用AppClassLoader的getParent()代码会得到ExtClassLoader的实例呢?先从URLClassLoader说起,这个类又是什么?
先上一张类的继承关系图
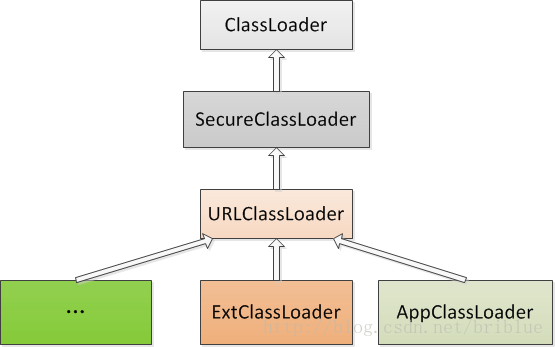
URLClassLoader的源码中并没有找到getParent()方法。这个方法在ClassLoader.java中。
public abstract class ClassLoader {

// The parent class loader for delegation
// Note: VM hardcoded the offset of this field, thus all new fields
// must be added *after* it.
private final ClassLoader parent;
// The class loader for the system
    // @GuardedBy("ClassLoader.class")
private static ClassLoader scl;

private ClassLoader(Void unused, ClassLoader parent) {
    this.parent = parent;
    ...
}
protected ClassLoader(ClassLoader parent) {
    this(checkCreateClassLoader(), parent);
}
protected ClassLoader() {
    this(checkCreateClassLoader(), getSystemClassLoader());
}
public final ClassLoader getParent() {
    if (parent == null)
        return null;
    return parent;
}
public static ClassLoader getSystemClassLoader() {
    initSystemClassLoader();
    if (scl == null) {
        return null;
    }
    return scl;
}

private static synchronized void initSystemClassLoader() {
    if (!sclSet) {
        if (scl != null)
            throw new IllegalStateException("recursive invocation");
        sun.misc.Launcher l = sun.misc.Launcher.getLauncher();
        if (l != null) {
            Throwable oops = null;
            //通过Launcher获取ClassLoader
            scl = l.getClassLoader();
            try {
                scl = AccessController.doPrivileged(
                    new SystemClassLoaderAction(scl));
            } catch (PrivilegedActionException pae) {
                oops = pae.getCause();
                if (oops instanceof InvocationTargetException) {
                    oops = oops.getCause();
                }
            }
            if (oops != null) {
                if (oops instanceof Error) {
                    throw (Error) oops;
                } else {
                    // wrap the exception
                    throw new Error(oops);
                }
            }
        }
        sclSet = true;
    }
}
}
我们可以看到getParent()实际上返回的就是一个ClassLoader对象parent,parent的赋值是在ClassLoader对象的构造方法中,它有两个情况:
1. 由外部类创建ClassLoader时直接指定一个ClassLoader为parent。
2. 由getSystemClassLoader()方法生成,也就是在sun.misc.Laucher通过getClassLoader()获取,也就是AppClassLoader。直白的说,一个ClassLoader创建时如果没有指定parent,那么它的parent默认就是AppClassLoader。
我们主要研究的是ExtClassLoader与AppClassLoader的parent的来源,正好它们与Launcher类有关,我们上面已经粘贴过Launcher的部分代码。
public class Launcher {
    private static URLStreamHandlerFactory factory = new Factory();
    private static Launcher launcher = new Launcher();
    private static String bootClassPath =
        System.getProperty("sun.boot.class.path");

    public static Launcher getLauncher() {
        return launcher;
    }

    private ClassLoader loader;

    public Launcher() {
        // Create the extension class loader
        ClassLoader extcl;
        try {
            extcl = ExtClassLoader.getExtClassLoader();
        } catch (IOException e) {
            throw new InternalError(
                "Could not create extension class loader", e);
        }

        // Now create the class loader to use to launch the application
        try {
        //将ExtClassLoader对象实例传递进去
            loader = AppClassLoader.getAppClassLoader(extcl);
        } catch (IOException e) {
            throw new InternalError(
                "Could not create application class loader", e);
        }

public ClassLoader getClassLoader() {
        return loader;
    }
static class ExtClassLoader extends URLClassLoader {

        /**
         * create an ExtClassLoader. The ExtClassLoader is created
         * within a context that limits which files it can read
         */
        public static ExtClassLoader getExtClassLoader() throws IOException
        {
            final File[] dirs = getExtDirs();

            try {
                // Prior implementations of this doPrivileged() block supplied
                // aa synthesized ACC via a call to the private method
                // ExtClassLoader.getContext().

                return AccessController.doPrivileged(
                    new PrivilegedExceptionAction() {
                        public ExtClassLoader run() throws IOException {
                            //ExtClassLoader在这里创建
                            return new ExtClassLoader(dirs);
                        }
                    });
            } catch (java.security.PrivilegedActionException e) {
                throw (IOException) e.getException();
            }
        }


        /*
         * Creates a new ExtClassLoader for the specified directories.
         */
        public ExtClassLoader(File[] dirs) throws IOException {
            super(getExtURLs(dirs), null, factory);

        }
        }
 }
我们需要注意的是
ClassLoader extcl;

extcl = ExtClassLoader.getExtClassLoader();

loader = AppClassLoader.getAppClassLoader(extcl);
代码已经说明了问题AppClassLoader的parent是一个ExtClassLoader实例。
ExtClassLoader并没有直接找到对parent的赋值。它调用了它的父类也就是URLClassLoder的构造方法并传递了3个参数。
public ExtClassLoader(File[] dirs) throws IOException {
            super(getExtURLs(dirs), null, factory);
}
对应的代码
public  URLClassLoader(URL[] urls, ClassLoader parent,
                          URLStreamHandlerFactory factory) {
     super(parent);
}
答案已经很明了了,ExtClassLoader的parent为null。
上面张贴这么多代码也是为了说明AppClassLoader的parent是ExtClassLoader,ExtClassLoader的parent是null。这符合我们之前编写的测试代码。
不过,细心的同学发现,还是有疑问的我们只看到ExtClassLoader和AppClassLoader的创建,那么BootstrapClassLoader呢?
还有,ExtClassLoader的父加载器为null,但是Bootstrap CLassLoader却可以当成它的父加载器这又是为何呢?
我们继续往下进行。
Bootstrap ClassLoader是由C/C++编写的,它本身是虚拟机的一部分,所以它并不是一个JAVA类,也就是无法在java代码中获取它的引用,JVM启动时通过Bootstrap类加载器加载rt.jar等核心jar包中的class文件,之前的int.class,String.class都是由它加载。然后呢,我们前面已经分析了,JVM初始化sun.misc.Launcher并创建Extension ClassLoader和AppClassLoader实例。并将ExtClassLoader设置为AppClassLoader的父加载器。Bootstrap没有父加载器,但是它却可以作用一个ClassLoader的父加载器。比如ExtClassLoader。这也可以解释之前通过ExtClassLoader的getParent方法获取为Null的现象。具体是什么原因,很快就知道答案了。
双亲委托。
我们终于来到了这一步了。
一个类加载器查找class和resource时,是通过“委托模式”进行的,它首先判断这个class是不是已经加载成功,如果没有的话它并不是自己进行查找,而是先通过父加载器,然后递归下去,直到Bootstrap ClassLoader,如果Bootstrap classloader找到了,直接返回,如果没有找到,则一级一级返回,最后到达自身去查找这些对象。这种机制就叫做双亲委托。
整个流程可以如下图所示:
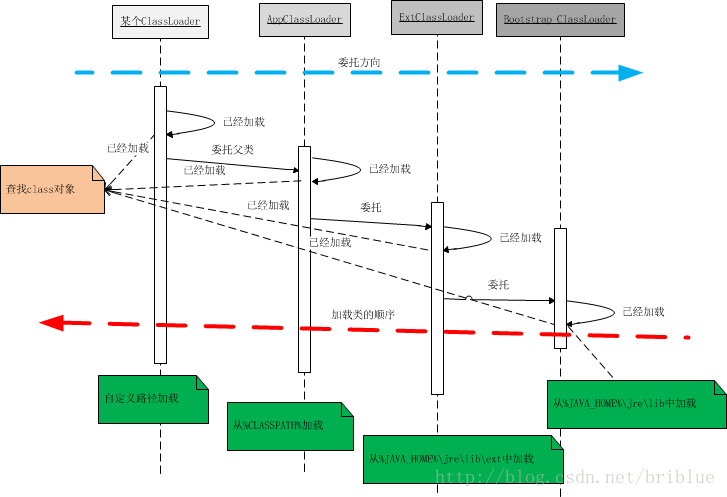
这张图是用时序图画出来的,不过画出来的结果我却自己都觉得不理想。
大家可以看到2根箭头,蓝色的代表类加载器向上委托的方向,如果当前的类加载器没有查询到这个class对象已经加载就请求父加载器(不一定是父类)进行操作,然后以此类推。直到Bootstrap ClassLoader。如果Bootstrap ClassLoader也没有加载过此class实例,那么它就会从它指定的路径中去查找,如果查找成功则返回,如果没有查找成功则交给子类加载器,也就是ExtClassLoader,这样类似操作直到终点,也就是我上图中的红色箭头示例。
用序列描述一下:
1. 一个AppClassLoader查找资源时,先看看缓存是否有,缓存有从缓存中获取,否则委托给父加载器。
2. 递归,重复第1部的操作。
3. 如果ExtClassLoader也没有加载过,则由Bootstrap ClassLoader出面,它首先查找缓存,如果没有找到的话,就去找自己的规定的路径下,也就是sun.mic.boot.class下面的路径。找到就返回,没有找到,让子加载器自己去找。
4. Bootstrap ClassLoader如果没有查找成功,则ExtClassLoader自己在java.ext.dirs路径中去查找,查找成功就返回,查找不成功,再向下让子加载器找。
5. ExtClassLoader查找不成功,AppClassLoader就自己查找,在java.class.path路径下查找。找到就返回。如果没有找到就让子类找,如果没有子类会怎么样?抛出各种异常。
上面的序列,详细说明了双亲委托的加载流程。我们可以发现委托是从下向上,然后具体查找过程却是自上至下。
我说过上面用时序图画的让自己不满意,现在用框图,最原始的方法再画一次。
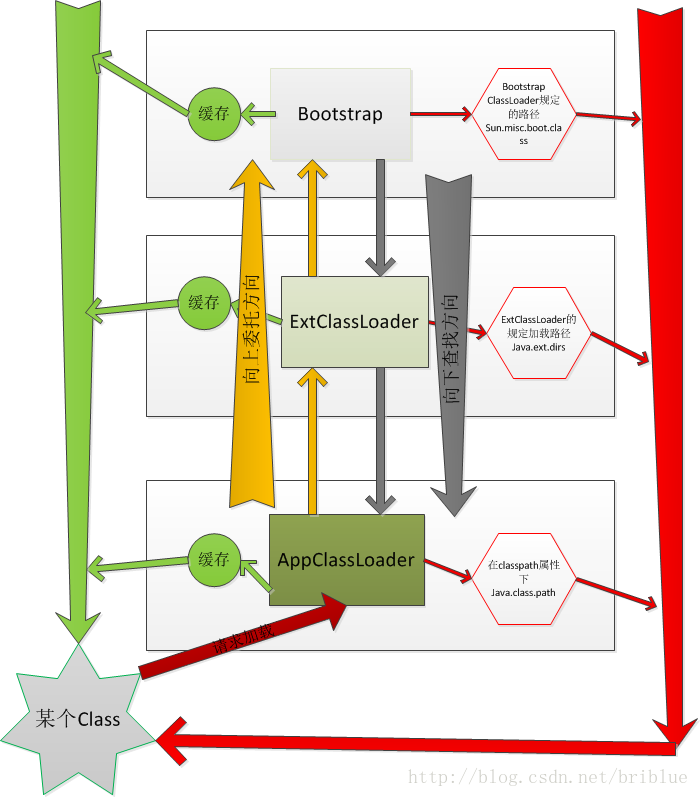
上面已经详细介绍了加载过程,但具体为什么是这样加载,我们还需要了解几个个重要的方法loadClass()、findLoadedClass()、findClass()、defineClass()。
JDK文档中是这样写的,通过指定的全限定类名加载class,它通过同名的loadClass(String,boolean)方法。
protected Class<?> loadClass(String name,
                             boolean resolve)
                      throws ClassNotFoundException
上面是方法原型,一般实现这个方法的步骤是
1. 执行findLoadedClass(String)去检测这个class是不是已经加载过了。
2. 执行父加载器的loadClass方法。如果父加载器为null,则jvm内置的加载器去替代,也就是Bootstrap ClassLoader。这也解释了ExtClassLoader的parent为null,但仍然说Bootstrap ClassLoader是它的父加载器。
3. 如果向上委托父加载器没有加载成功,则通过findClass(String)查找。
如果class在上面的步骤中找到了,参数resolve又是true的话,那么loadClass()又会调用resolveClass(Class)这个方法来生成最终的Class对象。 我们可以从源代码看出这个步骤。
protected Class<?> loadClass(String name, boolean resolve)
        throws ClassNotFoundException
    {
        synchronized (getClassLoadingLock(name)) {
            // 首先,检测是否已经加载
            Class<?> c = findLoadedClass(name);
            if (c == null) {
                long t0 = System.nanoTime();
                try {
                    if (parent != null) {
                        //父加载器不为空则调用父加载器的loadClass
                        c = parent.loadClass(name, false);
                    } else {
                        //父加载器为空则调用Bootstrap Classloader
                        c = findBootstrapClassOrNull(name);
                    }
                } catch (ClassNotFoundException e) {
                    // ClassNotFoundException thrown if class not found
                    // from the non-null parent class loader
                }

                if (c == null) {
                    // If still not found, then invoke findClass in order
                    // to find the class.
                    long t1 = System.nanoTime();
                    //父加载器没有找到,则调用findclass
                    c = findClass(name);

                    // this is the defining class loader; record the stats
                    sun.misc.PerfCounter.getParentDelegationTime().addTime(t1 - t0);
                    sun.misc.PerfCounter.getFindClassTime().addElapsedTimeFrom(t1);
                    sun.misc.PerfCounter.getFindClasses().increment();
                }
            }
            if (resolve) {
                //调用resolveClass()
                resolveClass(c);
            }
            return c;
        }
    }
代码解释了双亲委托。
另外,要注意的是如果要编写一个classLoader的子类,也就是自定义一个classloader,建议覆盖findClass()方法,而不要直接改写loadClass()方法。
另外
if (parent != null) {
    //父加载器不为空则调用父加载器的loadClass
    c = parent.loadClass(name, false);
} else {
    //父加载器为空则调用Bootstrap Classloader
    c = findBootstrapClassOrNull(name);
}
前面说过ExtClassLoader的parent为null,所以它向上委托时,系统会为它指定Bootstrap ClassLoader。
不知道大家有没有发现,不管是Bootstrap ClassLoader还是ExtClassLoader等,这些类加载器都只是加载指定的目录下的jar包或者资源。如果在某种情况下,我们需要动态加载一些东西呢?比如从D盘某个文件夹加载一个class文件,或者从网络上下载class主内容然后再进行加载,这样可以吗?
如果要这样做的话,需要我们自定义一个classloader。
findClass()方法。findClass()方法中调用defineClass()。这个方法在编写自定义classloader的时候非常重要,它能将class二进制内容转换成Class对象,如果不符合要求的会抛出各种异常。
一个ClassLoader创建时如果没有指定parent,那么它的parent默认就是AppClassLoader。
上面说的是,如果自定义一个ClassLoader,默认的parent父加载器是AppClassLoader,因为这样就能够保证它能访问系统内置加载器加载成功的class文件。
假设我们需要一个自定义的classloader,默认加载路径为D:\lib下的jar包和资源。
我们写编写一个测试用的类文件,Test.java
package com.frank.test;

public class Test {

    public void say(){
        System.out.println("Say Hello");
    }

}
然后将它编译过年class文件Test.class放到D:\lib这个路径下。
DiskClassLoader
我们编写DiskClassLoader的代码。
import java.io.ByteArrayOutputStream;
import java.io.File;
import java.io.FileInputStream;
import java.io.FileNotFoundException;
import java.io.IOException;


public class DiskClassLoader extends ClassLoader {

    private String mLibPath;

    public DiskClassLoader(String path) {
        // TODO Auto-generated constructor stub
        mLibPath = path;
    }

    @Override
    protected Class<?> findClass(String name) throws ClassNotFoundException {
        // TODO Auto-generated method stub

        String fileName = getFileName(name);

        File file = new File(mLibPath,fileName);

        try {
            FileInputStream is = new FileInputStream(file);

            ByteArrayOutputStream bos = new ByteArrayOutputStream();
            int len = 0;
            try {
                while ((len = is.read()) != -1) {
                    bos.write(len);
                }
            } catch (IOException e) {
                e.printStackTrace();
            }

            byte[] data = bos.toByteArray();
            is.close();
            bos.close();

            return defineClass(name,data,0,data.length);

        } catch (IOException e) {
            // TODO Auto-generated catch block
            e.printStackTrace();
        }

        return super.findClass(name);
    }

    //获取要加载 的class文件名
    private String getFileName(String name) {
        // TODO Auto-generated method stub
        int index = name.lastIndexOf('.');
        if(index == -1){
            return name+".class";
        }else{
            return name.substring(index+1)+".class";
        }
    }

}
我们在findClass()方法中定义了查找class的方法,然后数据通过defineClass()生成了Class对象。
测试
现在我们要编写测试代码。我们知道如果调用一个Test对象的say方法,它会输出”Say Hello”这条字符串。但现在是我们把Test.class放置在应用工程所有的目录之外,我们需要加载它,然后执行它的方法。具体效果如何呢?我们编写的DiskClassLoader能不能顺利完成任务呢?我们拭目以待。
import java.lang.reflect.InvocationTargetException;
import java.lang.reflect.Method;

public class ClassLoaderTest {

    public static void main(String[] args) {
        // TODO Auto-generated method stub

        //创建自定义classloader对象。
        DiskClassLoader diskLoader = new DiskClassLoader("D:\\lib");
        try {
            //加载class文件
            Class c = diskLoader.loadClass("com.frank.test.Test");

            if(c != null){
                try {
                    Object obj = c.newInstance();
                    Method method = c.getDeclaredMethod("say",null);
                    //通过反射调用Test类的say方法
                    method.invoke(obj, null);
                } catch (InstantiationException | IllegalAccessException
                        | NoSuchMethodException
                        | SecurityException |
                        IllegalArgumentException |
                        InvocationTargetException e) {
                    // TODO Auto-generated catch block
                    e.printStackTrace();
                }
            }
        } catch (ClassNotFoundException e) {
            // TODO Auto-generated catch block
            e.printStackTrace();
        }

    }

}
我们点击运行按钮,结果显示。

可以看到,Test类的say方法正确执行,也就是我们写的DiskClassLoader编写成功。
讲了这么大的篇幅,自定义ClassLoader才姗姗来迟。 很多同学可能觉得前面有些啰嗦,但我按照自己的思路,我觉得还是有必要的。因为我是围绕一个关键字进行讲解的。
关键字是什么?
它们的关联部分就是路径,也就是要加载的class或者是资源的路径。
BootStrap ClassLoader、ExtClassLoader、AppClassLoader都是加载指定路径下的jar包。如果我们要突破这种限制,实现自己某些特殊的需求,我们就得自定义ClassLoader,自已指定加载的路径,可以是磁盘、内存、网络或者其它。
所以,你说路径能不能成为它们的关键字?
当然上面的只是我个人的看法,可能不正确,但现阶段,这样有利于自己的学习理解。
突破了JDK系统内置加载路径的限制之后,我们就可以编写自定义ClassLoader,然后剩下的就叫给开发者你自己了。你可以按照自己的意愿进行业务的定制,将ClassLoader玩出花样来。
常见的用法是将Class文件按照某种加密手段进行加密,然后按照规则编写自定义的ClassLoader进行解密,这样我们就可以在程序中加载特定了类,并且这个类只能被我们自定义的加载器进行加载,提高了程序的安全性。
下面,我们编写代码。
加密和解密的协议有很多种,具体怎么定看业务需要。在这里,为了便于演示,我简单地将加密解密定义为异或运算。当一个文件进行异或运算后,产生了加密文件,再进行一次异或后,就进行了解密。
import java.io.File;
import java.io.FileInputStream;
import java.io.FileNotFoundException;
import java.io.FileOutputStream;
import java.io.IOException;


public class FileUtils {

    public static void test(String path){
        File file = new File(path);
        try {
            FileInputStream fis = new FileInputStream(file);
            FileOutputStream fos = new FileOutputStream(path+"en");
            int b = 0;
            int b1 = 0;
            try {
                while((b = fis.read()) != -1){
                    //每一个byte异或一个数字2
                    fos.write(b ^ 2);
                }
                fos.close();
                fis.close();
            } catch (IOException e) {
                // TODO Auto-generated catch block
                e.printStackTrace();
            }
        } catch (FileNotFoundException e) {
            // TODO Auto-generated catch block
            e.printStackTrace();
        }
    }

}
我们再写测试代码
FileUtils.test("D:\\lib\\Test.class");
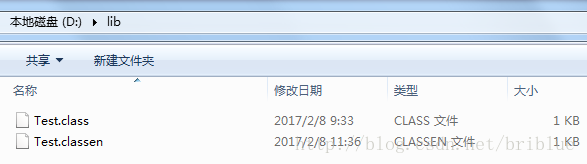
然后可以看见路径D:\\lib\\Test.class下Test.class生成了Test.classen文件。
import java.io.ByteArrayOutputStream;
import java.io.File;
import java.io.FileInputStream;
import java.io.IOException;


public class DeClassLoader extends ClassLoader {

    private String mLibPath;

    public DeClassLoader(String path) {
        // TODO Auto-generated constructor stub
        mLibPath = path;
    }

    @Override
    protected Class<?> findClass(String name) throws ClassNotFoundException {
        // TODO Auto-generated method stub

        String fileName = getFileName(name);

        File file = new File(mLibPath,fileName);

        try {
            FileInputStream is = new FileInputStream(file);

            ByteArrayOutputStream bos = new ByteArrayOutputStream();
            int len = 0;
            byte b = 0;
            try {
                while ((len = is.read()) != -1) {
                    //将数据异或一个数字2进行解密
                    b = (byte) (len ^ 2);
                    bos.write(b);
                }
            } catch (IOException e) {
                e.printStackTrace();
            }

            byte[] data = bos.toByteArray();
            is.close();
            bos.close();

            return defineClass(name,data,0,data.length);

        } catch (IOException e) {
            // TODO Auto-generated catch block
            e.printStackTrace();
        }

        return super.findClass(name);
    }

    //获取要加载 的class文件名
    private String getFileName(String name) {
        // TODO Auto-generated method stub
        int index = name.lastIndexOf('.');
        if(index == -1){
            return name+".classen";
        }else{
            return name.substring(index+1)+".classen";
        }
    }

}
我们可以在ClassLoaderTest.java中的main方法中如下编码:
DeClassLoader diskLoader = new DeClassLoader("D:\\lib");
        try {
            //加载class文件
            Class c = diskLoader.loadClass("com.frank.test.Test");

            if(c != null){
                try {
                    Object obj = c.newInstance();
                    Method method = c.getDeclaredMethod("say",null);
                    //通过反射调用Test类的say方法
                    method.invoke(obj, null);
                } catch (InstantiationException | IllegalAccessException
                        | NoSuchMethodException
                        | SecurityException |
                        IllegalArgumentException |
                        InvocationTargetException e) {
                    // TODO Auto-generated catch block
                    e.printStackTrace();
                }
            }
        } catch (ClassNotFoundException e) {
            // TODO Auto-generated catch block
            e.printStackTrace();
        }
查看运行结果是:

可以看到了,同样成功了。现在,我们有两个自定义的ClassLoader:DiskClassLoader和DeClassLoader,我们可以尝试一下,看看DiskClassLoader能不能加载Test.classen文件也就是Test.class加密后的文件。
我们首先移除D:\\lib\\Test.class文件,只剩下一下Test.classen文件,然后进行代码的测试。
DeClassLoader diskLoader1 = new DeClassLoader("D:\\lib");
        try {
            //加载class文件
            Class c = diskLoader1.loadClass("com.frank.test.Test");

            if(c != null){
                try {
                    Object obj = c.newInstance();
                    Method method = c.getDeclaredMethod("say",null);
                    //通过反射调用Test类的say方法
                    method.invoke(obj, null);
                } catch (InstantiationException | IllegalAccessException
                        | NoSuchMethodException
                        | SecurityException |
                        IllegalArgumentException |
                        InvocationTargetException e) {
                    // TODO Auto-generated catch block
                    e.printStackTrace();
                }
            }
        } catch (ClassNotFoundException e) {
            // TODO Auto-generated catch block
            e.printStackTrace();
        }

        DiskClassLoader diskLoader = new DiskClassLoader("D:\\lib");
        try {
            //加载class文件
            Class c = diskLoader.loadClass("com.frank.test.Test");

            if(c != null){
                try {
                    Object obj = c.newInstance();
                    Method method = c.getDeclaredMethod("say",null);
                    //通过反射调用Test类的say方法
                    method.invoke(obj, null);
                } catch (InstantiationException | IllegalAccessException
                        | NoSuchMethodException
                        | SecurityException |
                        IllegalArgumentException |
                        InvocationTargetException e) {
                    // TODO Auto-generated catch block
                    e.printStackTrace();
                }
            }
        } catch (ClassNotFoundException e) {
            // TODO Auto-generated catch block
            e.printStackTrace();
        }

    }
运行结果:
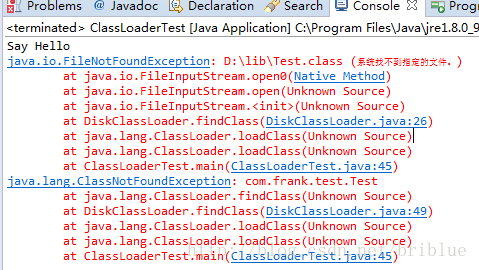
我们可以看到。DeClassLoader运行正常,而DiskClassLoader却找不到Test.class的类,并且它也无法加载Test.classen文件。
我们可以看到。DeClassLoader运行正常,而DiskClassLoader却找不到Test.class的类,并且它也无法加载Test.classen文件。
前面讲到过Bootstrap ClassLoader、ExtClassLoader、AppClassLoader,现在又出来这么一个类加载器,这是为什么?
前面三个之所以放在前面讲,是因为它们是真实存在的类,而且遵从”双亲委托“的机制。而ContextClassLoader其实只是一个概念。
查看Thread.java源码可以发现
public class Thread implements Runnable {

/* The context ClassLoader for this thread */
   private ClassLoader contextClassLoader;

   public void setContextClassLoader(ClassLoader cl) {
       SecurityManager sm = System.getSecurityManager();
       if (sm != null) {
           sm.checkPermission(new RuntimePermission("setContextClassLoader"));
       }
       contextClassLoader = cl;
   }

   public ClassLoader getContextClassLoader() {
       if (contextClassLoader == null)
           return null;
       SecurityManager sm = System.getSecurityManager();
       if (sm != null) {
           ClassLoader.checkClassLoaderPermission(contextClassLoader,
                                                  Reflection.getCallerClass());
       }
       return contextClassLoader;
   }
}
contextClassLoader只是一个成员变量,通过setContextClassLoader()方法设置,通过getContextClassLoader()设置。
每个Thread都有一个相关联的ClassLoader,默认是AppClassLoader。并且子线程默认使用父线程的ClassLoader除非子线程特别设置。
我们同样可以编写代码来加深理解。
现在有2个SpeakTest.class文件,一个源码是
package com.frank.test;

public class SpeakTest implements ISpeak {

    @Override
    public void speak() {
        // TODO Auto-generated method stub
        System.out.println("Test");
    }

}
它生成的SpeakTest.class文件放置在D:\\lib\\test目录下。
另外ISpeak.java代码
package com.frank.test;

public interface ISpeak {
    public void speak();

}
然后,我们在这里还实现了一个SpeakTest.java
package com.frank.test;

public class SpeakTest implements ISpeak {

    @Override
    public void speak() {
        // TODO Auto-generated method stub
        System.out.println("I\' frank");
    }

}
它生成的SpeakTest.class文件放置在D:\\lib目录下。
然后我们还要编写另外一个ClassLoader,DiskClassLoader1.java这个ClassLoader的代码和DiskClassLoader.java代码一致,我们要在DiskClassLoader1中加载位置于D:\\lib\\test中的SpeakTest.class文件。
测试代码:
DiskClassLoader1 diskLoader1 = new DiskClassLoader1("D:\\lib\\test");
Class cls1 = null;
try {
//加载class文件
 cls1 = diskLoader1.loadClass("com.frank.test.SpeakTest");
System.out.println(cls1.getClassLoader().toString());
if(cls1 != null){
    try {
        Object obj = cls1.newInstance();
        //SpeakTest1 speak = (SpeakTest1) obj;
        //speak.speak();
        Method method = cls1.getDeclaredMethod("speak",null);
        //通过反射调用Test类的speak方法
        method.invoke(obj, null);
    } catch (InstantiationException | IllegalAccessException
            | NoSuchMethodException
            | SecurityException |
            IllegalArgumentException |
            InvocationTargetException e) {
        // TODO Auto-generated catch block
        e.printStackTrace();
    }
}
} catch (ClassNotFoundException e) {
// TODO Auto-generated catch block
e.printStackTrace();
}

DiskClassLoader diskLoader = new DiskClassLoader("D:\\lib");
System.out.println("Thread "+Thread.currentThread().getName()+" classloader: "+Thread.currentThread().getContextClassLoader().toString());
new Thread(new Runnable() {

    @Override
    public void run() {
        System.out.println("Thread "+Thread.currentThread().getName()+" classloader: "+Thread.currentThread().getContextClassLoader().toString());

        // TODO Auto-generated method stub
        try {
            //加载class文件
        //  Thread.currentThread().setContextClassLoader(diskLoader);
            //Class c = diskLoader.loadClass("com.frank.test.SpeakTest");
            ClassLoader cl = Thread.currentThread().getContextClassLoader();
            Class c = cl.loadClass("com.frank.test.SpeakTest");
            // Class c = Class.forName("com.frank.test.SpeakTest");
            System.out.println(c.getClassLoader().toString());
            if(c != null){
                try {
                    Object obj = c.newInstance();
                    //SpeakTest1 speak = (SpeakTest1) obj;
                    //speak.speak();
                    Method method = c.getDeclaredMethod("speak",null);
                    //通过反射调用Test类的say方法
                    method.invoke(obj, null);
                } catch (InstantiationException | IllegalAccessException
                        | NoSuchMethodException
                        | SecurityException |
                        IllegalArgumentException |
                        InvocationTargetException e) {
                    // TODO Auto-generated catch block
                    e.printStackTrace();
                }
            }
        } catch (ClassNotFoundException e) {
            // TODO Auto-generated catch block
            e.printStackTrace();
        }
    }
}).start();
结果如下:

我们可以得到如下的信息:
1. DiskClassLoader1加载成功了SpeakTest.class文件并执行成功。
2. 子线程的ContextClassLoader是AppClassLoader。
3. AppClassLoader加载不了父线程当中已经加载的SpeakTest.class内容。
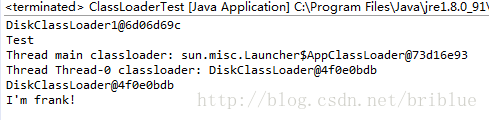
我们修改一下代码,在子线程开头处加上这么一句内容。
Thread.currentThread().setContextClassLoader(diskLoader1);
结果如下:
可以看到子线程的ContextClassLoader变成了DiskClassLoader。
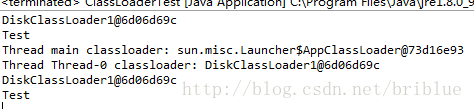
继续改动代码:
Thread.currentThread().setContextClassLoader(diskLoader);
结果:
可以看到DiskClassLoader1和DiskClassLoader分别加载了自己路径下的SpeakTest.class文件,并且它们的类名是一样的com.frank.test.SpeakTest,但是执行结果不一样,因为它们的实际内容不一样。
其实这个我也不是很清楚,我的主业是Android,研究ClassLoader也是为了更好的研究Android。网上的答案说是适应那些Web服务框架软件如Tomcat等。主要为了加载不同的APP,因为加载器不一样,同一份class文件加载后生成的类是不相等的。如果有同学想多了解更多的细节,请自行查阅相关资料。
来自:https://blog.csdn.net/briblue/article/details/54973413
我这篇文章写了好几天,修修改改,然后加上自己的理解。参考了下面的这些网站。
1. grepcode ClassLoader源码
2. http://blog.csdn.net/xyang81/article/details/7292380
3. http://blog.csdn.net/irelandken/article/details/7048817
4. https://docs.oracle.com/javase/7/docs/api/java/net/URLClassLoader.html
针对本文,博主最近在写《成神之路系列文章》,分章分节介绍所有知识点。欢迎关注。
| 主要版本 | 更新时间 | 备注 |
|---|---|---|
| v1.0 | 2015-08-01 | 首次发布 |
| v1.1 | 2018-03-12 | 增加新技术知识、完善知识体系 |
堆、栈、方法区、直接内存、堆和栈区别
内存可见性、重排序、顺序一致性、volatile、锁、final
内存分配策略、垃圾收集器(G1)、GC算法、GC参数、对象存活的判定
oop-klass、对象头
即时编译器、编译优化
classLoader、类加载过程、双亲委派(破坏双亲委派)、模块化(jboss modules、osgi、jigsaw)
jps, jstack, jmap、jstat, jconsole, jinfo, jhat, javap, btrace、TProfiler
javac 、javap 、jad 、CRF
String、Integer、Long、Enum、BigDecimal、ThreadLocal、ClassLoader & URLClassLoader、ArrayList & LinkedList、 HashMap & LinkedHashMap & TreeMap & CouncurrentHashMap、HashSet & LinkedHashSet & TreeSet
JDK 6和JDK 7中substring的原理及区别、
replaceFirst、replaceAll、replace区别、
String对“+”的重载、
String.valueOf和Integer.toString的区别、
字符串的不可变性
Integer的缓存机制
transient、instanceof、volatile、synchronized、final、static、const 原理及用法。
常用集合类的使用、ArrayList和LinkedList和Vector的区别 、SynchronizedList和Vector的区别、HashMap、HashTable、ConcurrentHashMap区别、Java 8中stream相关用法、apache集合处理工具类的使用、不同版本的JDK中HashMap的实现的区别以及原因
枚举的用法、枚举与单例、Enum类
bio、nio和aio的区别、三种IO的用法与原理、netty
反射与工厂模式、 java.lang.reflect.*
什么是序列化与反序列化、为什么序列化、序列化底层原理、序列化与单例模式、protobuf、为什么说序列化并不安全
元注解、自定义注解、Java中常用注解使用、注解与反射的结合
什么是Java消息服务、JMS消息传送模型
java.lang.management.*、 javax.management.*
泛型与继承、类型擦除、泛型中K T V E ? object等的含义、泛型各种用法
junit、mock、mockito、内存数据库(h2)
java.lang.util.regex.*
commons.lang, commons.*... guava-libraries netty
异常类型、正确处理异常、自定义异常
时区、时令、Java中时间API
解决乱码问题、常用编码方式
Java中语法糖原理、解语法糖
Thread、Runnable、Callable、ReentrantLock、ReentrantReadWriteLock、Atomic*、Semaphore、CountDownLatch、、ConcurrentHashMap、Executors
自己设计线程池、submit() 和 execute()
死锁、死锁如何排查、Java线程调度、线程安全和内存模型的关系
CAS、乐观锁与悲观锁、数据库相关锁机制、分布式锁、偏向锁、轻量级锁、重量级锁、monitor、锁优化、锁消除、锁粗化、自旋锁、可重入锁、阻塞锁、死锁
happens-before、编译器指令重排和CPU指令重
synchronized是如何实现的?synchronized和lock之间关系、不使用synchronized如何实现一个线程安全的单例
守护线程和非守护线程的区别以及用法
用位运算实现加、减、乘、除、取余
单例、策略、工厂、适配器、责任链。
三次握手与四次关闭、流量控制和拥塞控制、OSI七层模型、tcp粘包与拆包
cookie被禁用,如何实现session
实现客户端缓存功能,支持返回304 实现可并发下载一个文件 使用线程池处理客户端请求 使用nio处理客户端请求 支持简单的rewrite规则 上述功能在实现的时候需要满足“开闭原则”
Spring Boot的starter原理,自己实现一个starter
lambda表达式、Stream API、
Jigsaw、Jshell、Reactive Streams
局部变量类型推断、G1的并行Full GC、ThreadLocal握手机制
响应式编程
使用单例、使用Future模式、使用线程池、选择就绪、减少上下文切换、减少锁粒度、数据压缩、结果缓存
线程Dump、内存Dump、gc情况
分析死锁、分析内存泄露
HeapOutOfMemory、 Young OutOfMemory、MethodArea OutOfMemory、ConstantPool OutOfMemory、DirectMemory OutOfMemory、Stack OutOfMemory Stack OverFlow
内存溢出、线程死锁、类加载冲突
当一个Java程序响应很慢时如何查找问题、
当一个Java程序频繁FullGC时如何解决问题、
如何查看垃圾回收日志、
当一个Java应用发生OutOfMemory时该如何解决、
如何判断是否出现死锁、
如何判断是否存在内存泄露
如何查看执行计划,如何根据执行计划进行SQL优化
事务的隔离级别、事务能不能实现锁的功能
行锁、表锁、使用数据库锁实现乐观锁、
h2
redis、memcached
栈、队列、链表、数组、哈希表、
二叉树、字典树、平衡树、排序树、B树、B+树、R树、多路树、红黑树
各种排序算法和时间复杂度 深度优先和广度优先搜索 全排列、贪心算法、KMP算法、hash算法、海量数据处理
基本概念、常见用法
在linux上部署solr,solrcloud,,新增、删除、查询索引
在linux上部署storm,用zookeeper做协调,运行storm hello world,local和remote模式运行调试storm topology。
HDFS、MapReduce
XSS的防御
SQL注入、XML注入、CRLF注入
MD5,SHA1、DES、AES、RSA、DSA
memcached为什么可以导致DDos攻击、什么是反射型DDoS
数据一致性、服务治理、服务降级
2PC、3PC、CAP、BASE、 可靠消息最终一致性、最大努力通知、TCC
服务注册、服务发现,服务治理
怎样打造一个分布式数据库、什么时候需要分布式数据库、mycat、otter、HBase
mfs、fastdfs
缓存一致性、缓存命中率、缓存冗余
SOA、康威定律
ActiveMQ
CPU、内存、磁盘I/O、网络I/O等
进程监控、语义监控、机器资源监控、数据波动
日志、埋点
tomcat负载均衡、Nginx负载均衡
DNS原理、DNS的设计
数据一致性
IaaS、SaaS、PaaS、虚拟化技术、openstack、Serverlsess
Solr、Lucene、Nutch、Elasticsearch
Shiro
哈希算法、Merkle树、公钥密码算法、共识算法、Raft协议、Paxos 算法与 Raft 算法、拜占庭问题与算法、消息认证码与数字签名
挖矿、共识机制、闪电网络、侧链、热点问题、分叉
数学基础、机器学习、人工神经网络、深度学习、应用场景。
TensorFlow、DeepLearning4J
Groovy、Python、Go、NodeJs、Swift、Rust
《深入理解Java虚拟机》 《Effective Java》 《深入分析Java Web技术内幕》 《大型网站技术架构》 《代码整洁之道》 《Head First设计模式》 《maven实战》 《区块链原理、设计与应用》 《Java并发编程实战》 《鸟哥的Linux私房菜》 《从Paxos到Zookeeper》 《架构即未来》
来自:http://www.hollischuang.com/archives/489
推荐阅读:
技术:分布式唯一ID极简教程
职场:程序员职业规划
架构师小秘圈
https://blog.csdn.net/g6U8W7p06dCO99fQ3/article/details/79787830