为了方便复习,总结了SSM框架的搭建过程:
用的是eclipse 和tomcat服务器。创建了一个 Dynamic web project。
有关这些基础相关资料,可以查找网络。
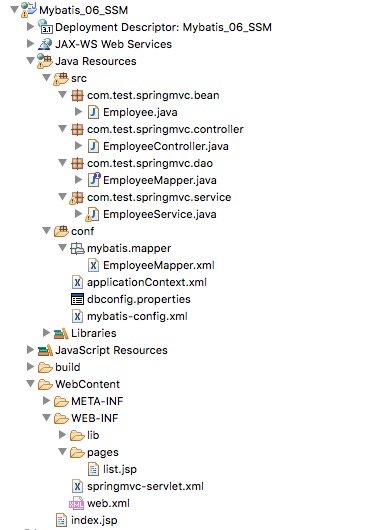
一、项目整合概览
二、项目jar包介绍
jar包下载地址:http://central.maven.org/maven2/org/springframework/

其实,source.jar 是用来查看源代码的,javadoc.jar 是用来查看 文档的。这些可以去掉。
1、Spring IOC jar包:
core , content , bean , 在启动服务器 时需要 common log,在加载 容器时 需要 expression(spring 的标签语言),aop模块(面向切面编程)
2、SpringMVC jar包
只要 spring-webmvc.jar 包就行了。如果整合 struts框架,那么spring-webmvc.jar这个就不用了,spring 整合 Struts时 用 Struts 提供的整合 插件
3、jsp页面用jstl标签语言
当在jsp页面使用 jstl标签语言时,需要导入 jstl.jar 包。
比如 <%@taglib prefix="c" uri="http://java.sun.com/jsp/jstl/core" %>
4、数据库问题
mybatis核心包【mybatis.jar 】
mybatis 与spring整合包【mybatis-spring.jar】
mysql数据库驱动包 【mysql-connector.jar】
数据库 解析注解事务 【spring-tx.jar】
<!-- spring IOC 容器配置文件中, 开启基于注解的事务 -->
<tx:annotation-driven transaction-manager="dataSourceTransactionManager"/>
数据源包:根据不同数据源 配置,导入不同包
下面就是 导入 spring-jdbc.jar 包
<!-- spring IOC 容器配置文件中, 配置数据源 --> <bean id="dataSource" class="org.springframework.jdbc.datasource.DriverManagerDataSource"> <property name="driverClassName" value="com.mysql.jdbc.Driver" /> <!-- http://jingyan.baidu.com/article/b7001fe197a3f60e7282dd8d.html 中文数据库存取乱码问题 --> <property name="url" value="jdbc:mysql://127.0.0.1:3306/mybatis?useUnicode=true&characterEncoding=UTF-8" /> <property name="username" value="root" /> <property name="password" value="Cool123!" /> </bean>
当然数据库配置文件,可以写在properties文件中,然后用${}引用。比如下面
当然这里的数据源也修改了:所以要用 c3p0.jar 包。
<!-- 引入数据库的配置文件 -->
<context:property-placeholder location="classpath:dbconfig.properties" />
<!-- Spring IOC 容器配置文件中,用来控制数据源 -->
<bean id="dataSource" class="com.mchange.v2.c3p0.ComboPooledDataSource">
	<property name="jdbcUrl" value="${jdbc.url}"></property>
	<property name="driverClass" value="${jdbc.driver}"></property>
	<property name="user" value="${jdbc.username}"></property>
	<property name="password" value="${jdbc.password}"></property>
</bean>
关于数据源的写法,也可以有另一种写法:
<bean id="dataSource" class="org.springframework.jdbc.datasource.DriverManagerDataSource"> <property name="driverClassName"> <value>com.mysql.jdbc.Driver</value> </property> <property name="url"> <value>jdbc:mysql://127.0.0.1:3306/mybatis?useUnicode=true&characterEncoding=UTF-8 </value> </property> <property name="username"> <value>root</value> </property> <property name="password"> <value>Cool123!</value> </property> </bean>
三、数据库搭建
简单举例:
id	last_name    gender	  email
1	   mike	       0      [email protected]
2          book        0      [email protected]
3          tom         1      [email protected]
4          jerry       1       [email protected]
四、SSM项目搭建
1、编辑web.xml
文件中添加了:
1、spring-mvc 配置文件【springmvc-servlet.xml】
2、spring-ioc 配置文件【applicationContext.xml】
<?xml version="1.0" encoding="UTF-8"?>
<web-app xmlns:xsi="http://www.w3.org/2001/XMLSchema-instance" xmlns="http://xmlns.jcp.org/xml/ns/javaee" xsi:schemaLocation="http://xmlns.jcp.org/xml/ns/javaee http://xmlns.jcp.org/xml/ns/javaee/web-app_3_1.xsd" id="WebApp_ID" version="3.1">
  <display-name>Mybatis_06_SSM</display-name>


   <!--Spring配置: needed for ContextLoaderListener -->
	<context-param>
		<param-name>contextConfigLocation</param-name>
		<param-value>classpath:applicationContext.xml</param-value>
	</context-param>

	<!-- Bootstraps the root web application context before servlet initialization -->
	<listener>
		<listener-class>org.springframework.web.context.ContextLoaderListener</listener-class>
	</listener>

	<!-- SpringMVC配置 -->
	<!-- The front controller of this Spring Web application, responsible for handling all application requests -->
	<servlet>
		<servlet-name>springmvc</servlet-name>
		<servlet-class>org.springframework.web.servlet.DispatcherServlet</servlet-class>
		<load-on-startup>1</load-on-startup>
	</servlet>

	<!-- Map all requests to the DispatcherServlet for handling -->
	<servlet-mapping>
		<servlet-name>springmvc</servlet-name>
		<url-pattern>/</url-pattern>
	</servlet-mapping>


  <welcome-file-list>
    <welcome-file>index.html</welcome-file>
    <welcome-file>index.htm</welcome-file>
    <welcome-file>index.jsp</welcome-file>
  </welcome-file-list>

</web-app>
2、配置springmvc-servlet.xml
<?xml version="1.0" encoding="UTF-8"?>
<beans xmlns="http://www.springframework.org/schema/beans"
	xmlns:xsi="http://www.w3.org/2001/XMLSchema-instance"
	xmlns:context="http://www.springframework.org/schema/context"
	xmlns:mvc="http://www.springframework.org/schema/mvc"
	xsi:schemaLocation="http://www.springframework.org/schema/mvc http://www.springframework.org/schema/mvc/spring-mvc-4.0.xsd
		http://www.springframework.org/schema/beans http://www.springframework.org/schema/beans/spring-beans.xsd
		http://www.springframework.org/schema/context http://www.springframework.org/schema/context/spring-context-4.0.xsd">

	<!--SpringMVC只是控制网站跳转逻辑  -->
	<!-- 只扫描控制器 -->
	<context:component-scan base-package="com.test.springmvc" use-default-filters="false">
		<context:include-filter type="annotation" expression="org.springframework.stereotype.Controller"/>
	</context:component-scan>

	<!-- 视图解析器 -->
	<bean class="org.springframework.web.servlet.view.InternalResourceViewResolver">
		<property name="prefix" value="/WEB-INF/pages/"></property>
		<property name="suffix" value=".jsp"></property>
	</bean>

	<mvc:annotation-driven></mvc:annotation-driven>
	<mvc:default-servlet-handler/>
</beans>
3、编辑请求页面
<%@ page language="java" contentType="text/html; charset=UTF-8"
    pageEncoding="UTF-8"%>
<!DOCTYPE html PUBLIC "-//W3C//DTD HTML 4.01 Transitional//EN" "http://www.w3.org/TR/html4/loose.dtd">
<html>
<head>
<meta http-equiv="Content-Type" content="text/html; charset=UTF-8">
<title>Insert title here</title>
</head>
<body>
<a href="getemps">查询所有员工</a>
</body>
</html>
4、编辑控制器controller层
package com.test.springmvc.controller;

import java.util.List;
import java.util.Map;

import org.springframework.beans.factory.annotation.Autowired;
import org.springframework.stereotype.Controller;
import org.springframework.web.bind.annotation.RequestMapping;

import com.test.springmvc.bean.Employee;
import com.test.springmvc.service.EmployeeService;

@Controller
public class EmployeeController {

	@Autowired
	EmployeeService employeeService;

	@RequestMapping("/getemps")
	public String emps(Map<String,Object> map){
		List<Employee> emps = employeeService.getEmps();
		map.put("allEmps", emps);
		return "list";
	}

}
5、编辑bean层和显示结果页
Employee.java
package com.test.springmvc.bean;


public class Employee {


	private Integer id;
	private String lastName;
	private String email;
	private String gender;

	public Employee() {
		super();
	}


	public Employee(Integer id, String lastName, String email, String gender) {
		super();
		this.id = id;
		this.lastName = lastName;
		this.email = email;
		this.gender = gender;
	}


	public Integer getId() {
		return id;
	}
	public void setId(Integer id) {
		this.id = id;
	}
	public String getLastName() {
		return lastName;
	}
	public void setLastName(String lastName) {
		this.lastName = lastName;
	}
	public String getEmail() {
		return email;
	}
	public void setEmail(String email) {
		this.email = email;
	}
	public String getGender() {
		return gender;
	}
	public void setGender(String gender) {
		this.gender = gender;
	}

	@Override
	public String toString() {
		return "Employee [id=" + id + ", lastName=" + lastName + ", email="
				+ email + ", gender=" + gender + "]";
	}

}
list.jsp
<%@ page language="java" contentType="text/html; charset=UTF-8"
    pageEncoding="UTF-8"%>
<%@taglib prefix="c" uri="http://java.sun.com/jsp/jstl/core" %>
<!DOCTYPE html PUBLIC "-//W3C//DTD HTML 4.01 Transitional//EN" "http://www.w3.org/TR/html4/loose.dtd">
<html>
<head>
<meta http-equiv="Content-Type" content="text/html; charset=UTF-8">
<title>员工列表</title>
</head>
<body>
	<table>
			<tr>
				<td>id</td>
				<td>lastName</td>
				<td>email</td>
				<td>gender</td>
			</tr>
		<c:forEach items="${allEmps }" var="emp">
			<tr>
				<td>${emp.id }</td>
				<td>${emp.lastName }</td>
				<td>${emp.email }</td>
				<td>${emp.gender }</td>
			</tr>
		</c:forEach>

	</table>

</body>
</html>
6、编辑Service层和Dao层
EmployeeService.java
package com.test.springmvc.service;

import java.util.List;

import org.apache.ibatis.session.SqlSession;
import org.springframework.beans.factory.annotation.Autowired;
import org.springframework.stereotype.Service;

import com.test.springmvc.bean.Employee;
import com.test.springmvc.dao.EmployeeMapper;

@Service
public class EmployeeService {

	@Autowired
	private EmployeeMapper employeeMapper;

	@Autowired
	private SqlSession sqlSession;

	public List<Employee> getEmps(){

		return employeeMapper.getEmps();
	}

}
EmployeeMapper.java
package com.test.springmvc.dao;


import java.util.List;

import com.test.springmvc.bean.Employee;


public interface EmployeeMapper {

	public Employee getEmpById(Integer id);

	public List<Employee> getEmps();


}
7、编辑applicationContext.xml
<?xml version="1.0" encoding="UTF-8"?>
<beans xmlns="http://www.springframework.org/schema/beans"
xmlns:xsi="http://www.w3.org/2001/XMLSchema-instance"
xmlns:context="http://www.springframework.org/schema/context"
xmlns:mybatis-spring="http://mybatis.org/schema/mybatis-spring"
xmlns:tx="http://www.springframework.org/schema/tx"
xsi:schemaLocation="http://www.springframework.org/schema/beans http://www.springframework.org/schema/beans/spring-beans.xsd
http://mybatis.org/schema/mybatis-spring http://mybatis.org/schema/mybatis-spring-1.2.xsd
http://www.springframework.org/schema/tx http://www.springframework.org/schema/tx/spring-tx-4.0.xsd
http://www.springframework.org/schema/context http://www.springframework.org/schema/context/spring-context-4.0.xsd">
<!-- Spring希望管理所有的业务逻辑组件,等。。。 -->
<context:component-scan base-package="com.test.springmvc">
<context:exclude-filter type="annotation"
expression="org.springframework.stereotype.Controller" />
</context:component-scan>
<!-- 引入数据库的配置文件 -->
<!--
<context:property-placeholder location="classpath:dbconfig.properties" />
Spring用来控制业务逻辑。数据源、事务控制、aop
<bean id="dataSource" class="com.mchange.v2.c3p0.ComboPooledDataSource">
<property name="jdbcUrl" value="${jdbc.url}"></property>
<property name="driverClass" value="${jdbc.driver}"></property>
<property name="user" value="${jdbc.username}"></property>
<property name="password" value="${jdbc.password}"></property>
</bean> -->
<bean id="dataSource" class="org.springframework.jdbc.datasource.DriverManagerDataSource">
<property name="driverClassName" value="com.mysql.jdbc.Driver" />
<!-- http://jingyan.baidu.com/article/b7001fe197a3f60e7282dd8d.html 中文数据库存取乱码问题 -->
<property name="url" value="jdbc:mysql://127.0.0.1:3306/mybatis?useUnicode=true&characterEncoding=UTF-8" />
<property name="username" value="root" />
<property name="password" value="Kitty521!" />
</bean>
<!-- <bean id="dataSource" class="org.springframework.jdbc.datasource.DriverManagerDataSource">
<property name="driverClassName">
<value>com.mysql.jdbc.Driver</value>
</property>
<property name="url">
<value>jdbc:mysql://127.0.0.1:3306/mybatis?useUnicode=true&characterEncoding=UTF-8
</value>
</property>
<property name="username">
<value>root</value>
</property>
<property name="password">
<value>Kitty521!</value>
</property>
</bean> -->
<!-- spring事务管理 -->
<bean id="dataSourceTransactionManager" class="org.springframework.jdbc.datasource.DataSourceTransactionManager">
<property name="dataSource" ref="dataSource"></property>
</bean>
<!-- 开启基于注解的事务 -->
<tx:annotation-driven transaction-manager="dataSourceTransactionManager"/>
<!--
整合mybatis
目的:1、spring管理所有组件。mapper的实现类。
service==>Dao @Autowired:自动注入mapper;
2、spring用来管理事务,spring声明式事务
-->
<!--创建出SqlSessionFactory对象 -->
<bean id="sqlSessionFactoryBean" class="org.mybatis.spring.SqlSessionFactoryBean">
<property name="dataSource" ref="dataSource"></property>
<!-- configLocation指定全局配置文件的位置 -->
<property name="configLocation" value="classpath:mybatis-config.xml"></property>
<!--mapperLocations: 指定mapper文件的位置-->
<property name="mapperLocations" value="classpath:mybatis/mapper/*.xml"></property>
</bean>
<!-- 扫描所有的mapper接口的实现,让这些mapper能够自动注入;
base-package:指定mapper接口的包名
-->
<mybatis-spring:scan base-package="com.test.springmvc.dao"/>
<!-- <bean class="org.mybatis.spring.mapper.MapperScannerConfigurer">
<property name="basePackage" value="com.test.springmvc.dao"></property>
</bean> -->
</beans>
8、数据库配置文件和mybatis全局配置文件
dbconfig.properties
jdbc.driver=com.mysql.jdbc.Driver
jdbc.url=jdbc:mysql://localhost:3306/mybatis?allowMultiQueries=true
jdbc.username=root
jdbc.password=Cool123!orcl.driver=oracle.jdbc.OracleDriver
orcl.url=jdbc:oracle:thin:@localhost:1521:orcl
orcl.username=scott
orcl.password=123456
mybatis-config.xml
<?xml version="1.0" encoding="UTF-8" ?>
<!DOCTYPE configuration
 PUBLIC "-//mybatis.org//DTD Config 3.0//EN"
 "http://mybatis.org/dtd/mybatis-3-config.dtd">
<configuration>

    <!--显式的指定每个我们需要更改的配置的值,即使他是默认的。防止版本更新带来的问题  -->
	<settings>

		<!-- 开启数据库字段 自动 驼峰大小写转换,比如数据库 last_name 字段 会自动转换 赋值给bean中 的 lastName 属性-->
		<setting name="mapUnderscoreToCamelCase" value="true"/>

		<!-- 主要是因为 插入 null 到 oracle会报错,因为插入类型是JdbcType OTHER ,所以这里设置类型 为 NULL  来解决oracle 插入null报错问题-->
		<setting name="jdbcTypeForNull" value="NULL"/>

		<!-- 下面两个设置,是为了开启 mybatis的 延迟加载功能 -->
		<setting name="lazyLoadingEnabled" value="true"/>
		<setting name="aggressiveLazyLoading" value="false"/>

	</settings>

	<!-- 给数据库类型取别名,方便SQL映射文件,可以根据不同类型数据库,来写相应SQL语句 -->
	<databaseIdProvider type="DB_VENDOR">
		<property name="MySQL" value="mysql"/>
		<property name="Oracle" value="oracle"/>
		<property name="SQL Server" value="sqlserver"/>
	</databaseIdProvider>

<!-- 已经在 spring ioc 容器中 配置了 sql 映射文件了,这里就不需要了写了,两个地方只要 有一个地方写了SQL映射文件就行
    <mappers>
	<mapper resource="mybatis/mapper/EmployeeMapper.xml" />
	</mappers> -->

</configuration>
9、mybatis之SQL映射文件
EmployeeMapper.xml
<?xml version="1.0" encoding="UTF-8" ?>
<!DOCTYPE mapper
 PUBLIC "-//mybatis.org//DTD Mapper 3.0//EN"
 "http://mybatis.org/dtd/mybatis-3-mapper.dtd">
<mapper namespace="com.test.springmvc.dao.EmployeeMapper">

	<!-- public Employee getEmpById(Integer id); -->
	<select id="getEmpById" resultType="com.test.springmvc.bean.Employee">
		select * from tbl_employee where id=#{id}
	</select>

	<!--public List<Employee> getEmps();  -->
	<select id="getEmps" resultType="com.test.springmvc.bean.Employee">
		select * from tbl_employee
	</select>
</mapper>