软件设计模式-设计模式资源

设计模式资源

本章列出了设计模式相关的网站、书籍和文章。

设计模式相关的网站

http://design-patterns.readthedocs.io/zh_CN/latest/index.html#

Java 设计模式有用的书籍

Java Design Patterns Head First Design Patterns

软件设计模式-J2EE模式-传输对象模式

传输对象模式


传输对象模式(Transfer Object Pattern)用于从客户端向服务器一次性传递带有多个属性的数据。传输对象也被称为数值对象。传输对象是一个具有 getter/setter 方法的简单的 POJO 类,它是可序列化的,所以它可以通过网络传输。它没有任何的行为。服务器端的业务类通常从数据库读取数据,然后填充 POJO,并把它发送到客户端或按值传递它。对于客户端,传输对象是只读的。客户端可以创建自己的传输对象,并把它传递给服务器,以便一次性更新数据库中的数值。以下是这种设计模式的实体。

  • 业务对象(Business Object) – 为传输对象填充数据的业务服务。
  • 传输对象(Transfer Object) – 简单的 POJO,只有设置/获取属性的方法。
  • 客户端(Client) – 客户端可以发送请求或者发送传输对象到业务对象。

实现


我们将创建一个作为业务对象的 StudentBO 和作为传输对象的 StudentVO,它们都代表了我们的实体。

TransferObjectPatternDemo,我们的演示类在这里是作为一个客户端,将使用 StudentBO 和 Student 来演示传输对象设计模式。

步骤 1

创建传输对象。

public class StudentVO {
   private String name;
   private int rollNo;
 
   StudentVO(String name, int rollNo){
      this.name = name;
      this.rollNo = rollNo;
   }
 
   public String getName() {
      return name;
   }
 
   public void setName(String name) {
      this.name = name;
   }
 
   public int getRollNo() {
      return rollNo;
   }
 
   public void setRollNo(int rollNo) {
      this.rollNo = rollNo;
   }
}

步骤 2

创建业务对象。

import java.util.ArrayList;
import java.util.List;
 
public class StudentBO {
   
   //列表是当作一个数据库
   List<StudentVO> students;
 
   public StudentBO(){
      students = new ArrayList<StudentVO>();
      StudentVO student1 = new StudentVO("Robert",0);
      StudentVO student2 = new StudentVO("John",1);
      students.add(student1);
      students.add(student2);    
   }
   public void deleteStudent(StudentVO student) {
      students.remove(student.getRollNo());
      System.out.println("Student: Roll No " 
      + student.getRollNo() +", deleted from database");
   }
 
   //从数据库中检索学生名单
   public List<StudentVO> getAllStudents() {
      return students;
   }
 
   public StudentVO getStudent(int rollNo) {
      return students.get(rollNo);
   }
 
   public void updateStudent(StudentVO student) {
      students.get(student.getRollNo()).setName(student.getName());
      System.out.println("Student: Roll No " 
      + student.getRollNo() +", updated in the database");
   }
}

步骤 3

使用 StudentBO 来演示传输对象设计模式。

public class TransferObjectPatternDemo {
   public static void main(String[] args) {
      StudentBO studentBusinessObject = new StudentBO();
 
      //输出所有的学生
      for (StudentVO student : studentBusinessObject.getAllStudents()) {
         System.out.println("Student: [RollNo : "
         +student.getRollNo()+", Name : "+student.getName()+" ]");
      }
 
      //更新学生
      StudentVO student =studentBusinessObject.getAllStudents().get(0);
      student.setName("Michael");
      studentBusinessObject.updateStudent(student);
 
      //获取学生
      studentBusinessObject.getStudent(0);
      System.out.println("Student: [RollNo : "
      +student.getRollNo()+", Name : "+student.getName()+" ]");
   }
}

步骤 4

执行程序,输出结果:

Student: [RollNo : 0, Name : Robert ]
Student: [RollNo : 1, Name : John ]
Student: Roll No 0, updated in the database
Student: [RollNo : 0, Name : Michael ]


软件设计模式-J2EE模式-服务定位器模式

服务定位器模式


服务定位器模式(Service Locator Pattern)用在我们想使用 JNDI 查询定位各种服务的时候。考虑到为某个服务查找 JNDI 的代价很高,服务定位器模式充分利用了缓存技术。在首次请求某个服务时,服务定位器在 JNDI 中查找服务,并缓存该服务对象。当再次请求相同的服务时,服务定位器会在它的缓存中查找,这样可以在很大程度上提高应用程序的性能。以下是这种设计模式的实体。

  • 服务(Service) – 实际处理请求的服务。对这种服务的引用可以在 JNDI 服务器中查找到。
  • Context / 初始的 Context – JNDI Context 带有对要查找的服务的引用。
  • 服务定位器(Service Locator) – 服务定位器是通过 JNDI 查找和缓存服务来获取服务的单点接触。
  • 缓存(Cache) – 缓存存储服务的引用,以便复用它们。
  • 客户端(Client) – Client 是通过 ServiceLocator 调用服务的对象。

实现


我们将创建 ServiceLocatorInitialContextCacheService 作为表示实体的各种对象。Service1 和 Service2 表示实体服务。

ServiceLocatorPatternDemo,我们的演示类在这里是作为一个客户端,将使用 ServiceLocator 来演示服务定位器设计模式。

步骤 1

创建服务接口 Service。

public interface Service {
   public String getName();
   public void execute();
}

步骤 2

创建实体服务。

public class Service1 implements Service {
   public void execute(){
      System.out.println("Executing Service1");
   }
 
   @Override
   public String getName() {
      return "Service1";
   }
}
public class Service2 implements Service {
   public void execute(){
      System.out.println("Executing Service2");
   }
 
   @Override
   public String getName() {
      return "Service2";
   }
}

步骤 3

为 JNDI 查询创建 InitialContext。

public class InitialContext {
   public Object lookup(String jndiName){
      if(jndiName.equalsIgnoreCase("SERVICE1")){
         System.out.println("Looking up and creating a new Service1 object");
         return new Service1();
      }else if (jndiName.equalsIgnoreCase("SERVICE2")){
         System.out.println("Looking up and creating a new Service2 object");
         return new Service2();
      }
      return null;      
   }
}

步骤 4

创建缓存 Cache。

import java.util.ArrayList;
import java.util.List;
 
public class Cache {
 
   private List<Service> services;
 
   public Cache(){
      services = new ArrayList<Service>();
   }
 
   public Service getService(String serviceName){
      for (Service service : services) {
         if(service.getName().equalsIgnoreCase(serviceName)){
            System.out.println("Returning cached  "+serviceName+" object");
            return service;
         }
      }
      return null;
   }
 
   public void addService(Service newService){
      boolean exists = false;
      for (Service service : services) {
         if(service.getName().equalsIgnoreCase(newService.getName())){
            exists = true;
         }
      }
      if(!exists){
         services.add(newService);
      }
   }
}

步骤 5

创建服务定位器。

public class ServiceLocator {
   private static Cache cache;
 
   static {
      cache = new Cache();    
   }
 
   public static Service getService(String jndiName){
 
      Service service = cache.getService(jndiName);
 
      if(service != null){
         return service;
      }
 
      InitialContext context = new InitialContext();
      Service service1 = (Service)context.lookup(jndiName);
      cache.addService(service1);
      return service1;
   }
}

步骤 6

使用 ServiceLocator 来演示服务定位器设计模式。

public class ServiceLocatorPatternDemo {
   public static void main(String[] args) {
      Service service = ServiceLocator.getService("Service1");
      service.execute();
      service = ServiceLocator.getService("Service2");
      service.execute();
      service = ServiceLocator.getService("Service1");
      service.execute();
      service = ServiceLocator.getService("Service2");
      service.execute();      
   }
}

步骤 7

执行程序,输出结果:

Looking up and creating a new Service1 object
Executing Service1
Looking up and creating a new Service2 object
Executing Service2
Returning cached  Service1 object
Executing Service1
Returning cached  Service2 object
Executing Service2


软件设计模式-J2EE模式-拦截过滤器模式

拦截过滤器模式


拦截过滤器模式(Intercepting Filter Pattern)用于对应用程序的请求或响应做一些预处理/后处理。定义过滤器,并在把请求传给实际目标应用程序之前应用在请求上。过滤器可以做认证/授权/记录日志,或者跟踪请求,然后把请求传给相应的处理程序。以下是这种设计模式的实体。

  • 过滤器(Filter) – 过滤器在请求处理程序执行请求之前或之后,执行某些任务。
  • 过滤器链(Filter Chain) – 过滤器链带有多个过滤器,并在 Target 上按照定义的顺序执行这些过滤器。
  • Target – Target 对象是请求处理程序。
  • 过滤管理器(Filter Manager) – 过滤管理器管理过滤器和过滤器链。
  • 客户端(Client) – Client 是向 Target 对象发送请求的对象。

实现


我们将创建 FilterChainFilterManagerTargetClient 作为表示实体的各种对象。AuthenticationFilter 和 DebugFilter 表示实体过滤器。

InterceptingFilterDemo,我们的演示类使用 Client 来演示拦截过滤器设计模式。

步骤 1

创建过滤器接口 Filter。

public interface Filter {
   public void execute(String request);
}

步骤 2

创建实体过滤器。

public class AuthenticationFilter implements Filter {
   public void execute(String request){
      System.out.println("Authenticating request: " + request);
   }
}
public class DebugFilter implements Filter {
   public void execute(String request){
      System.out.println("request log: " + request);
   }
}

步骤 3

创建 Target。

public class Target {
   public void execute(String request){
      System.out.println("Executing request: " + request);
   }
}

步骤 4

创建过滤器链。

import java.util.ArrayList;
import java.util.List;
 
public class FilterChain {
   private List<Filter> filters = new ArrayList<Filter>();
   private Target target;
 
   public void addFilter(Filter filter){
      filters.add(filter);
   }
 
   public void execute(String request){
      for (Filter filter : filters) {
         filter.execute(request);
      }
      target.execute(request);
   }
 
   public void setTarget(Target target){
      this.target = target;
   }
}

步骤 5

创建过滤管理器。

public class FilterManager {
   FilterChain filterChain;
 
   public FilterManager(Target target){
      filterChain = new FilterChain();
      filterChain.setTarget(target);
   }
   public void setFilter(Filter filter){
      filterChain.addFilter(filter);
   }
 
   public void filterRequest(String request){
      filterChain.execute(request);
   }
}

步骤 6

创建客户端 Client。

public class Client {
   FilterManager filterManager;
 
   public void setFilterManager(FilterManager filterManager){
      this.filterManager = filterManager;
   }
 
   public void sendRequest(String request){
      filterManager.filterRequest(request);
   }
}

步骤 7

使用 Client 来演示拦截过滤器设计模式。

public class InterceptingFilterDemo {
   public static void main(String[] args) {
      FilterManager filterManager = new FilterManager(new Target());
      filterManager.setFilter(new AuthenticationFilter());
      filterManager.setFilter(new DebugFilter());
 
      Client client = new Client();
      client.setFilterManager(filterManager);
      client.sendRequest("HOME");
   }
}

步骤 8

执行程序,输出结果:

Authenticating request: HOME
request log: HOME
Executing request: HOME


软件设计模式-J2EE模式-前端控制器模式

前端控制器模式


前端控制器模式(Front Controller Pattern)是用来提供一个集中的请求处理机制,所有的请求都将由一个单一的处理程序处理。该处理程序可以做认证/授权/记录日志,或者跟踪请求,然后把请求传给相应的处理程序。以下是这种设计模式的实体。

  • 前端控制器(Front Controller) – 处理应用程序所有类型请求的单个处理程序,应用程序可以是基于 web 的应用程序,也可以是基于桌面的应用程序。
  • 调度器(Dispatcher) – 前端控制器可能使用一个调度器对象来调度请求到相应的具体处理程序。
  • 视图(View) – 视图是为请求而创建的对象。

实现


我们将创建 FrontControllerDispatcher 分别当作前端控制器和调度器。HomeView 和 StudentView 表示各种为前端控制器接收到的请求而创建的视图。

FrontControllerPatternDemo,我们的演示类使用 FrontController 来演示前端控制器设计模式。

步骤 1

创建视图。

public class HomeView {
   public void show(){
      System.out.println("Displaying Home Page");
   }
}
public class StudentView {
   public void show(){
      System.out.println("Displaying Student Page");
   }
}

步骤 2

创建调度器 Dispatcher。

public class Dispatcher {
   private StudentView studentView;
   private HomeView homeView;
   public Dispatcher(){
      studentView = new StudentView();
      homeView = new HomeView();
   }
 
   public void dispatch(String request){
      if(request.equalsIgnoreCase("STUDENT")){
         studentView.show();
      }else{
         homeView.show();
      }  
   }
}

步骤 3

创建前端控制器 FrontController。

public class FrontController {
   
   private Dispatcher dispatcher;
 
   public FrontController(){
      dispatcher = new Dispatcher();
   }
 
   private boolean isAuthenticUser(){
      System.out.println("User is authenticated successfully.");
      return true;
   }
 
   private void trackRequest(String request){
      System.out.println("Page requested: " + request);
   }
 
   public void dispatchRequest(String request){
      //记录每一个请求
      trackRequest(request);
      //对用户进行身份验证
      if(isAuthenticUser()){
         dispatcher.dispatch(request);
      }  
   }
}

步骤 4

使用 FrontController 来演示前端控制器设计模式。

public class FrontControllerPatternDemo {
   public static void main(String[] args) {
      FrontController frontController = new FrontController();
      frontController.dispatchRequest("HOME");
      frontController.dispatchRequest("STUDENT");
   }
}

步骤 5

执行程序,输出结果:

Page requested: HOME
User is authenticated successfully.
Displaying Home Page
Page requested: STUDENT
User is authenticated successfully.
Displaying Student Page


软件设计模式-J2EE模式-数据访问对象模式

数据访问对象模式


数据访问对象模式(Data Access Object Pattern)或 DAO 模式用于把低级的数据访问 API 或操作从高级的业务服务中分离出来。以下是数据访问对象模式的参与者。

  • 数据访问对象接口(Data Access Object Interface) – 该接口定义了在一个模型对象上要执行的标准操作。
  • 数据访问对象实体类(Data Access Object concrete class) – 该类实现了上述的接口。该类负责从数据源获取数据,数据源可以是数据库,也可以是 xml,或者是其他的存储机制。
  • 模型对象/数值对象(Model Object/Value Object) – 该对象是简单的 POJO,包含了 get/set 方法来存储通过使用 DAO 类检索到的数据。

实现


我们将创建一个作为模型对象或数值对象的 Student 对象。StudentDao 是数据访问对象接口。StudentDaoImpl 是实现了数据访问对象接口的实体类。DaoPatternDemo,我们的演示类使用 StudentDao 来演示数据访问对象模式的用法。

步骤 1

创建数值对象。

public class Student {
   private String name;
   private int rollNo;
 
   Student(String name, int rollNo){
      this.name = name;
      this.rollNo = rollNo;
   }
 
   public String getName() {
      return name;
   }
 
   public void setName(String name) {
      this.name = name;
   }
 
   public int getRollNo() {
      return rollNo;
   }
 
   public void setRollNo(int rollNo) {
      this.rollNo = rollNo;
   }
}

步骤 2

创建数据访问对象接口。

import java.util.List;
 
public interface StudentDao {
   public List<Student> getAllStudents();
   public Student getStudent(int rollNo);
   public void updateStudent(Student student);
   public void deleteStudent(Student student);
}

步骤 3

创建实现了上述接口的实体类。

import java.util.ArrayList;
import java.util.List;
 
public class StudentDaoImpl implements StudentDao {
   
   //列表是当作一个数据库
   List<Student> students;
 
   public StudentDaoImpl(){
      students = new ArrayList<Student>();
      Student student1 = new Student("Robert",0);
      Student student2 = new Student("John",1);
      students.add(student1);
      students.add(student2);    
   }
   @Override
   public void deleteStudent(Student student) {
      students.remove(student.getRollNo());
      System.out.println("Student: Roll No " + student.getRollNo() 
         +", deleted from database");
   }
 
   //从数据库中检索学生名单
   @Override
   public List<Student> getAllStudents() {
      return students;
   }
 
   @Override
   public Student getStudent(int rollNo) {
      return students.get(rollNo);
   }
 
   @Override
   public void updateStudent(Student student) {
      students.get(student.getRollNo()).setName(student.getName());
      System.out.println("Student: Roll No " + student.getRollNo() 
         +", updated in the database");
   }
}

步骤 4

使用 StudentDao 来演示数据访问对象模式的用法。

public class DaoPatternDemo {
   public static void main(String[] args) {
      StudentDao studentDao = new StudentDaoImpl();
 
      //输出所有的学生
      for (Student student : studentDao.getAllStudents()) {
         System.out.println("Student: [RollNo : "
            +student.getRollNo()+", Name : "+student.getName()+" ]");
      }
 
 
      //更新学生
      Student student =studentDao.getAllStudents().get(0);
      student.setName("Michael");
      studentDao.updateStudent(student);
 
      //获取学生
      studentDao.getStudent(0);
      System.out.println("Student: [RollNo : "
         +student.getRollNo()+", Name : "+student.getName()+" ]");      
   }
}

步骤 5

执行程序,输出结果:

Student: [RollNo : 0, Name : Robert ]
Student: [RollNo : 1, Name : John ]
Student: Roll No 0, updated in the database
Student: [RollNo : 0, Name : Michael ]


软件设计模式-J2EE模式-组合实体模式

组合实体模式


组合实体模式(Composite Entity Pattern)用在 EJB 持久化机制中。一个组合实体是一个 EJB 实体 bean,代表了对象的图解。当更新一个组合实体时,内部依赖对象 beans 会自动更新,因为它们是由 EJB 实体 bean 管理的。以下是组合实体 bean 的参与者。

  • 组合实体(Composite Entity) – 它是主要的实体 bean。它可以是粗粒的,或者可以包含一个粗粒度对象,用于持续生命周期。
  • 粗粒度对象(Coarse-Grained Object) – 该对象包含依赖对象。它有自己的生命周期,也能管理依赖对象的生命周期。
  • 依赖对象(Dependent Object) – 依赖对象是一个持续生命周期依赖于粗粒度对象的对象。
  • 策略(Strategies) – 策略表示如何实现组合实体。

实现


我们将创建作为组合实体的 CompositeEntity 对象。CoarseGrainedObject 是一个包含依赖对象的类。

CompositeEntityPatternDemo,我们的演示类使用 Client 类来演示组合实体模式的用法。

步骤 1

创建依赖对象。

public class DependentObject1 {
   
   private String data;
 
   public void setData(String data){
      this.data = data; 
   } 
 
   public String getData(){
      return data;
   }
}
public class DependentObject2 {
   
   private String data;
 
   public void setData(String data){
      this.data = data; 
   } 
 
   public String getData(){
      return data;
   }
}

步骤 2

创建粗粒度对象。

public class CoarseGrainedObject {
   DependentObject1 do1 = new DependentObject1();
   DependentObject2 do2 = new DependentObject2();
 
   public void setData(String data1, String data2){
      do1.setData(data1);
      do2.setData(data2);
   }
 
   public String[] getData(){
      return new String[] {do1.getData(),do2.getData()};
   }
}

步骤 3

创建组合实体。

public class CompositeEntity {
   private CoarseGrainedObject cgo = new CoarseGrainedObject();
 
   public void setData(String data1, String data2){
      cgo.setData(data1, data2);
   }
 
   public String[] getData(){
      return cgo.getData();
   }
}

步骤 4

创建使用组合实体的客户端类。

public class Client {
   private CompositeEntity compositeEntity = new CompositeEntity();
 
   public void printData(){
      for (int i = 0; i < compositeEntity.getData().length; i++) {
         System.out.println("Data: " + compositeEntity.getData()[i]);
      }
   }
 
   public void setData(String data1, String data2){
      compositeEntity.setData(data1, data2);
   }
}

步骤 5

使用 Client 来演示组合实体设计模式的用法。

public class CompositeEntityPatternDemo {
   public static void main(String[] args) {
       Client client = new Client();
       client.setData("Test", "Data");
       client.printData();
       client.setData("Second Test", "Data1");
       client.printData();
   }
}

步骤 6

执行程序,输出结果:

Data: Test
Data: Data
Data: Second Test
Data: Data1


软件设计模式-J2EE模式-业务代表模式

业务代表模式


业务代表模式(Business Delegate Pattern)用于对表示层和业务层解耦。它基本上是用来减少通信或对表示层代码中的业务层代码的远程查询功能。在业务层中我们有以下实体。

  • 客户端(Client) – 表示层代码可以是 JSP、servlet 或 UI java 代码。
  • 业务代表(Business Delegate) – 一个为客户端实体提供的入口类,它提供了对业务服务方法的访问。
  • 查询服务(LookUp Service) – 查找服务对象负责获取相关的业务实现,并提供业务对象对业务代表对象的访问。
  • 业务服务(Business Service) – 业务服务接口。实现了该业务服务的实体类,提供了实际的业务实现逻辑。

实现


我们将创建 ClientBusinessDelegateBusinessServiceLookUpServiceJMSService 和 EJBService 来表示业务代表模式中的各种实体。

BusinessDelegatePatternDemo,我们的演示类使用 BusinessDelegate 和 Client 来演示业务代表模式的用法。

步骤 1

创建 BusinessService 接口。

public interface BusinessService {
   public void doProcessing();
}

步骤 2

创建实体服务类。

public class EJBService implements BusinessService {
 
   @Override
   public void doProcessing() {
      System.out.println("Processing task by invoking EJB Service");
   }
}
public class JMSService implements BusinessService {
 
   @Override
   public void doProcessing() {
      System.out.println("Processing task by invoking JMS Service");
   }
}

步骤 3

创建业务查询服务。

public class BusinessLookUp {
   public BusinessService getBusinessService(String serviceType){
      if(serviceType.equalsIgnoreCase("EJB")){
         return new EJBService();
      }else {
         return new JMSService();
      }
   }
}

步骤 4

创建业务代表。

public class BusinessDelegate {
   private BusinessLookUp lookupService = new BusinessLookUp();
   private BusinessService businessService;
   private String serviceType;
 
   public void setServiceType(String serviceType){
      this.serviceType = serviceType;
   }
 
   public void doTask(){
      businessService = lookupService.getBusinessService(serviceType);
      businessService.doProcessing();     
   }
}

步骤 5

创建客户端。

public class Client {
   
   BusinessDelegate businessService;
 
   public Client(BusinessDelegate businessService){
      this.businessService  = businessService;
   }
 
   public void doTask(){      
      businessService.doTask();
   }
}

步骤 6

使用 BusinessDelegate 和 Client 类来演示业务代表模式。

public class BusinessDelegatePatternDemo {
   
   public static void main(String[] args) {
 
      BusinessDelegate businessDelegate = new BusinessDelegate();
      businessDelegate.setServiceType("EJB");
 
      Client client = new Client(businessDelegate);
      client.doTask();
 
      businessDelegate.setServiceType("JMS");
      client.doTask();
   }
}

步骤 7

执行程序,输出结果:

Processing task by invoking EJB Service
Processing task by invoking JMS Service


软件设计模式-J2EE模式-MVC模式

MVC 模式


MVC 模式代表 Model-View-Controller(模型-视图-控制器) 模式。这种模式用于应用程序的分层开发。

  • Model(模型) – 模型代表一个存取数据的对象或 JAVA POJO。它也可以带有逻辑,在数据变化时更新控制器。
  • View(视图) – 视图代表模型包含的数据的可视化。
  • Controller(控制器) – 控制器作用于模型和视图上。它控制数据流向模型对象,并在数据变化时更新视图。它使视图与模型分离开。

实现


我们将创建一个作为模型的 Student 对象。StudentView 是一个把学生详细信息输出到控制台的视图类,StudentController 是负责存储数据到 Student 对象中的控制器类,并相应地更新视图 StudentView

MVCPatternDemo,我们的演示类使用 StudentController 来演示 MVC 模式的用法。

步骤 1

创建模型。

public class Student {
   private String rollNo;
   private String name;
   public String getRollNo() {
      return rollNo;
   }
   public void setRollNo(String rollNo) {
      this.rollNo = rollNo;
   }
   public String getName() {
      return name;
   }
   public void setName(String name) {
      this.name = name;
   }
}

步骤 2

创建视图。

public class StudentView {
   public void printStudentDetails(String studentName, String studentRollNo){
      System.out.println("Student: ");
      System.out.println("Name: " + studentName);
      System.out.println("Roll No: " + studentRollNo);
   }
}

步骤 3

创建控制器。

public class StudentController {
   private Student model;
   private StudentView view;
 
   public StudentController(Student model, StudentView view){
      this.model = model;
      this.view = view;
   }
 
   public void setStudentName(String name){
      model.setName(name);    
   }
 
   public String getStudentName(){
      return model.getName();    
   }
 
   public void setStudentRollNo(String rollNo){
      model.setRollNo(rollNo);      
   }
 
   public String getStudentRollNo(){
      return model.getRollNo();     
   }
 
   public void updateView(){           
      view.printStudentDetails(model.getName(), model.getRollNo());
   }  
}

步骤 4

使用 StudentController 方法来演示 MVC 设计模式的用法。

public class MVCPatternDemo {
   public static void main(String[] args) {
 
      //从数据库获取学生记录
      Student model  = retriveStudentFromDatabase();
 
      //创建一个视图:把学生详细信息输出到控制台
      StudentView view = new StudentView();
 
      StudentController controller = new StudentController(model, view);
 
      controller.updateView();
 
      //更新模型数据
      controller.setStudentName("John");
 
      controller.updateView();
   }
 
   private static Student retriveStudentFromDatabase(){
      Student student = new Student();
      student.setName("Robert");
      student.setRollNo("10");
      return student;
   }
}

步骤 5

执行程序,输出结果:

Student: 
Name: Robert
Roll No: 10
Student: 
Name: John
Roll No: 10


软件设计模式-行为型模式-访问者模式

访问者模式


在访问者模式(Visitor Pattern)中,我们使用了一个访问者类,它改变了元素类的执行算法。通过这种方式,元素的执行算法可以随着访问者改变而改变。这种类型的设计模式属于行为型模式。根据模式,元素对象已接受访问者对象,这样访问者对象就可以处理元素对象上的操作。

介绍


意图:主要将数据结构与数据操作分离。

主要解决:稳定的数据结构和易变的操作耦合问题。

何时使用:需要对一个对象结构中的对象进行很多不同的并且不相关的操作,而需要避免让这些操作”污染”这些对象的类,使用访问者模式将这些封装到类中。

如何解决:在被访问的类里面加一个对外提供接待访问者的接口。

关键代码:在数据基础类里面有一个方法接受访问者,将自身引用传入访问者。

应用实例:您在朋友家做客,您是访问者,朋友接受您的访问,您通过朋友的描述,然后对朋友的描述做出一个判断,这就是访问者模式。

优点: 1、符合单一职责原则。 2、优秀的扩展性。 3、灵活性。

缺点: 1、具体元素对访问者公布细节,违反了迪米特原则。 2、具体元素变更比较困难。 3、违反了依赖倒置原则,依赖了具体类,没有依赖抽象。

使用场景: 1、对象结构中对象对应的类很少改变,但经常需要在此对象结构上定义新的操作。 2、需要对一个对象结构中的对象进行很多不同的并且不相关的操作,而需要避免让这些操作”污染”这些对象的类,也不希望在增加新操作时修改这些类。

注意事项:访问者可以对功能进行统一,可以做报表、UI、拦截器与过滤器。
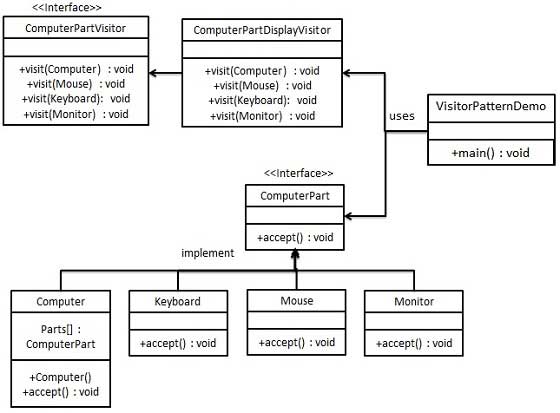
实现


我们将创建一个定义接受操作的 ComputerPart 接口。KeyboardMouseMonitor 和 Computer 是实现了 ComputerPart 接口的实体类。我们将定义另一个接口 ComputerPartVisitor,它定义了访问者类的操作。Computer 使用实体访问者来执行相应的动作。

VisitorPatternDemo,我们的演示类使用 ComputerComputerPartVisitor 类来演示访问者模式的用法。

步骤 1

定义一个表示元素的接口。

public interface ComputerPart {
   public void accept(ComputerPartVisitor computerPartVisitor);
}

步骤 2

创建扩展了上述类的实体类。

public class Keyboard  implements ComputerPart {
 
   @Override
   public void accept(ComputerPartVisitor computerPartVisitor) {
      computerPartVisitor.visit(this);
   }
}
public class Monitor  implements ComputerPart {
 
   @Override
   public void accept(ComputerPartVisitor computerPartVisitor) {
      computerPartVisitor.visit(this);
   }
}
public class Mouse  implements ComputerPart {
 
   @Override
   public void accept(ComputerPartVisitor computerPartVisitor) {
      computerPartVisitor.visit(this);
   }
}
public class Computer implements ComputerPart {
   
   ComputerPart[] parts;
 
   public Computer(){
      parts = new ComputerPart[] {new Mouse(), new Keyboard(), new Monitor()};      
   } 
 
 
   @Override
   public void accept(ComputerPartVisitor computerPartVisitor) {
      for (int i = 0; i < parts.length; i++) {
         parts[i].accept(computerPartVisitor);
      }
      computerPartVisitor.visit(this);
   }
}

步骤 3

定义一个表示访问者的接口。

public interface ComputerPartVisitor {
   public void visit(Computer computer);
   public void visit(Mouse mouse);
   public void visit(Keyboard keyboard);
   public void visit(Monitor monitor);
}

步骤 4

创建实现了上述类的实体访问者。

public class ComputerPartDisplayVisitor implements ComputerPartVisitor {
 
   @Override
   public void visit(Computer computer) {
      System.out.println("Displaying Computer.");
   }
 
   @Override
   public void visit(Mouse mouse) {
      System.out.println("Displaying Mouse.");
   }
 
   @Override
   public void visit(Keyboard keyboard) {
      System.out.println("Displaying Keyboard.");
   }
 
   @Override
   public void visit(Monitor monitor) {
      System.out.println("Displaying Monitor.");
   }
}

步骤 5

使用 ComputerPartDisplayVisitor 来显示 Computer 的组成部分。

public class VisitorPatternDemo {
   public static void main(String[] args) {
 
      ComputerPart computer = new Computer();
      computer.accept(new ComputerPartDisplayVisitor());
   }
}

步骤 6

执行程序,输出结果:

Displaying Mouse.
Displaying Keyboard.
Displaying Monitor.
Displaying Computer.