springmvc原理-POJO对象是如何赋值的及PUT请求如何赋值

SpringMVC封装POJO对象的时候,会调用request.getParamter(“属性名”) 并赋值给 POJO中每个属性。


在Tomcat 服务器中:

如果是POST请求:
1、会将请求体中的数据,封装一个map。
2、request.getParameter(“empName”)就会从这个map中取值。
3、SpringMVC封装POJO对象的时候,会调用request.getParamter(“属性名”) 并赋值给 POJO中每个属性。

如果是PUT请求:
Tomcat一看是PUT不会封装请求体中的数据为map,只有POST形式的请求才封装请求体为map
所以请求体中的数据,request.getParameter(“empName”)拿不到。

下面是Tomcat源代码的处理逻辑,只有post请求,才能封装请求体为map对象。

 * org.apache.catalina.connector.Request(类名)--parseParameters(方法名) (3111行);
	 * 
	 * protected String parseBodyMethods = "POST";
	 * if( !getConnector().isParseBodyMethod(getMethod()) ) {
                success = true;
                return;
            }
	 *

 put传递数据解决方案

我们要能支持直接发送PUT之类的请求还要封装请求体中的数据
1、配置上HttpPutFormContentFilter;
2、他的作用;将请求体中的数据解析包装成一个map。
3、request被重新包装,request.getParameter()被重写,就会从自己封装的map中取数据

在web.xml中配置过滤器,

<filter>
	<filter-name>HttpPutFormContentFilter</filter-name>
	<filter-class>org.springframework.web.filter.HttpPutFormContentFilter</filter-class>
</filter>
<filter-mapping>
	<filter-name>HttpPutFormContentFilter</filter-name>
	<url-pattern>/*</url-pattern>
</filter-mapping>

大致的原理就是:

HttpServletRequest 本来就是 一个接口,在之前的接口实现类中,我们又添加了HttpPutFormContentFilter对象,并重写了 之前接口实现类的getParameter方法,该方法内部调用的是 HttpPutFormContentFilter 里面的方法。

springmvc踩坑-service文件没有标注且返回值null

在我们自动新建一个服务类时,因为方便,有时会忘记给类添加 @Service注解

甚至忘记 将返回值 添加好。

package com.ssm.crud.service;

import java.util.List;

import org.springframework.beans.factory.annotation.Autowired;
import org.springframework.stereotype.Service;

import com.ssm.crud.bean.Employee;
import com.ssm.crud.mapper.EmployeeMapper;

@Service
public class employeeService {

	@Autowired
	EmployeeMapper employeeMapper;
	
	public  List<Employee> getAll() {
        employeeMapper.selectByExampleWithDept(null);
		return null;
	}//上面这个地方 的返回值 默认是null  而我们需要的操作是 return  employeeMapper.selectByExampleWithDept(null);


}


springmvc基础-springmvc与struts2的比较

①. Spring MVC 的入口是 Servlet, 而 Struts2 是 Filter •
②. Spring MVC 会稍微比 Struts2 快些. Spring MVC 是基 •
于方法设计, 而 Sturts2 是基于类, 每次发一次请求都会实
例一个 Action.
③. Spring MVC 使用更加简洁, 开发效率Spring MVC确实 •
比 struts2 高: 支持 JSR303, 处理 ajax 的请求更方便
④. Struts2 的 • OGNL 表达式使页面的开发效率相比
Spring MVC 更高些.

springmvc基础-springmvc与spring的整合与关系

<!--  
	需要进行 Spring 整合 SpringMVC 吗 ?
	还是否需要再加入 Spring 的 IOC 容器 ?
	是否需要再 web.xml 文件中配置启动 Spring IOC 容器的 ContextLoaderListener ?
		
	1. 需要: 通常情况下, 类似于数据源, 事务, 整合其他框架都是放在 Spring 的配置文件中(而不是放在 SpringMVC 的配置文件中).
	实际上放入 Spring 配置文件对应的 IOC 容器中的还有 Service 和 Dao. 
	2. 不需要: 都放在 SpringMVC 的配置文件中. 也可以分多个 Spring 的配置文件, 然后使用 import 节点导入其他的配置文件
-->
	
<!--  
	问题: 若 Spring 的 IOC 容器和 SpringMVC 的 IOC 容器扫描的包有重合的部分, 就会导致有的 bean 会被创建 2 次.
	解决:
	1. 使 Spring 的 IOC 容器扫描的包和 SpringMVC 的 IOC 容器扫描的包没有重合的部分. 
	2. 使用 exclude-filter 和 include-filter 子节点来规定只能扫描的注解
-->
	
<!--  
	SpringMVC 的 IOC 容器中的 bean 可以来引用 Spring IOC 容器中的 bean. 
	返回来呢 ? 反之则不行. Spring IOC 容器中的 bean 却不能来引用 SpringMVC IOC 容器中的 bean!
-->

一、springmvc与spring的整合举例:

1、配置 web.xml ,配置了两个容器。

<?xml version="1.0" encoding="UTF-8"?>
<web-app xmlns:xsi="http://www.w3.org/2001/XMLSchema-instance" xmlns="http://java.sun.com/xml/ns/javaee" xsi:schemaLocation="http://java.sun.com/xml/ns/javaee http://java.sun.com/xml/ns/javaee/web-app_2_5.xsd" id="WebApp_ID" version="2.5">
  
  	<!-- 配置启动 Spring IOC 容器的 Listener -->
	<!-- needed for ContextLoaderListener -->
	<context-param>
		<param-name>contextConfigLocation</param-name>
		<param-value>classpath:springioc.xml</param-value>
	</context-param>

	<!-- Bootstraps the root web application context before servlet initialization -->
	<listener>
		<listener-class>org.springframework.web.context.ContextLoaderListener</listener-class>
	</listener>
  
  
  <servlet>
    <servlet-name>dispatcherServlet</servlet-name>
    <servlet-class>org.springframework.web.servlet.DispatcherServlet</servlet-class>
    <init-param>
      <param-name>contextConfigLocation</param-name>
      <param-value>classpath:springmvc.xml</param-value>
    </init-param>
    <load-on-startup>1</load-on-startup>
  </servlet>
  <servlet-mapping>
    <servlet-name>dispatcherServlet</servlet-name>
    <url-pattern>/</url-pattern>
  </servlet-mapping>

</web-app>

2、配置父容器 springioc.xml

<?xml version="1.0" encoding="UTF-8"?>
<beans xmlns="http://www.springframework.org/schema/beans"
	xmlns:xsi="http://www.w3.org/2001/XMLSchema-instance"
	xmlns:context="http://www.springframework.org/schema/context"
	xsi:schemaLocation="http://www.springframework.org/schema/beans http://www.springframework.org/schema/beans/spring-beans.xsd
		http://www.springframework.org/schema/context http://www.springframework.org/schema/context/spring-context-4.0.xsd">

    <context:component-scan base-package="com.test.springmvc">
		<context:exclude-filter type="annotation" 
			expression="org.springframework.stereotype.Controller"/>
		<context:exclude-filter type="annotation" 
			expression="org.springframework.web.bind.annotation.ControllerAdvice"/>
	</context:component-scan>

	<!-- 配置数据源, 整合其他框架, 事务等. -->

</beans>

3、配置springmvc.xml

<?xml version="1.0" encoding="UTF-8"?>
<beans xmlns="http://www.springframework.org/schema/beans"
	xmlns:xsi="http://www.w3.org/2001/XMLSchema-instance"
	xmlns:context="http://www.springframework.org/schema/context"
	xmlns:mvc="http://www.springframework.org/schema/mvc"
	xsi:schemaLocation="http://www.springframework.org/schema/beans http://www.springframework.org/schema/beans/spring-beans.xsd
		http://www.springframework.org/schema/context http://www.springframework.org/schema/context/spring-context-4.0.xsd
		http://www.springframework.org/schema/mvc http://www.springframework.org/schema/mvc/spring-mvc-4.0.xsd">

	<!-- 配置自动扫描的包 -->
	<context:component-scan base-package="com.test.springmvc" use-default-filters="false">
		<context:include-filter type="annotation" 
			expression="org.springframework.stereotype.Controller"/>
		<context:include-filter type="annotation" 
			expression="org.springframework.web.bind.annotation.ControllerAdvice"/>
	</context:component-scan>
	
	<!-- 配置视图解析器 -->
	<bean class="org.springframework.web.servlet.view.InternalResourceViewResolver">
		<property name="prefix" value="/WEB-INF/views/"></property>
		<property name="suffix" value=".jsp"></property>
	</bean>


</beans>

4、编辑服务器:

package com.test.springmvc.handlers;

import org.springframework.beans.factory.annotation.Autowired;
import org.springframework.stereotype.Service;

@Service
public class UserService {

//	//因为父容器 配置文件 规定了 不扫描handler 所以,helloWorld无法注入
//	@Autowired
//	private HelloWorld helloWorld;
	
	public UserService() {
		System.out.println("UserService Constructor...");
	}
	
}

5、编辑控制器:

package com.test.springmvc.handlers;

import javax.servlet.http.HttpServletRequest;
import javax.servlet.http.HttpServletResponse;

import org.springframework.beans.factory.annotation.Autowired;
import org.springframework.stereotype.Controller;
import org.springframework.web.bind.annotation.RequestMapping;

@Controller // spring里面 又名handler 处理器
public class HelloWorld {

	/**
	 * 1、使用RequestMapping 注解来映射 请求的url
	 * 2、返回值会通过视图解析器解析为实际的物理视图,
	 * 对于org.springframework.web.servlet.view.InternalResourceViewResolver
	 * 会做如下解析,prefix + returnVal + suffix 得到实际的物理视图。然后做转发操作。
	 * 即 WEB-INF/views/success.jsp
 	 */

	@Autowired
	private UserService userService;
	
	public HelloWorld() {
		System.out.println("HelloWorld Constructor...");
	}
	
	@RequestMapping("/helloworld")
	public String hello( HttpServletRequest request,HttpServletResponse response){
		System.out.println("hello request" + request.toString());
		System.out.println("hello response" + response.toString());
		
		System.out.println("success");
		System.out.println(userService);
		
		return "success";
		//return "/WEB-INF/views/success.jsp";
     }
	
	
}

二、springmvc与spring容器关系

spring容器是父容器,springmvc是子容器。

子容器(相当于局部变量)可以访问父容器的对象(相当于全局变量)
但是父容器不能访问子容器中的对象。

springmvc基础-运行流程图

备注:

1、
<mvc:default-servlet-handler/>可以解决 请求静态资源问题。<mvc:annotation-driven></mvc:annotation-driven>可以保证非静态资源也能请求,当配置了<mvc:default-servlet-handler/>

2、在DispatcherServlet.doDispatch(request, response)中有一个 mappedHandler= getHandler(processedRequest);

mappedHandler 就是 HandlerExecutionChain (里面包含了控制器方法handler和拦截器Interceptors)

HandlerExecutionChain 由 handlerMapping 根据 处理器 和请求映射而来。

当没有配置1中的<mvc:default-servlet-handler/>和<mvc:annotation-driven>时,handlerMapping 包括:【
BeanNameUrlHandlerMapping
DefaultAnnotationHandlerMapping

当有配置1中时:handlerMapping 包括:【
RequestMappingHandlerMapping
SimpleUrlHandlerMapping
BeanNameUrlHandlerMapping

3、HandlerAdapter 里面有 MessageConverter


springmvc中级-异常处理

一、先构建一个普通程序

1、测试页面:

<a href="testExceptionHandlerExceptionResolver?i=10">测试异常</a>

2、编辑控制器:

@RequestMapping("/testExceptionHandlerExceptionResolver")
public String testExceptionHandlerExceptionResolver(@RequestParam("i") int i){
	System.out.println("result: " + (10 / i));
	return "success";
}

3、结果成功页面,就显示成功两字,很简单就不写了

二、编辑异常捕获

1、编辑捕获异常的代码

//这个是 之前已经写好的 控制器代码
@RequestMapping("/testExceptionHandlerExceptionResolver")
public String testExceptionHandlerExceptionResolver(@RequestParam("i") int i){
	System.out.println("result: " + (10 / i));
	return "success";
}

/**
 * 1. 在 @ExceptionHandler 方法的入参中可以加入 Exception 类型的参数, 该参数即对应发生的异常对象
 * 2. @ExceptionHandler 方法的入参中不能传入 Map. 若希望把异常信息传导页面上, 需要使用 ModelAndView 作为返回值
 * 3. @ExceptionHandler 方法标记的异常有优先级的问题. 
 * 4. @ControllerAdvice: 如果在当前 Handler 中找不到 @ExceptionHandler 方法来出来当前方法出现的异常, 
 * 则将去 @ControllerAdvice 标记的类中查找 @ExceptionHandler 标记的方法来处理异常. 
 */
@ExceptionHandler({ArithmeticException.class})
public ModelAndView handleArithmeticException(Exception ex){
	System.out.println("@ExceptionHandler+ArithmeticException.class+出异常了: " + ex);
	ModelAndView mv = new ModelAndView("error");
	mv.addObject("exception", ex);
	return mv;
}
	
@ExceptionHandler({RuntimeException.class})
public ModelAndView handleArithmeticException2(Exception ex){
	System.out.println("@ExceptionHandler+RuntimeException.class+ [出异常了]: " + ex);
	ModelAndView mv = new ModelAndView("error");
	mv.addObject("exception", ex);
	return mv;
}

注意:上面两个异常捕获器,精度不一样,实际使用时,抛出的异常按精度来捕获。【还有,异常捕获器中不能在方法中添加map 形参,这和普通的控制器不同,所以保存信息,必须先新建ModelAndView,然后保存并返回】

上面两个异常捕获器,作用域在这个控制器的类文件中,如果想要作用于所有的控制器类文件的话,需要新建一个异常捕获器类。

//因为是注解,所有这个全局异常捕获器,需要放在 注解扫描器 能够扫描到的目录
//在转发配置中,我们可以看到 <!-- 配置自动扫描的包 -->
//<context:component-scan base-package="com.test.springmvc"></context:component-scan>


@ControllerAdvice
public class SpringMVCTestExceptionHandler {

	@ExceptionHandler({RuntimeException.class})
	public ModelAndView handleArithmeticException(Exception ex){
		System.out.println("全局+@ControllerAdvice+@ExceptionHandler+ArithmeticException.class+----> 出异常了: " + ex);
		ModelAndView mv = new ModelAndView("error");
		mv.addObject("exception", ex);
		return mv;
	}
	
}

2、返回结果失败页面,就显示失败两字,很简单就不写了。

核心注意:上面提到的属于同一层的异常捕获,出现异常时,只能先内部捕获后全局捕获,且按照精确度优先原则。这一层的异常捕获,只要有一个捕获了,该层的其他捕获器就不捕获了。

三、产生异常测试

除数为0,抛出异常。

<a href="testExceptionHandlerExceptionResolver?i=0">测试异常</a>

四、@ResponseStatus注解

直接在异常页,显示编辑过的响应头信息。
1、可以注解一个类或一个方法,当注解为一个类时,该异常作用于所有控制器。

@ResponseStatus(value=HttpStatus.FORBIDDEN, reason="用户名和密码不匹配!")
public class UserNameNotMatchPasswordException extends RuntimeException{

	/**
	 * 
	 */
	private static final long serialVersionUID = 1L;

	public  UserNameNotMatchPasswordException() {
		System.out.println("全局+@ResponseStatus+RuntimeException+ArithmeticException.class+----> 出异常了: ");
	}
	
}

2、也可以直接注解在控制器方法上。此时,控制器无论是否抛出异常,都会按照设置的异常信息,展示异常网页。(也就是无论是否有异常,控制器自己都会捕获异常,并展示@ResponseStatus设置好的异常信息)

@ResponseStatus(reason="测试",value=HttpStatus.NOT_FOUND)
@RequestMapping("/testResponseStatusExceptionResolver")
public String testResponseStatusExceptionResolver(@RequestParam("i") int i){
	if(i == 13){
		System.out.println("throw +testResponseStatusExceptionResolver...");
		throw new UserNameNotMatchPasswordException();
	}
	System.out.println("testResponseStatusExceptionResolver...");
		
	return "success";
}

注意:@ResponseStatus注解

1、如果控制器没有抛出异常,也不会跳转到success页面,而是用tomcat默认的异常页面,例如:  HTTP Status 404 – 测试

2、如果出现异常,且有@ExceptionHandler, @ControllerAdvice  异常捕获类,那么异常会被二次捕获了。【先ResponseStatus捕获,然后ExceptionHandler又捕获,这两种捕获器属于两个层次】

[FirstIntercept] preHandle
throw +testResponseStatusExceptionResolver...
全局+@ResponseStatus+RuntimeException+ArithmeticException.class+----> 出异常了: 
@ExceptionHandler+RuntimeException.class+ [出异常了]: com.test.springmvc.test.UserNameNotMatchPasswordException
[FirstIntercept] afterCompletion

3、如果出现异常,且没有@ExceptionHandler, @ControllerAdvice  异常捕获类,那么就由ResponseStatus 捕获一次就结束了。

五、DefaultHandlerExceptionResolver

这个就是springmvc默认的异常处理,比如我们控制器编写错误,出异常了,如果我们写异常处理模块,那么默认情况下就是这个类处理的。比如控制器只支持post请求,然后用get请求就报错,请求方法不支持。

目前测试到的异常情况看,默认异常处理器,捕获到异常后,不会将异常传递给其他异常捕获器了。

直接在网页中显示错误:

HTTP Status 405 - Request method 'GET' not supported

type Status report

message Request method 'GET' not supported

description The specified HTTP method is not allowed for the requested resource.

Apache Tomcat/8.0.36

控制台有错误信息:

org.springframework.web.servlet.PageNotFound handleHttpRequestMethodNotSupported
WARNING: Request method 'GET' not supported

六、SimpleMappingExceptionResolveer

在控制器中:

@RequestMapping("/testSimpleMappingExceptionResolver")
public String testSimpleMappingExceptionResolver(@RequestParam("i") int i){
	String [] vals = new String[10];
	System.out.println(vals[i]);
	return "success";
}

测试网页:

http://localhost:8080/springmvc-2/testSimpleMappingExceptionResolver?i=10

编辑转发配置器:

<!-- 配置使用 SimpleMappingExceptionResolver 来映射异常 -->
<bean class="org.springframework.web.servlet.handler.SimpleMappingExceptionResolver">
	<!-- 配置请求域 异常属性名 ex,默认值为 exception -->
	<property name="exceptionAttribute" value="ex"></property>
	<!-- 异常类型 映射 跳转页  -->
	<property name="exceptionMappings">
		<props>
			<prop key="java.lang.ArrayIndexOutOfBoundsException">error</prop>
		</props>
	</property>
</bean>

七、异常处理器的优先级

同一个异常:

DefaultHandlerExceptionResolver (优先级第一,捕获到异常后,就将异常截断,在网页中展示异常信息,不会再往下传递)

@ResponseStatus(优先级第二,捕获到异常后,会将异常往后传递,返回结果以最后一个异常返回网页信息为准)

在控制器中,添加这个@ResponseStatus注解,就算没有抛出异常,也会展示指定状态的异常的网页。

@ResponseStatus(reason="测试",value=HttpStatus.NOT_FOUND)
@RequestMapping("/testResponseStatusExceptionResolver")
public String testResponseStatusExceptionResolver(@RequestParam("i") int i){
	if(i == 13){
		System.out.println("throw +testResponseStatusExceptionResolver...");
		throw new UserNameNotMatchPasswordException();
	}
	System.out.println("testResponseStatusExceptionResolver...");
		
	return "success";
}

如果上面的控制器没有@ResponseStatus(reason="测试",value=HttpStatus.NOT_FOUND) ,然后异常时抛出了UserNameNotMatchPasswordException类

对UserNameNotMatchPasswordException查看编码信息:

@ResponseStatus(value=HttpStatus.FORBIDDEN, reason="用户名和密码不匹配!")
public class UserNameNotMatchPasswordException extends RuntimeException{

	/**
	 * 
	 */
	private static final long serialVersionUID = 1L;
	
	public  UserNameNotMatchPasswordException() {
		System.out.println("全局+@ResponseStatus+RuntimeException+ArithmeticException.class+----> 出异常了: ");
	}
	
}

看上面的异常类,如果项目中没有低优先级的异常捕获器,那么网页就返回错误信息就结束了。如果有其他低优先级的异常了,那么异常还会被继续处理。

@ExceptionHandler和@ControllerAdvice(优先级第三,异常被捕获后,不会继续往下传递了)

@ExceptionHandler适用于和控制器位于同一个文件中,@ControllerAdvice单独一个文件,作用域针对所有的控制器。

SimpleMappingExceptionResolver(异常映射器,优先级最低,针对异常的类型,指定错误和异常的返回页)

<!-- 配置使用 SimpleMappingExceptionResolver 来映射异常 -->
<bean class="org.springframework.web.servlet.handler.SimpleMappingExceptionResolver">
	<!-- 配置请求域 异常属性名 ex,默认值为 exception -->
	<property name="exceptionAttribute" value="ex"></property>
	<!-- 异常类型 映射 跳转页  -->
	<property name="exceptionMappings">
		<props>
			<prop key="java.lang.ArrayIndexOutOfBoundsException">error</prop>
		</props>
	</property>
</bean>

补充:

针对指定的异常信息返回页,可以在返回页的网页中,直接读取异常信息。
默认jstl 表达式为:  ${requestScope.exception},在SimpleMappingExceptionResolver 中信息配置时,将异常的属性名改成了ex,所以错误信息展示页 该调用 ${requestScope.ex}来获取异常信息。

springmvc中级-自定义拦截器

Spring MVC也可以使用拦截器对请求进行拦截处理,用户 可以自定义拦截器来实现特定的功能,自定义的拦截器必 须实现HandlerInterceptor接口。

preHandle():这个方法在业务处理器处理请求之前被调用,在该 方法中对用户请求 request 进行处理。如果程序员决定该拦截器对 请求进行拦截处理后还要调用其他的拦截器,或者是业务处理器去 进行处理,则返回true;如果程序员决定不需要再调用其他的组件 去处理请求,则返回false。

postHandle():这个方法在业务处理器处理完请求后,但是DispatcherServlet 向客户端返回响应前被调用,在该方法中对 用户请求request进行处理。

afterCompletion():这个方法在 DispatcherServlet 完全处理完请 求后被调用,可以在该方法中进行一些资源清理的操作。


自定义拦截器大白话:

1、首先新建一个拦截器类

就是 implements HandlerInterceptor 实现接口类就行。

public class FirstIntercept implements HandlerInterceptor{

	/**
	 * 该方法在目标方法之前被调用.
	 * 若返回值为 true, 则继续调用后续的拦截器和目标方法. 
	 * 若返回值为 false, 则不会再调用后续的拦截器和目标方法. 
	 * 
	 * 可以考虑做权限. 日志, 事务等. 
	 */
	@Override
	public boolean preHandle(HttpServletRequest request, HttpServletResponse response, Object handler)
			throws Exception {
		// TODO Auto-generated method stub
		System.out.println("[FirstIntercept] preHandle");
		return true;
	}


	/**
	 * 调用目标方法之后, 但渲染视图之前. 
	 * 可以对请求域中的属性或视图做出修改. 
	 */
	@Override
	public void postHandle(HttpServletRequest request, HttpServletResponse response, Object handler,
			ModelAndView modelAndView) throws Exception {
		// TODO Auto-generated method stub
		System.out.println("[FirstIntercept] postHandle");

		
	}


	/**
	 * 渲染视图之后被调用. 释放资源
	 */
	@Override
	public void afterCompletion(HttpServletRequest request, HttpServletResponse response, Object handler, Exception ex)
			throws Exception {
		// TODO Auto-generated method stub
		System.out.println("[FirstIntercept] afterCompletion");

	}

}

2、编辑转发配置文件

<mvc:interceptors>
       
        <!-- 配置自定义拦截器 -->
	<bean class="com.test.springmvc.test.FirstIntercept"></bean>
	
	<!-- 配置 带参数的 自定义拦截器,SencondIntercept和FirstIntercept 代码一样的只是改了名字,这里就不写了 -->
	<mvc:interceptor>
            <!-- 拦截器只作用在 /emps 请求域中,一定要记得“/”,否则没有效果 -->
	    <mvc:mapping path="/emps"/>
	    <bean class="com.test.springmvc.test.SecondIntercept"></bean>
	</mvc:interceptor>
	
</mvc:interceptors>

3、拦截器执行顺序:

(1)如果只配置了FirstIntercept,且里面的 preHandle方法返回true,且没有  配置 带参数的 自定义拦截器(即SencondIntercept
那么url请求,控制台输出结果:

[FirstIntercept] preHandle
[FirstIntercept] postHandle
[FirstIntercept] afterCompletion

(2)如果上面的FirstIntercept里面的preHandle方法返回false。且没有  配置 带参数的 自定义拦截器(即SencondIntercept
那么url请求,控制台输出结果:

[FirstIntercept] preHandle

(3)如果配置了FirstInterceptSecondIntercept,且两者里面的preHandle方法都返回true,且请求域是emps
控制台输出结果:

[FirstIntercept] preHandle
[SecondIntercept] preHandle
[SecondIntercept] postHandle
[FirstIntercept] postHandle
[SecondIntercept] afterCompletion
[FirstIntercept] afterCompletion

(4)如果配置了FirstInterceptSecondIntercept请求域是emps
FirstIntercept的preHandle方法返回true,SecondIntercept的preHandle方法返回false,控制台输出结果:

[FirstIntercept] preHandle
[SecondIntercept] preHandle
[FirstIntercept] afterCompletion

备注:下图中的虚线不是执行过程实线才是真正的执行过程


特别提醒:当初在改项目代码时,因为代码是热更新的,但是测试结果来看,热更新后,Intercept 的测试输出 有bug ,因为多输出了 一遍 下面的:
[FirstIntercept] preHandle
[FirstIntercept] postHandle
[FirstIntercept] afterCompletion

所以,测试代码时最好还是重启一下服务器,这样就不会出现意想不到的bug。

4、拦截器顺序与异常

当自定义拦截器的preHandle方法返回true,遇到springmvc出现异常时:

1、DefaultHandlerExceptionResolver  系统默认自带异常处理器。
里面实现了很多异常 ,如:handleHttpRequestMethodNotSupported

我测试控制器规定了请求方法只能是post,当我get请求时,出异常了。

@RequestMapping(value="/testDefaultHandlerExceptionResolver",method=RequestMethod.POST)
public String testDefaultHandlerExceptionResolver(){
	System.out.println("testDefaultHandlerExceptionResolver...");
	return "success";
}

控制台打印的是:(看出来,自定义拦截器根本没有调用到)

org.springframework.web.servlet.PageNotFound handleHttpRequestMethodNotSupported
WARNING: Request method 'GET' not supported

网页显示:

HTTP Status 405 - Request method 'GET' not supported

type Status report

message Request method 'GET' not supported

description The specified HTTP method is not allowed for the requested resource.

Apache Tomcat/8.0.36

2、其他 遇到下面的异常捕获器:

@ResponseStatus (优先级第一)

@ExceptionHandler,@ControllerAdvice(优先级第二)

SimpleMappingExceptionResolver (优先级第三)

控制台结果显示:(自定义拦截器调用了方法一和方法三)

[FirstIntercept] preHandle
[FirstIntercept] afterCompletion


springmvc中级-文件上传与下载

Spring MVC 为文件上传提供了直接的支持,这种支持是通 过即插即用的 MultipartResolver 实现的。Spring 用 Jakarta Commons FileUpload 技术实现了一个MultipartResolver 实现类:CommonsMultipartResovler

Spring MVC 上下文中默认没有装配 MultipartResovler,因 此默认情况下不能处理文件的上传工作,如果想使用 Spring 的文件上传功能,需现在上下文中配置 MultipartResolver

defaultEncoding: 必须和用户 JSP 的 pageEncoding 属性 一致,以便正确解析表单的内容。

为了让 CommonsMultipartResovler 正确工作,必须先 将 Jakarta Commons FileUpload 及 Jakarta Commons io 的类包添加到类路径下。

文件上传大白话:

1、添加文件上传的jar包

commons-fileupload-1.2.1.jar
commons-io-2.0.jar

2、编辑转发配置文件

<!-- 文件上传 配置  multipartresolver -->
<bean id="multipartResolver" 
class="org.springframework.web.multipart.commons.CommonsMultipartResolver">
<property name="defaultEncoding" value="utf-8"></property>
<property name="maxUploadSize" value="102400"></property>
</bean>

3、网页测试页:

<form action="testFileUpload" method="post" enctype="multipart/form-data">
File:<input type="file" name="name-file"/>
Desc:<input type="text" name="name-desc"/>
<input type="submit" name="name-submit" value="submit" />
</form>

4、编辑控制器controler

@RequestMapping("/testFileUpload")
public String testFileUpload(@RequestParam("name-desc") String desc, 
		@RequestParam("name-file") MultipartFile file) throws IOException{
	System.out.println("name-desc: " + desc);
	System.out.println("OriginalFilename: " + file.getOriginalFilename());
	System.out.println("InputStream: " + file.getInputStream());
	return "success";
}


文件下载:

已经在HttpMessageConverter详解中的,ResponseEntity<byte[]>已经提到过了。

@RequestMapping("/testResponseEntity")
public ResponseEntity<byte[]> testResponseEntity(HttpSession session) throws IOException{
	byte [] body = null;
	ServletContext servletContext = session.getServletContext();
	InputStream in = servletContext.getResourceAsStream("/files/abc.txt");
	body = new byte[in.available()];
	in.read(body);
		
	HttpHeaders headers = new HttpHeaders();
	headers.add("Content-Disposition", "attachment;filename=abc.txt");
		
	HttpStatus statusCode = HttpStatus.OK;
		
	ResponseEntity<byte[]> response = new ResponseEntity<byte[]>(body, headers, statusCode);
	return response;
}


springmvc中级-国际化详解

一、国际化与locale

springmvc 中,根据local 属性,实现  信息本地化。

1、当接受到请求时,SpringMVC 会在上下文中查找一个本地化解析器(LocalResolver),找到后使用它获取请求 所对应的本地化类型信息。AcceptHeaderLocaleResolver:根据 HTTP 请求头的 Accept-Language 参数确定本地化类型,如果没有显式定义 本地化解析器, SpringMVC 使用该解析器。
CookieLocaleResolver:根据指定的 Cookie 值确定本地化类型。
SessionLocaleResolver:根据 Session 中特定的属性确定本 地化类型

2、SpringMVC 还允许装配一个动态更改本地化类型的拦截 器,这样通过指定一个请求参数就可以控制单个请求的本 地化类型。
LocaleChangeInterceptor:从请求参数中获取本次请求对应的本地化类型。
比如在转发配置器中,可以编辑如下:

<!-- 动态修改国际化信息 -->
<!-- 配置sessionLocalResolver -->
<bean id="localeResolver" class="org.springframework.web.servlet.i18n.SessionLocaleResolver"></bean>
<!-- 配置localeChangeIntercept -->
<mvc:interceptors>
<bean class="org.springframework.web.servlet.i18n.LocaleChangeInterceptor"></bean>
</mvc:interceptors>

总体原理路线:

二、获取locale

1、local来源

服务器读取浏览器设置,然后利用默认类   AcceptHeaderLocaleResolver  读取默认放在 request中的local。【locale应该是浏览器中的Accept-Language: zh-CN,zh;q=0.9,zh-TW;q=0.8,en;q=0.7 】

2、国际化前期准备

首先编辑国际化文件,然后转发配置表中进行配置。

i18n.properties

i18n.username=Username
i18n.password=Password

i18n_zh_CN.properties

i18n.username=\u7528\u6237\u540D
i18n.password=\u5BC6\u7801

i18n_en_US.properties

i18n.username=Username
i18n.password=Password

在转发配置器中:编辑国际化 bean

<!-- 配置国际化资源文件 -->
<bean id="messageSource"
	class="org.springframework.context.support.ResourceBundleMessageSource">
	<property name="basename" value="i18n"></property>	
</bean>

3、在jsp页面获取:

index.jsp ,用来跳转到tetsi18n.jsp

<a href="testi18n">测试国际化</a>

tetsi18n.jsp 文件

<%@ taglib prefix="fmt" uri="http://java.sun.com/jsp/jstl/fmt" %>
.....

<body>
<br>
<!--  fmt标签必须经过转发后才能正确显示结果  -->
<br>
<fmt:message key="i18n.username"></fmt:message>
<fmt:message key="i18n.password"></fmt:message>
<a href="testi18n">testi18n</a>
...
</body>

4、在control控制器中获取:

// 在控制器类中 自动注入 转发配置文件中 已经配置好的国际化 messageSource bean
@Autowired
private ResourceBundleMessageSource messageSource;

//国际化控制器,
@RequestMapping("/testi18n")
public String testI18n(Locale locale){
        //从messageSource 中 选取国际化信息
	String val = messageSource.getMessage("i18n.username", null, locale);
	System.out.println(val); 
	return "testi18n";
}

三、修改locale

默认情况下:locale是存放在request里面的,无法修改locale。
需要将locale存放到session中,通过操作修改session里面的locale。

1、编辑转发配置文件:

<!-- 配置国际化资源文件,前面编辑过的,这里不用改 -->
<bean id="messageSource"
	class="org.springframework.context.support.ResourceBundleMessageSource">
	<property name="basename" value="i18n"></property>	
</bean>
	
<!-- 动态修改国际化信息 -->
<!-- 配置sessionLocalResolver -->
<bean id="localeResolver" class="org.springframework.web.servlet.i18n.SessionLocaleResolver"></bean>
<!-- 配置localeChangeIntercept -->
<mvc:interceptors>
<bean class="org.springframework.web.servlet.i18n.LocaleChangeInterceptor"></bean>
</mvc:interceptors>

2、编辑testi18n.jsp【用超链接修改了locale值】

<!--  fmt标签必须经过转发后才能正确显示结果  -->
<fmt:message key="i18n.username"></fmt:message>
<fmt:message key="i18n.password"></fmt:message>
<a href="testi18n">testi18n</a>
<a href="testi18n?locale=zh_CN">测试国际化中文</a>
<a href="testi18n?locale=en_US">测试国际化英文</a>


springmvc中级-HttpMessageConverter详解

一、HttpMessageConverter概述

HttpMessageConverter<T> 是 Spring3.0 新添加的一个接 口,负责将请求信息转换为一个对象(类型为 T),将对象( 类型为 T)输出为响应信息。


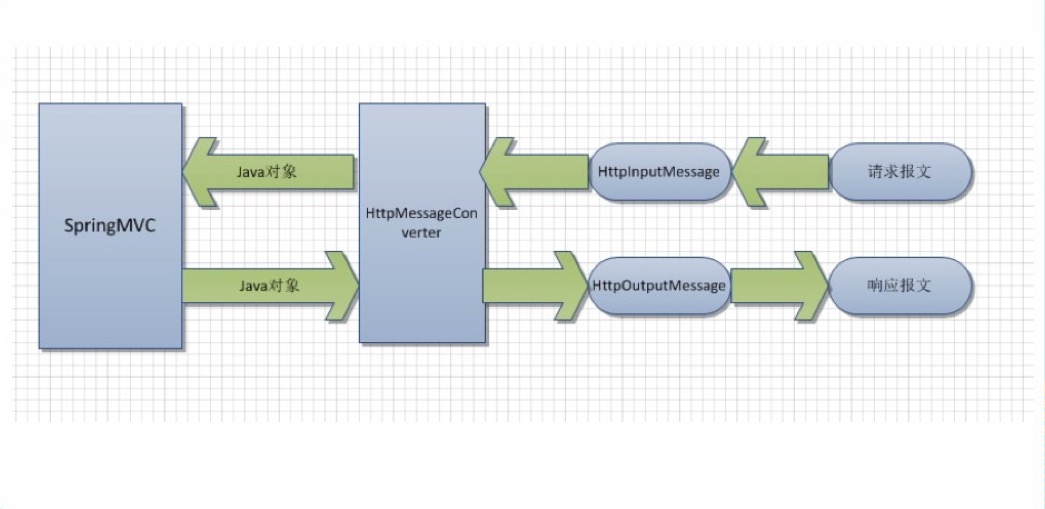
使用 HttpMessageConverter<T> 将请求信息转化并绑定到处理方法的入 参中或将响应结果转为对应类型的响应信息,Spring 提供了两种途径:
–使用 @RequestBody / @ResponseBody 对处理方法进行标注
–使用 HttpEntity<T> / ResponseEntity<T> 作为处理方法的入参或返回值

当控制器处理方法使用到 @RequestBody/@ResponseBody 或HttpEntity<T>/ResponseEntity<T> 时, Spring 首先根据请求头或响应头的Accept 属性选择匹配的 HttpMessageConverter,  进而根据参数类型或 泛型类型的过滤得到匹配的 HttpMessageConverter, 若找不到可用的HttpMessageConverter 将报错

  • @RequestBody@ResponseBody 不需要成对出现。

ajax发送和接收乱码问题:

因为HttpMessageConverter的几个实现类,都是先查询http请求头的编码方式,然后再解码的,如果没有指定就使用默认的编码方式。比如iso-8859-1。这样会使得中文乱码。

​碰到使用ajax调用spring mvc时出现乱码,这里写一下解决方法。​

一:ajax传入spring mvc时,@RequestBody出现乱码:

这是ajax调用时,传入data编码有误导致,通过以下方式解决(红色字体部分):

前台ajax调用代码:

$.ajax({
  url : baseUrl + “/crlandIsp/commonInfoCreate/save.do”,
  type : “POST”,
  cache : false,
  data : mdata,
  contentType : “text/html;charset=UTF-8”,
  dataType : “json”,
  success : function(result) {

  },
  error : function(xhr, ajaxOptions, thrownError) {
  

  }
 });

二:spring mvc通过@ResponseBody返回时,ajax接收到乱码结果:

修改spring mvc controller代码(添加红色部分),指定响应头编码方式

 @RequestMapping(value = “/queryDetail”,produces = “text/html;charset=UTF-8”)
   public @ResponseBody String save(@RequestBody String body) throws Exception {
       try {

。。。。

}

方法二、修改全局的默认配置编码

<mvc:annotation-driven>
        <mvc:message-converters register-defaults="true">
            <bean class="org.springframework.http.converter.StringHttpMessageConverter">
                <property name="supportedMediaTypes" value = "text/html;charset=UTF-8" />
            </bean>
        </mvc:message-converters>
</mvc:annotation-driven>

网上也有这种,但是你们是不是<mvc:annotation-driven>不能配置子集
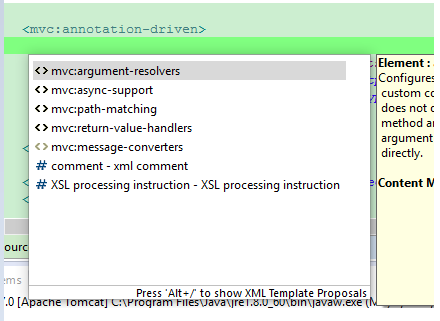
这里只要把你们的spring-mvc-.xsd改成4就可以在<mvc:annotation-driven>下配置了,如下图

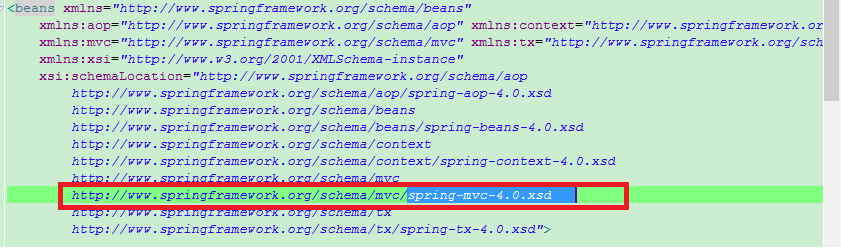
主要还是spring-mvc-4.0.xsd。改了之后再eclipse中按ALT+/就会出现如下提示

这边还要注意一点

<property name="supportedMediaTypes" value = "text/plain;charset=UTF-8" />

text/plain这个还是会中文乱码,用text/html就不会


二、HttpMessageConverter应用

1、测试请求体信息

(1)测试带上传文件

utf-8编码的文件:春节.txt

good春节OK
hello

文件二进制为:

676f 6f64 e698 a5e8 8a82 4f4b 0d0a 6865
6c6c 6f

(2)测试网页:

<form action="testRequestBody" method="post" enctype="multipart/form-data" accept-charset="gb2312">
File:<input type="file" name="name-file"/>
Desc:<input type="text" name="name-desc"/>
<input type="submit" name="name-submit" value="submit" />
</form>

(2)测试请求体的控制器:

@ResponseBody
@RequestMapping("/testRequestBody")
public String testHttpMessageConverter(@RequestBody String body){
	System.out.println(body);
	return "helloworld! " + new Date();
}

浏览器fiddler2抓包结果:
(将二进制流用gb2312解码的结果,很明显文件上传时传的是原始二进制流,原始信息是utf-8编码,上传时没有在重新经过编码,于是春节,二字的utf-8编码是 E6 98 A5 E8 8A 82 的二进制流,抓包解码时,将E6 98 A5 E8 8A 82用GB2312解码,于是出现乱码   鏄ヨ妭    ,至于表单中的其他信息 ,因为都采用了gb2312编码,所以解码时就正确了,不会出现乱码 )

POST http://192.168.1.131:8080/springmvc-2/testRequestBody HTTP/1.1
Host: 192.168.1.131:8080
Connection: keep-alive
Content-Length: 410
Cache-Control: max-age=0
Accept: text/html,application/xhtml+xml,application/xml;q=0.9,image/webp,*/*;q=0.8
Origin: http://192.168.1.131:8080
Upgrade-Insecure-Requests: 1
User-Agent: Mozilla/5.0 (Windows NT 5.1) AppleWebKit/537.36 (KHTML, like Gecko) Chrome/49.0.2623.112 Safari/537.36
Content-Type: multipart/form-data; boundary=----WebKitFormBoundaryrvTDZPfQOBKllDXv
Referer: http://192.168.1.131:8080/springmvc-2/
Accept-Encoding: gzip, deflate
Accept-Language: zh-CN,zh;q=0.8
Cookie: JSESSIONID=5E065281AC2C661A0098111FB38F3745

------WebKitFormBoundaryrvTDZPfQOBKllDXv
Content-Disposition: form-data; name="name-file"; filename="春节.txt"
Content-Type: text/plain

good鏄ヨ妭OK
hello
------WebKitFormBoundaryrvTDZPfQOBKllDXv
Content-Disposition: form-data; name="name-desc"

春节
------WebKitFormBoundaryrvTDZPfQOBKllDXv
Content-Disposition: form-data; name="name-submit"

submit
------WebKitFormBoundaryrvTDZPfQOBKllDXv--

服务器控制台输出结果:【输出的是请求体】

------WebKitFormBoundaryrvTDZPfQOBKllDXv
Content-Disposition: form-data; name="name-file"; filename="´º½Ú.txt"
Content-Type: text/plain

good春节OK
hello
------WebKitFormBoundaryrvTDZPfQOBKllDXv
Content-Disposition: form-data; name="name-desc"

´º½Ú
------WebKitFormBoundaryrvTDZPfQOBKllDXv
Content-Disposition: form-data; name="name-submit"

submit
------WebKitFormBoundaryrvTDZPfQOBKllDXv--

特别备注:控制台返回的请求体中:

##### 针对 filename="´º½Ú.txt" ,
##### 这个 ´º½Ú 是浏览器 用gb2312编码 春节 两字成 B4 BA BD DA 的二进制流,放入请求体中
##### 解码时 springmvc 查看http头,发现没有编码指明,于是默认用 iso-8859-1解码 造成乱码   
Content-Disposition: form-data; name="name-file"; filename="´º½Ú.txt"
##### 下面第三行 也是同样的 原因
Content-Disposition: form-data; name="name-desc"

´º½Ú
##### 总结来说,multipart/form-data 编码的表单,表单中信息都是按 表单规定的编码方式,
##### 直接编码成 二进制流。然后存放到 请求体中。而表单其他自动生成的信息,都是ASCII编码
##### 其实也可以说是按照 表单默认 的编码方式,因为http 用到的编码都是 ASCII码的扩展码,都兼容支持ASCII码
##### 当然 文件上传时 没有进行编码,直接是原始文件的二进制流加入到 请求体中 比如下面的文件信息:
Content-Type: text/plain

good春节OK
hello
------WebKitFormBoundaryrvTDZPfQOBKllDXv
##### 上面的例子中:原始文件信息 已经说过了 是用utf-8编码 成二进制流,utf-8兼容ASCII码,
##### 当 springmvc 接收请求体时,因为发现请求头中没有编码信息 ,所以采用默认的iso-8859-1解码,这个兼容ASCII码
##### 所以  英文字母能够正常解码 ,中文 春节 二字,一开始utf-8编码成 E6 98 A5 E8 8A 82 的二进制流,
##### 后来解码时 ,用ios-8859-1将这些二进制流错误的解码了,导致出现乱码  春节

=========================================================

如果将表单设置成utf-8编码,效果就不一样了。

<form action="testRequestBody" method="post" enctype="multipart/form-data" accept-charset="UTF-8">
File:<input type="file" name="name-file"/>
Desc:<input type="text" name="name-desc"/>
<input type="submit" name="name-submit" value="submit" />
</form>

用utf-8解码抓包时的二进制流:

POST http://192.168.1.131:8080/springmvc-2/testRequestBody HTTP/1.1
Host: 192.168.1.131:8080
Connection: keep-alive
Content-Length: 414
Cache-Control: max-age=0
Accept: text/html,application/xhtml+xml,application/xml;q=0.9,image/webp,*/*;q=0.8
Origin: http://192.168.1.131:8080
Upgrade-Insecure-Requests: 1
User-Agent: Mozilla/5.0 (Windows NT 5.1) AppleWebKit/537.36 (KHTML, like Gecko) Chrome/49.0.2623.112 Safari/537.36
Content-Type: multipart/form-data; boundary=----WebKitFormBoundarySIE2A85QOHmfv0rl
Referer: http://192.168.1.131:8080/springmvc-2/
Accept-Encoding: gzip, deflate
Accept-Language: zh-CN,zh;q=0.8
Cookie: JSESSIONID=69D0B1B2F9AAE721AED15F660424C708

------WebKitFormBoundarySIE2A85QOHmfv0rl
Content-Disposition: form-data; name="name-file"; filename="春节.txt"
Content-Type: text/plain

good春节OK
hello
------WebKitFormBoundarySIE2A85QOHmfv0rl
Content-Disposition: form-data; name="name-desc"

春节
------WebKitFormBoundarySIE2A85QOHmfv0rl
Content-Disposition: form-data; name="name-submit"

submit
------WebKitFormBoundarySIE2A85QOHmfv0rl--

查看服务器控制台输出结果:
所有乱码  春节  都是因为春节的utf-8 编码成二进制流  E6 98 A5 E8 8A 82
后来用iso-8859-1 解码 E6 98 A5 E8 8A 82 时,出现乱码   æ˜¥èŠ‚

------WebKitFormBoundarySIE2A85QOHmfv0rl
Content-Disposition: form-data; name="name-file"; filename="春节.txt"
Content-Type: text/plain

good春节OK
hello
------WebKitFormBoundarySIE2A85QOHmfv0rl
Content-Disposition: form-data; name="name-desc"

春节
------WebKitFormBoundarySIE2A85QOHmfv0rl
Content-Disposition: form-data; name="name-submit"

submit
------WebKitFormBoundarySIE2A85QOHmfv0rl--

为什么,控制台打印出来的是乱码呢?

debug解析过程:

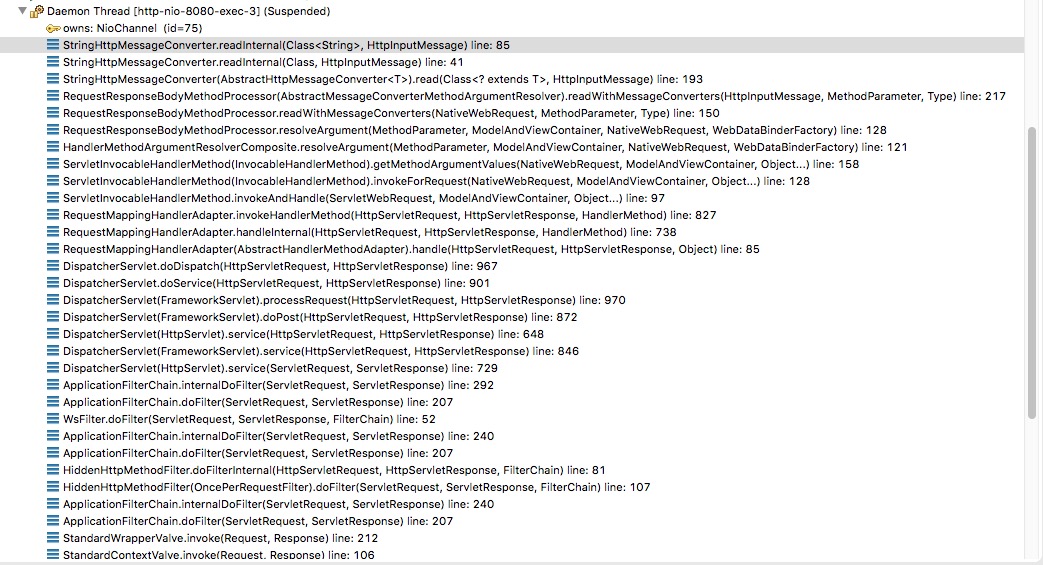
核心靠AbstractHttpMessageConverter.java 解析body
解码时,首先看请求头的编码,如果没有,则默认iso-8859-1编码。

//类方法 有删减
public class StringHttpMessageConverter extends AbstractHttpMessageConverter<String> {

	public static final Charset DEFAULT_CHARSET = Charset.forName("ISO-8859-1");


	private volatile List<Charset> availableCharsets;

	private boolean writeAcceptCharset = true;


	/**
	 * A default constructor that uses {@code "ISO-8859-1"} as the default charset.
	 * @see #StringHttpMessageConverter(Charset)
	 */
	public StringHttpMessageConverter() {
		this(DEFAULT_CHARSET);
	}

	/**
	 * A constructor accepting a default charset to use if the requested content
	 * type does not specify one.
	 */
	public StringHttpMessageConverter(Charset defaultCharset) {
		super(defaultCharset, MediaType.TEXT_PLAIN, MediaType.ALL);
	}


	/**
	 * Indicates whether the {@code Accept-Charset} should be written to any outgoing request.
	 * <p>Default is {@code true}.
	 */
	public void setWriteAcceptCharset(boolean writeAcceptCharset) {
		this.writeAcceptCharset = writeAcceptCharset;
	}


	@Override
	protected String readInternal(Class<? extends String> clazz, HttpInputMessage inputMessage) throws IOException {
		Charset charset = getContentTypeCharset(inputMessage.getHeaders().getContentType());
		return StreamUtils.copyToString(inputMessage.getBody(), charset);
	}


	@Override
	protected void writeInternal(String str, HttpOutputMessage outputMessage) throws IOException {
		if (this.writeAcceptCharset) {
			outputMessage.getHeaders().setAcceptCharset(getAcceptedCharsets());
		}
		Charset charset = getContentTypeCharset(outputMessage.getHeaders().getContentType());
		StreamUtils.copy(str, charset, outputMessage.getBody());
	}


}

所以,解决方法也好办了:

1.客户的发送方法稍微改一下,这个方式是最好的:

connection.setRequestProperty("content-type", "text/html;charset=GBk");

2.如果发送方无论如何都没法改,只能服务器端处理的时候,要么所有接收到的数据都 new String(data.getByte(“iso-8859-1″),”GBK”),要么直接自定义StringHttpConverter,将readInternal方法中的charset获取改为不先从请求头中读取,直接硬编码为GBK(当然这样做的后果就是只能接收GBK的数据了).【好像不能自定义,不过上文提到了可以转发配置中配置,修改StringHttpConverter的默认编码值】

2、文件下载

只需要在控制器中,编辑 ResponseEntity<byte[]>就行了。

@RequestMapping("/testResponseEntity")
	public ResponseEntity<byte[]> testResponseEntity(HttpSession session) throws IOException{
		byte [] body = null;
		ServletContext servletContext = session.getServletContext();
		InputStream in = servletContext.getResourceAsStream("/files/abc.txt");
		body = new byte[in.available()];
		in.read(body);
		
		HttpHeaders headers = new HttpHeaders();
		headers.add("Content-Disposition", "attachment;filename=abc.txt");
		
		HttpStatus statusCode = HttpStatus.OK;
		
		ResponseEntity<byte[]> response = new ResponseEntity<byte[]>(body, headers, statusCode);
		return response;
	}


3、返回json

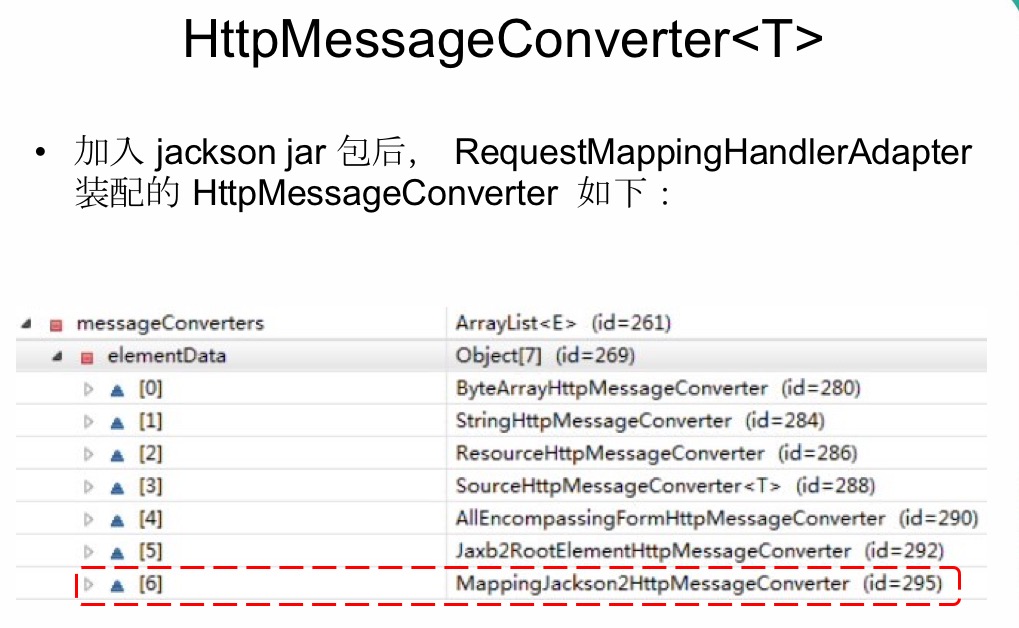
添加jackson jar包,编写控制器。【如果有中文的json,】

@ResponseBody
@RequestMapping("/testJson")
public Collection<Employee> testJson(){
	return employeeDao.getAll();
}

测试链接:http://localhost:8080/springmvc-2/testJson


参考:

测试 request body 问题

https://www.cnblogs.com/chyu/p/5517788.html

https://blog.csdn.net/u013239111/article/details/51347949

http://blog.sina.com.cn/s/blog_b1f34f990102vcm4.html