php7安装配置-在centos7上

一、先卸载旧版php

yum remove php* php-common

二、安装epel

yum -y install epel-release

三、安装第三方yum源

#centos 6.x 的yum源 (二选一)
rpm -Uvh https://dl.fedoraproject.org/pub/epel/epel-release-latest-6.noarch.rpm
rpm -Uvh https://mirror.webtatic.com/yum/el6/latest.rpm

#centos 7 的yum源 (二选一)
rpm -Uvh https://dl.fedoraproject.org/pub/epel/epel-release-latest-7.noarch.rpm
rpm -Uvh https://mirror.webtatic.com/yum/el7/webtatic-release.rpm

#查看是否安装了目标 yum 源
ls /etc/yum.repos.d

# 输出 目标yum源的信息
cat webtatic.repo
[webtatic]
name=Webtatic Repository EL7 - $basearch
#baseurl=https://repo.webtatic.com/yum/el7/$basearch/
mirrorlist=https://mirror.webtatic.com/yum/el7/$basearch/mirrorlist
failovermethod=priority
enabled=1
gpgcheck=1
gpgkey=file:///etc/pki/rpm-gpg/RPM-GPG-KEY-webtatic-el7

[webtatic-debuginfo]
name=Webtatic Repository EL7 - $basearch - Debug
#baseurl=https://repo.webtatic.com/yum/el7/$basearch/debug/
mirrorlist=https://mirror.webtatic.com/yum/el7/$basearch/debug/mirrorlist
failovermethod=priority
enabled=0
gpgcheck=1
gpgkey=file:///etc/pki/rpm-gpg/RPM-GPG-KEY-webtatic-el7

[webtatic-source]
name=Webtatic Repository EL7 - $basearch - Source
#baseurl=https://repo.webtatic.com/yum/el7/SRPMS/
mirrorlist=https://mirror.webtatic.com/yum/el7/SRPMS/mirrorlist
failovermethod=priority
enabled=0
gpgcheck=1
gpgkey=file:///etc/pki/rpm-gpg/RPM-GPG-KEY-webtatic-el7<br>

通过访问 https://repo.webtatic.com/yum/el7/SRPMS/
我们就能看到所有的 rpm 安装包了

#也可以通过命令查看该源对应的安装包
yum list --enablerepo=webtatic | grep php
#或者 直接 搜索 相关安装包
yum search php71w
Loaded plugins: fastestmirror, langpacks
Loading mirror speeds from cached hostfile
 * base: mirrors.linode.com
 * epel: mirrors.kernel.org
 * extras: mirrors.linode.com
 * updates: mirrors.linode.com
 * webtatic: sp.repo.webtatic.com
============================= N/S matched: php71w ==============================
mod_php71w.x86_64 : PHP module for the Apache HTTP Server
php71w-bcmath.x86_64 : A module for PHP applications for using the bcmath
                     : library
php71w-cli.x86_64 : Command-line interface for PHP
php71w-common.x86_64 : Common files for PHP
注意一个问题,php71w和php70w,它们的描述方式不同。
php70w.x86_64 : PHP scripting language for creating dynamic web sites
mod_php71w.x86_64 : PHP module for the Apache HTTP Server
其实效果是一样的,就是php 服务器,注意啦。
yum search php70w
Loaded plugins: fastestmirror, langpacks
Loading mirror speeds from cached hostfile
 * base: mirrors.linode.com
 * epel: mirrors.kernel.org
 * extras: mirrors.linode.com
 * updates: mirrors.linode.com
 * webtatic: sp.repo.webtatic.com
============================= N/S matched: php70w ==============================
php70w.x86_64 : PHP scripting language for creating dynamic web sites
php70w-bcmath.x86_64 : A module for PHP applications for using the bcmath
                     : library
php70w-cli.x86_64 : Command-line interface for PHP
php70w-common.x86_64 : Common files for PHP
<br>

四、安装 PHP 7.1

# 安装php7.1
yum install php71w -y
# nginx连接使用
yum install php71w-fpm -y
# 宽字节
yum install php71w-mbstring -y
# mysql相关
yum install php71w-mysqlnd -y
# redis扩展
yum install php71w-pecl-redis -y
# 加密使用
yum install php71w-mcrypt -y
# 性能加速 php5.5 以上使用
yum install php71w-opcache -y
# 安装这些基本的可以满足大量需求, 至于有些扩展, 会在安装这些库的时候附加进去<br>

五、启动 PHP 7.1

我已经安装好需要程序,要想PHP请求被Nginx接收并转交给PHP-FPM再由PHP解释器执行返回结果,还需要做一些配置。
1、设置Nginx
Nginx 配置文件中 已经配置过,如何接收 php请求了。
2、启动 PHP-FPM

# 启动PHP-FPM
systemctl start php-fpm  
# 设置开机启动
systemctl enable php-fpm

六、基本配置优化

对于搭建一般的小网站,参考 wordpress-优化php-fpm和mysql 。

bash-文件-linux设置文件权限

对指定 文件夹 文件 读写 全开放
chmod 777 -R 文件夹 (递归调用,使子文件 文件夹也是这个权限)

对指定 文件夹 ,设置 文件 文件夹 用户组 和用户 ;就是文件所有者
chown -R apache:apache 文件夹 (递归调用,使子文件 文件夹也是这个权限)

最后 设置好
chmod 755 -R 文件夹 (递归调用,使子文件 文件夹也是这个权限)
ls –l 文件夹 (可以查看文件 权限 用户组)

nginx配置文件-常用配置

一、找到Nginx安装目录

在centos下:可以用 rpm 查找

# 查看 nginx 是否已经安装 
sh-4.2# rpm -qa | grep -i nginx
nginx-1.12.2-1.el7_4.ngx.x86_64
# 查看 具体 软件名 的安装目录
sh-4.2# rpm -ql nginx-1.12.2-1.el7_4.ngx.x86_64
/etc/logrotate.d/nginx
/etc/nginx
/etc/nginx/conf.d
/etc/nginx/conf.d/default.conf
/etc/nginx/fastcgi_params
/etc/nginx/koi-utf
/etc/nginx/koi-win
/etc/nginx/mime.types
/etc/nginx/modules
/etc/nginx/nginx.conf
/etc/nginx/scgi_params
/etc/nginx/uwsgi_params
/etc/nginx/win-utf
/etc/sysconfig/nginx
/etc/sysconfig/nginx-debug
/usr/lib/systemd/system/nginx-debug.service
/usr/lib/systemd/system/nginx.service
/usr/lib64/nginx
/usr/lib64/nginx/modules
/usr/libexec/initscripts/legacy-actions/nginx
/usr/libexec/initscripts/legacy-actions/nginx/check-reload
/usr/libexec/initscripts/legacy-actions/nginx/upgrade
/usr/sbin/nginx
/usr/sbin/nginx-debug
/usr/share/doc/nginx-1.12.2
/usr/share/doc/nginx-1.12.2/COPYRIGHT
/usr/share/man/man8/nginx.8.gz
/usr/share/nginx
/usr/share/nginx/html
/usr/share/nginx/html/50x.html
/usr/share/nginx/html/index.html
/var/cache/nginx
/var/log/nginx
sh-4.2#

从 Nginx 安装目录可以知道,
nginx 系统配置文件:/etc/sysconfig/nginx

# Configuration file for the nginx service.

NGINX=/usr/sbin/nginx
CONFFILE=/etc/nginx/nginx.conf

所以nginx服务器的 配置文件是 /etc/nginx/nginx.conf
查看 此配置文件 发现 ,会加载 /etc/nginx/conf.d/default.conf
简单来说,/etc/nginx/nginx.conf 是主配置文件,会自动 加载 /etc/nginx/conf.d/文件夹下面的所有字配置文件


注意nginx的坑爹之处,nginx 在配置 服务器 名字时,可以是 ip地址,可以是 localhost,可以是 域名。
但是如果 一个 未配置 的 域名指向 该nginx 服务器时,nginx 在配置 文件中 找不到 该 域名的 配置文件,
于是 nginx 会 默认 选择 第一个 配置文件,作为 该域名的 nginx服务器 配置文件。

简单来说,nginx 的所有配置文件中 的server name 没有包括ip 访问的话,如果用 ip直接 访问服务器,
nginx就会 默认 选择 第一个 配置 文件,来进行解析。


二、Nginx基本参数配置

全局配置

我们分片段一点点的介绍默认的配置文件

#user  nobody;
worker_processes  1;

#error_log  logs/error.log;
#error_log  logs/error.log  notice;
#error_log  logs/error.log  info;

#pid        logs/nginx.pid;

events {
    worker_connections  1024;
}

这些是配置文件开始的默认行。通常的环境下,你不需要修改这些选项。这一部分有几个方面需要我们注意:

  • 所有以#号开的行是注释,nginx不会解析。默认的配置文件有许多说明解释的注释块
  • 指令是以一个变量名开头(例如,worker_processes或pid),然后包含一个参数(例如,1或 logs/nginx.pid)或者多个参数(例如,”logs/error.log notice”)
  • 所有指令以分号结尾
  • 某些指令,像上面的events可以包含多个子指令作为参数。这些子指令以花括号包围。
  • 虽然nginx不解析空白符(例如tab,空格,和换行符),但是良好的缩进能提高你维护长期运行配置文件的效率。良好的缩进使配置文件读起来更流畅,能让你很容易明白配置的策略,即使几个月前。

下面我们继续读配置文件

http {
    include       mime.types;
    default_type  application/octet-stream;

    #log_format  main  '$remote_addr - $remote_user [$time_local] "$request" '
    #                  '$status $body_bytes_sent "$http_referer" '
    #                  '"$http_user_agent" "$http_x_forwarded_for"';

    #access_log  logs/access.log  main;

    sendfile        on;
    #tcp_nopush     on;

    #keepalive_timeout  0;
    keepalive_timeout  65;

    #gzip  on;

“http { }”块的开头像配置文件的开头一样都是标准配置不需要修改。这里我们需要把注意力放在这些元素上:

  • 这部分内容的开始”include”语句包含/usr/loca/nginx/mime.types文件到nginx.conf文件include语句所在位置。include对ningx.conf文件的可读性和组织性很有用。
  • 不能过多使用include,如果太多递归地include文件会产生混乱,所以需要合理有限制地使用include来保证配置文件的清晰和可管理。
  • 你可以去掉log_format指令前的注释并修改这几行设置的变量为你想记录的信息。
  • gzip指令告诉nginx使用gzip压缩的方式来降低带宽使用和加快传输速度。如果想使用gzip压缩,需要添加如下配置到配置文件的gzip位置。
        gzip on;
        gzip_http_version 1.1;
        gzip_comp_level 2;
        gzip_types    text/plain text/html text/css
                      application/x-javascript text/xml
                      application/xml application/xml+rss
                      text/javascript;

使用gizp压缩并不是没有代价的。在降低带宽的同时也增加了CPU的使用。gzip_cop_level的参数取值范围1-9,9代表最用CPU和1代表最少用CPU,其默认值是1.

另外,请注意上面的片段 “http { ” 是http的前半部分,其余部分解下面继续,直到匹配的”}”。

虚拟机server配置

我们家是nginx.conf接下来的配置文件是这样

        server {
                listen       80;
                server_name  localhost;

                access_log  logs/localhost.access.log  main;

                location / {
                    root   html;
                    index  index.html index.htm;
                }
        }
}

我们可以看到http{ }块到此结束。

server指令块,像上面例子中那个一样,是我们nginx用户主要配置自己虚拟主机的地方。在server块里有许多重要的指令。listen指令告诉nginx在一个特定的hostname,ip或者tcp端口监听连接。默认,http服务运行在80端口。一下这些listen指令都是有效的:

listen     127.0.0.1:80;
listen     localhost:80;

listen     127.0.0.1:8080;
listen     localhost:8080;

listen     192.168.3.105:80;
listen     192.168.3.105:8080;

listen     80;
listen     *:80;
listen     8080;
listen     *:8080;

listen     12.34.56.77:80;
listen     12.34.56.78:80;
listen     12.34.56.79:80;

在这些例子中,我们可以看到很多不同表达方式:

  • 第一组2个指令指明服务器监听在127.0.0.1或localhost的80端口,localhost通常定义在/etc/hosts指向127.0.0.1
  • 第二组除了端口号监听在8080而不是80外,与第一组相同。
  • 第三组例子定义服务器监听在192.168.3.105的80和8080端口
  • 第四组例子是在所有地址上监听特定的端口。listen 80与listen *:80相同,listen 8080与listen *:80相同。
  • 最后一组例子设置服务器只监听在12.34.56.77/78/79的80端口上的请求。

server_name指令可以设置基于域名的虚拟主机,根据请求头部的内容,一个ip的服务器可以配置多个域名。下面这些server_name的参数是有效的:

server_name   nginx.cn;
server_name   nginx.cn www.nginx.cn;
server_name   *.nginx.cn;
server_name   .nginx.cn;

server_name   nginx.*;

server_name   nginx.cng bucknell.net brackley.org;
server_name   localhost litchfield bleddington;

server_name   "";

多个域名之间以空格分隔。nginx允许一个虚拟主机有一个或多个名字,也可以使用通配符”*”来设置虚拟主机的名字。上面的例子我们看到了很多特殊的地方:

  • 第一组例子,首先定义server_name为nginx.cn,那么来自http://nginx.cn的请求就会发到该主机上。第二个例子配置了nginx.cn和www.nginx.cn,那么http://nginx.cn和http://www.nginx.cn的请求会发到这个主机上。
  • *.nginx.cn和.nginx.cn是等同的配置,设置该主机处理所有来自nginx.cn的子域名,比如www.nginx.cn,blog.nginx.cn等
  • 第二组server_name配置nginx.*,配置服务器处理所有以nginx.开头的请求。例如,nginx.com,nginx.cn,nginx.net,nginx.baidu.com
  • 接下来一组第一个server_name配置,设置主机处理来自三个域名的请求。nginx允许设置不是有效域名的名字。比如接下来这个配置我们可以看到三个不是有效域名的例子,localhost,litchfiled和bledington。nginx只查找请求的HTTP头中的域名但并不判断域名是否有效,这个例子中这些主机名可以配制在/etc/hosts中。当你在本机调试时使用非域名的主机名有时候更适合些。
  • 最后一组例子,server_name设置为空的双引号,它告诉nginx捕捉所有没有hostname的请求,或者hostname没有在其它server_name中指定的。


我们继续分析接下来的server指令块,看看access_log指令。

access_log logs/nginx.access.log;
access_log /srv/http/ducklington.org/logs/access.log;
access_log /var/log/nginx/access/ducklington.org;
access_log off;

第一个例子,日志使用相对路径,log文件放在与配置文件同级的目录中,也就是日志存储在/usr/local/nginx/logs/nginx.access.log;接下来的两个例子定义了完整的绝对路径;最后一个例子是关闭access log,不会记录访问日志到文件。

server块的最后部分是location指令块,对于client的不同请求目标,location是用来配置服务器的不同响应。

就像server_name指令配置nginx处理请求使用包含在请求中的信息一样,location指令配置如何响应不同位置资源的请求。例如:

无需修改主配置文件,只需新建一个域名配置文件。示例如下

[root@testdb ~]# cat /etc/nginx/conf.d/www.example.net.conf
server {
    listen       80;
    server_name  example.net , www.example.net;

    #charset koi8-r;
    #access_log  /var/log/nginx/host.access.log  main;

    root   /var/www/www.example.net;  #wordpress location
    index index.php index.html index.htm;


    location / {

        # try_files $uri $uri/ =404;
         try_files $uri $uri/ /index.php?q=$uri&args;

    }

    error_page  404              /404.html;

    # redirect server error pages to the static page /50x.html
    #
    error_page   500 502 503 504  /50x.html;
    location = /50x.html {
        root   /usr/share/nginx/html;
    }

    # proxy the PHP scripts to Apache listening on 127.0.0.1:80
    #
    #location ~ \.php$ {
    #    proxy_pass   http://127.0.0.1;
    #}

    # pass the PHP scripts to FastCGI server listening on 127.0.0.1:9000
    #
    location ~ \.php$ {
        try_files $uri =404;
        fastcgi_pass   127.0.0.1:9000;
      # fastcgi_pass unix:/var/run/php-fpm/php-fpm.sock;
        fastcgi_index  index.php;
        fastcgi_param  SCRIPT_FILENAME  $document_root$fastcgi_script_name;
        include        fastcgi_params;
    }

    # deny access to .htaccess files, if Apache's document root
    # concurs with nginx's one
    #
    #location ~ /\.ht {
    #    deny  all;
    #}

     location ~ ^/\.user\.ini {
        deny all;
     }

}

[root@testdb ~]# 

部分内容转载自:http://www.nginx.cn/591.html

nginx安装配置-在centos7上

一、Nginx 简介

Nginx (engine x) 是一个高性能的HTTP和反向代理服务器,也是一个IMAP/POP3/SMTP服务器。Nginx是由伊戈尔·赛索耶夫为俄罗斯访问量第二的Rambler.ru站点(俄文:Рамблер)开发的,其将源代码以类BSD许可证的形式发布,因它的稳定性、丰富的功能集、示例配置文件和低系统资源的消耗而闻名。
Nginx是一款轻量级的Web 服务器/反向代理服务器及电子邮件(IMAP/POP3)代理服务器,并在一个BSD-like 协议下发行。其特点是占有内存少,并发能力强。

二、配置Nginx 源

Official Red Hat/CentOS packages

To add NGINX yum repository, create a file named /etc/yum.repos.d/nginx.repo and paste one of the configurations below:

CentOS:

[nginx]
name=nginx repo
baseurl=http://nginx.org/packages/centos/$releasever/$basearch/
gpgcheck=0
enabled=1

RHEL:

[nginx]
name=nginx repo
baseurl=http://nginx.org/packages/rhel/$releasever/$basearch/
gpgcheck=0
enabled=1

Due to differences between how CentOS, RHEL, and Scientific Linux populate the $releasever variable, it is necessary to manually replace $releasever with either 5 (for 5.x) or 6 (for 6.x), depending upon your OS version.

三、centos7 安装 Nginx

1、利用 yum 进行安装

yum install nginx

2、利用命令行 进行编译安装 make install 待补充。。。

四、运行Nginx

#直接运行命令即可
nginx

五、Nginx使用帮助

# 运行帮助 命令即可
nginx -h
nginx version: nginx/1.12.2
Usage: nginx [-?hvVtTq] [-s signal] [-c filename] [-p prefix] [-g directives]

Options:
  -?,-h         : this help
  -v            : show version and exit
  -V            : show version and configure options then exit
  -t            : test configuration and exit
  -T            : test configuration, dump it and exit
  -q            : suppress non-error messages during configuration testing
  -s signal     : send signal to a master process: stop, quit, reopen, reload
  -p prefix     : set prefix path (default: /etc/nginx/)
  -c filename   : set configuration file (default: /etc/nginx/nginx.conf)
  -g directives : set global directives out of configuration file

直接输入 nginx 就可以启动 nginx 了或者 如下命令

#启动 nginx 服务
systemctl start nginx;
systemctl start nginx.service
#设置开机启动
systemctl enable nginx;
systemctl enable&amp;amp;amp;nbsp; nginx.service
#取消开启启动&amp;amp;amp;nbsp; 
systemctl disable nginx
#查看状态
systemctl status nginx.service
#停止运行
systemctl stop nginx.service

vnc-远程连接配置与入门(全攻略)

一、VNC简介

VNC (Virtual Network Console)是虚拟网络控制台的缩写。它 是一款优秀的远程控制工具软件,由著名的 AT&T 的欧洲研究实验室开发的。VNC 是在基于 UNIX 和 Linux 操作系统的免费的开源软件,远程控制能力强大,高效实用,其性能可以和 Windows 和 MAC 中的任何远程控制软件媲美。 在 Linux 中,VNC 包括以下四个命令:vncserver,vncviewer,vncpasswd,和 vncconnect。大多数情况下用户只需要其中的两个命令:vncserver 和 vncviewer。

VNC基本上是由两部分组成:一部分是客户端的应用程序(vncviewer);另外一部分是服务器端的应用程序(vncserver)。VNC的基本运行原理和一些Windows下的远程控制软件很相像。VNC的服务器端应用程序在UNIX和Linux操作系统中适应性很强,图形用户界面十分友好,看上去和Windows下的软件界面也很类似。在任何安装了客户端的应用程序(vncviewer)的Linux平台的计算机都能十分方便地和安装了服务器端的应用程序(vncserver)的计算机相互连接。另外,服务器端 (vncserver)还内建了Java Web接口,这样用户通过服务器端对其他计算机的操作就能通过Netscape显示出来了,这样的操作过程和显示方式比较直观方便。

二、配置vnc客户端

楼主下载的是:VNC Viewer
https://www.realvnc.com/en/connect/download/viewer/
下载完,直接安装就行了。

三、centos7配置vnc服务器端

# 1、下载linux桌面环境
yum groupinstall "GNOME Desktop"

# 2、安装tigervnc 服务端软件
yum install tigervnc-server

# 3、拷贝 vnc 配置文件
# In CentOS 7.0 there is change in the vncserver configuration file. 
# Before ContOS 7.0 it was  /etc/sysconfig/vncservers and now 
# it have changed in /lib/systemd/system/[email protected]. 
# Next I will use the original file and create the configuration file as shown:

cp /lib/systemd/system/[email protected] /etc/systemd/system/vncserver@:1.service

重点步骤:

# 4、编辑vnc配置文件
# Replace the string <USER> with appropriate vncuser’s username.  
# In my case I will be using the user root:
vi /etc/systemd/system/vncserver@:1.service

旧版 vnc 配置文件:

# ... 前面一大堆文字

[Service]
Type=forking
# Clean any existing files in /tmp/.X11-unix environment
ExecStartPre=/bin/sh -c '/usr/bin/vncserver -kill %i > /dev/null 2>&1 || :'
#ExecStart=/sbin/runuser -l  -c "/usr/bin/vncserver %i"
#PIDFile=/home//.vnc/%H%i.pid
ExecStart=/sbin/runuser -l srijan -c "/usr/bin/vncserver %i"
PIDFile=/home/srijan/.vnc/%H%i.pid
ExecStop=/bin/sh -c '/usr/bin/vncserver -kill %i > /dev/null 2>&1 || :'

新版 VNC 配置文件:

# The vncserver service unit file
#
# Quick HowTo:
# 1. Copy this file to /etc/systemd/system/[email protected]
# 2. Replace  with the actual user name and edit vncserver
#    parameters appropriately
#   ("User=" and "/home//.vnc/%H%i.pid")
# 3. Run `systemctl daemon-reload`
# 4. Run `systemctl enable vncserver@:.service`
#
# DO NOT RUN THIS SERVICE if your local area network is
# untrusted!  For a secure way of using VNC, you should
# limit connections to the local host and then tunnel from
# the machine you want to view VNC on (host A) to the machine
# whose VNC output you want to view (host B)
#
# [user@hostA ~]$ ssh -v -C -L 590N:localhost:590M hostB
#
# this will open a connection on port 590N of your hostA to hostB's port 590M
# (in fact, it ssh-connects to hostB and then connects to localhost (on hostB).
# See the ssh man page for details on port forwarding)
#
# You can then point a VNC client on hostA at vncdisplay N of localhost and with
# the help of ssh, you end up seeing what hostB makes available on port 590M
#
# Use "-nolisten tcp" to prevent X connections to your VNC server via TCP.
#
# Use "-localhost" to prevent remote VNC clients connecting except when
# doing so through a secure tunnel.  See the "-via" option in the
# `man vncviewer' manual page.                                                           

[Unit]
Description=Remote desktop service (VNC)
After=syslog.target network.target

[Service]
Type=forking
User=

# Clean any existing files in /tmp/.X11-unix environment
ExecStartPre=-/usr/bin/vncserver -kill %i
ExecStart=/usr/bin/vncserver %i
PIDFile=/home//.vnc/%H%i.pid
ExecStop=-/usr/bin/vncserver -kill %i

[Install]
WantedBy=multi-user.target

新版vnc配置文件,有一个坑

User=
#改成 User=root

PIDFile=/home//.vnc/%H%i.pid
# 改成 PIDFile=/root/.vnc/%H%i.pid
# 普通用户的话,目录都是 /home/用户名
# root 用户的目录是 /root
# 注意啊 这个是坑爹 的地方

5、配置防火墙

firewall-cmd --permanent --zone=public --add-service vnc-server
firewall-cmd --reload

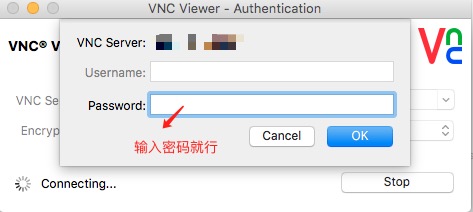
6、启动 vncserver ;就是开启 VNC 服务器,开启的同时,先让你设置个密码(这个密码是客户端需要输入的记住)

[root@server1 ~]# vncserver

You will require a password to access your desktops.

Password:<--yourvncpassword
Verify:<--yourvncpassword
xauth:  file /home/srijan/.Xauthority does not exist

New 'server1.example.com:1 (srijan)' desktop is server1.example.com:1

Creating default startup script /home/kishore/.vnc/xstartup
Starting applications specified in /home/kishore/.vnc/xstartup
Log file is /home/srijan/.vnc/server1.example.com:1.log

[root@server1 ~]#

其实这个时候,vnc服务器 已经可以运行了。
这里的配置的数字1,其实就是 从 VNC 端口 5900开始的,数字1 代表 5901端口,可接收远程连接请求。

7、设置开机自启动
Now make the service enabled on after every reboot with root credentials:

systemctl daemon-reload
systemctl enable vncserver@:1.service
reboot
systemctl start vncserver@:1.service
8、常见报错问题:(网上的解答,不靠谱,尝试了很多,最终看文档,明白了)
[root@localhost system]# systemctl start vncserver@:1.service 
Job for vncserver@:1.service failed. See ‘systemctl status vncserver@:1.service’ and ‘journ 
alctl -xn’ for details.[root@localhost system]# systemctl status vncserver@:1.service 
vncserver@:1.service - Remote desktop service (VNC) 
Loaded: loaded (/etc/systemd/system/vncserver@:1.service; enabled) 
Active: failed (Result: exit-code) since Thu 2015-04-23 16:04:58 CST; 14s ago 
Process: 24764 ExecStart=/sbin/runuser -l root -c /usr/bin/vncserver :1 -geometry 1280x10 
24 -depth 24 (code=exited, status=98) Process: 24760 ExecStartPre=/bin/sh -c /usr/bin/vncserver -kill %1 > /dev/null 2>&1 || : 
(code=exited, status=0/SUCCESS) 
Apr 23 16:04:58 localhost.localdomain systemd[1]: vncserver@:1.service: control proces…98 
Apr 23 16:04:58 localhost.localdomain systemd[1]: Failed to start Remote desktop servi…). 
Apr 23 16:04:58 localhost.localdomain systemd[1]: Unit vncserver@:1.service entered fa…e. 
Hint: Some lines were ellipsized, use -l to show in full. 
[root@localhost system]#

解决方法:
1、可能是 临时文件 问题。

rm -rf  /tmp/.X11-unix

2、可能是端口被占用问题,或者死锁了。

[root@testdb ~]# lsof -i:5901
COMMAND   PID USER   FD   TYPE DEVICE SIZE/OFF NODE NAME
Xvnc    17513 root    9u  IPv4 365529      0t0  TCP localhost:5901 (LISTEN)
Xvnc    17513 root   10u  IPv6 365530      0t0  TCP localhost:5901 (LISTEN)
[root@testdb ~]# kill 17513
[root@testdb ~]#

重新启动系统,就可以啦。


其实直接用命令行启动VNC服务端最方便,使用了很多次,没有报错过

[root@testdb ~]# vncserver -h

usage: vncserver [:<number>] [-name <desktop-name>] [-depth <depth>]
                 [-geometry <width>x<height>]
                 [-pixelformat rgbNNN|bgrNNN]
                 [-fp <font-path>]
                 [-cc <visual>]
                 [-fg]
                 [-autokill]
                 [-noxstartup]
                 [-xstartup <file>]
                 <Xvnc-options>...

       vncserver -kill <X-display>

       vncserver -list

[root@testdb ~]#
# 启动 vnc 服务端 5901端口(分配一个窗口) 命令 
vncserver :1
# 关闭 vnc 服务端 5901 端口(一个窗口) 命令
vncserver -kill :1
# 查看 当前 有 多少个 vnc 窗口 命令
vncserver -list
##########   下面就是命令行 能看到的结果
#  TigerVNC server sessions:
#
#   X DISPLAY #	  PROCESS ID
#    :1		    18936
##################################

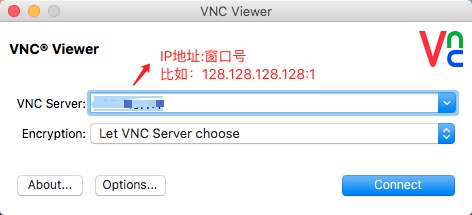
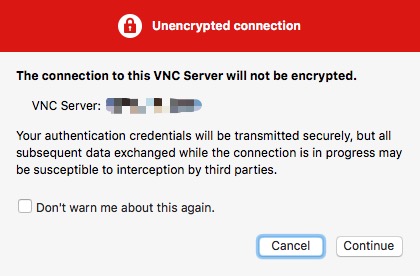
四、客户端连接操作


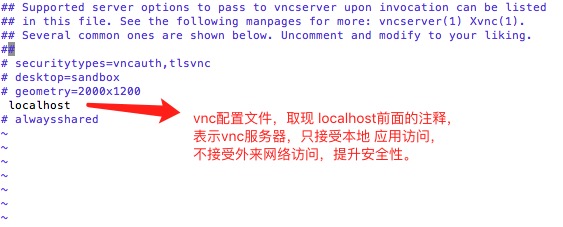
五、VNC安全加固,使用ssh隧道连接登录

利用ssh 登入centos7系统,或者用vnc登录也行。

[root@testdb ~]# ls -a
.                Downloads                                   Pictures
..               .esd_auth                                   .pki
anaconda-ks.cfg  Firefox_wallpaper.png                       Public
.bash_history    get-pip.py                                  .ssh
.bash_logout     .gvfs                                       .tcshrc
.bash_profile    html.tar.gz                                 Templates
.bashrc          .ICEauthority                               Videos
.cache           .local                                      .viminfo
.config          .mozilla                                    .vnc
.cshrc           Music                                       .Xauthority
Desktop          mysql57-community-release-el7-8.noarch.rpm
Documents        .mysql_history
[root@li1582-175 ~]# cd .vnc
[root@li1582-175 .vnc]# ls -a
.       li1582-175.members.linode.com:1.log  passwd
..      li1582-175.members.linode.com:2.log  xstartup
config  localhost.localdomain:1.log
[root@testdb .vnc]# vim config

vim编辑完文件后,保存并重启VNC服务端。

#关闭vnc服务器,
vncserver -kill :1
#重启vnc服务器
vncserver :1

客户端操作如下:
1、SSH本地端口转发。VNC远程连接过程中需要保持一直在后台运行。
假定服务器ip 是 128.128.128.128
假定服务器SSH 端口是 8888

ssh -v -C -L 5901:localhost:5901 [email protected] -p 8888

2、登录vnc客户端:
只需将vnc服务器填本机即可。
VNC SERVER:127.0.0.1:1

部分内容参考自:https://www.howtoforge.com/vnc-server-installation-on-centos-7

yum-配置与入门

yum 的配置文件分为两部分:main 和repository

  • main 部分定义了全局配置选项,整个yum 配置文件应该只有一个main。常位于/etc/yum.conf 中。
  • repository 部分定义了每个源/服务器的具体配置,可以有一到多个。常位于/etc/yum.repo.d 目录下的各文件中。

参考:https://www.cnblogs.com/mchina/archive/2013/01/04/2842275.html

一、yum的配置文件

[bash]
[root@tomy ~]# cat /etc/yum.conf
[main]
cachedir=/var/cache/yum/$basearch/$releasever #yum下载的RPM包的缓存目录
keepcache=0 #缓存是否保存,1保存,0不保存。
debuglevel=2 #调试级别(0-10),默认为2(具体调试级别的应用,我也不了解)。
logfile=/var/log/yum.log #yum的日志文件所在的位置
exactarch=1 #在更新的时候,是否允许更新不同版本的RPM包,比如是否在i386上更新i686的RPM包
obsoletes=1 #这是一个update的参数,具体请参阅yum(8),简单的说就是相当于upgrade,允许更新陈旧的RPM包
gpgcheck=1 #是否检查GPG(GNU Private Guard),一种密钥方式签名。
plugins=1 #是否允许使用插件,默认是0不允许,但是我们一般会用yum-fastestmirror这个插件。
installonly_limit=5 #允许保留多少个内核包
bugtracker_url=http://bugs.centos.org/set_project.php?project_id=23&ref=http://bugs.centos.org/bug_report_page.php?category=yum
distroverpkg=centos-release

# This is the default, if you make this bigger yum won’t see if the metadata
# is newer on the remote and so you’ll “gain” the bandwidth of not having to
# download the new metadata and “pay” for it by yum not having correct
# information.
# It is esp. important, to have correct metadata, for distributions like
# Fedora which don’t keep old packages around. If you don’t like this checking
# interupting your command line usage, it’s much better to have something
# manually check the metadata once an hour (yum-updatesd will do this).
# metadata_expire=90m

# PUT YOUR REPOS HERE OR IN separate files named file.repo
# in /etc/yum.repos.d
[/bash]

二、 yum的详细使用方法

yum是什么
yum = Yellow dog Updater, Modified
主要功能是更方便的添加/删除/更新RPM包.
它能自动解决包的倚赖性问题.
它能便于管理大量系统的更新问题
yum特点
可以同时配置多个资源库(Repository)
简洁的配置文件(/etc/yum.conf
自动解决增加或删除rpm包时遇到的倚赖性问题
使用方便
保持与RPM数据库的一致性

[bash]
yum安装
CentOS自带(yum-*.noarch.rpm)
#rpm -ivh yum-*.noarch.rpm
在第一次启用yum之前首先需要导入系统的RPM-GPG-KEY:
#rpm –import /usr/share/doc/centos-release-3(4)/RPM-GPG-KEY-CentOS-3(4)

yum指令
注:当第一次使用yum或yum资源库有更新时,yum会自动下载所有所需的headers放置于/var/cache/yum目录下,所需时间可能较长.

rpm包的更新
检查可更新的rpm包
#yum check-update
更新所有的rpm包
#yum update
更新指定的rpm包,如更新kernel和kernel source
#yum update kernel kernel-source
大规模的版本升级,与yum update不同的是,连旧的淘汰的包也升级
#yum upgrade

rpm包的安装和删除
安装rpm包,如xmms-mp3
#yum install xmms-mp3
删除rpm包,包括与该包有倚赖性的包
#yum remove licq
注:同时会提示删除licq-gnome,licq-qt,licq-text

yum暂存(/var/cache/yum/)的相关参数
清除暂存中rpm包文件
#yum clean packages
清除暂存中rpm头文件
#yum clearn headers
清除暂存中旧的rpm头文件
#yum clean oldheaders
清除暂存中旧的rpm头文件和包文件
#yum clearn 或#yum clearn all
注:相当于yum clean packages + yum clean oldheaders

包列表
列出资源库中所有可以安装或更新的rpm包
#yum list
列出资源库中特定的可以安装或更新以及已经安装的rpm包
#yum list mozilla#yum list mozilla*
注:可以在rpm包名中使用匹配符,如列出所有以mozilla开头的rpm包
列出资源库中所有可以更新的rpm包
#yum list updates
列出已经安装的所有的rpm包
#yum list installed
列出已经安装的但是不包含在资源库中的rpm包
#yum list extras
注:通过其它网站下载安装的rpm包

rpm包信息显示(info参数同list)
列出资源库中所有可以安装或更新的rpm包的信息
#yum info
列出资源库中特定的可以安装或更新以及已经安装的rpm包的信息
#yum info mozilla#yum info mozilla*
注:可以在rpm包名中使用匹配符,如列出所有以mozilla开头的rpm包的信息
列出资源库中所有可以更新的rpm包的信息
#yum info updates
列出已经安装的所有的rpm包的信息
#yum info installed
列出已经安装的但是不包含在资源库中的rpm包的信息
#yum info extras
注:通过其它网站下载安装的rpm包的信息

搜索rpm包
搜索匹配特定字符的rpm包
#yum search mozilla
注:在rpm包名,包描述等中搜索
搜索有包含特定文件名的rpm包
#yum provides realplay

增加资源库
例如:增加rpm.livna.org作为资源库
安装Livna.org rpms GPG key
#rpm –import http://rpm.livna.org/RPM-LIVNA-GPG-KEY
检查GPG Key
# rpm -qa gpg-pubkey*
显示Key信息
#rpm -qi gpg-pubkey-a109b1ec-3f6e28d5
(注:如果要删除Key,使用#rpm -e gpg-pubkey-a109b1ec-3f6e28d5)

yum常用的命令

# yum install xxx 安装xxx软件

# yum info xxx 查看xxx软件的信息

# yum remove xxx 删除软件包

# yum list 列出软件包

# yum clean 清除缓冲和就的包

# yum provides xxx 以xxx为关键字搜索包(提供的信息为关键字)

# yum search xxx 搜索软件包(以名字为关键字)

# yum groupupdate xxx

# yum grouplist xxx

# yum groupremove xxx

这三个都是一组为单位进行升级 列表和删除的操作。。比如 “Mysql Database”就是一个组会同时操作相关的所有软件包;

# yum update 系统升级

# yum list available 列出所有升级源上的包;

# yum list updates 列出所有升级源上的可以更新包;

# yum list installed 列出已经安装的包;

# yun update kernel 升级内核;

yum常用的源

1) 自动选择最快的源

由于yum中有的mirror速度是非常慢的,如果yum选择了这个mirror,这个时候yum就会非常慢,对此,可以下载fastestmirror插件,它会自动选择最快的mirror:

#yum install yum-fastestmirror

配置文件:(一般不用动)/etc/yum/pluginconf.d/fastestmirror.conf

你的yum镜像的速度测试记录文件:/var/cache/yum/timedhosts.txt

(2)使用图形界面的yum

如果觉得命令行的yum不方便,那么可以使用图形化的yumex,这个看起来更方便,因为可以自由地选择软件仓库:

#yum install yumex

然后在系统工具中就可以看到yum extender了。实际上系统自带的“添加/删除程序“也可以实现图形化的软件安装,但有些yumex的功能它没有。
[/bash]

三、*.repo文件详解

什么是repo文件?【下面提到的是Fedora系统,和centos 类似,都是linux系统】
[bash]
repo文件是Fedora中yum源(软件仓库)的配置文件,通常一个repo文件定义了一个或者多个软件仓库的细节内容,例如我们将从哪里下载需要安装或者升级的软件包,repo文件中的设置内容将被yum读取和应用!
我们以一份系统自带的repo文件做为实例来探讨(#号后面是我加的注释):
[fedora] #方括号里面的是软件源的名称,将被yum取得并识别

name=Fedora $releasever – $basearch #这里也定义了软件 仓库的名称,通常是为了方便阅读配置文件,一般没什么作用,$releasever变量定义了发行版本,通常是8,9,10等数字,$basearch变 量定义了系统的架构,可以是i386、x86_64、ppc等值,这两个变量根据当前系统的版本架构不同而有不同的取值,这可以方便yum升级的时候选择 适合当前系统的软件包,以下同……
failovermethod=priority #failovermethod 有两个值可以选择,priority是默认值,表示从列出的baseurl中顺序选择镜像服务器地址,roundrobin表示在列出的服务器中随机选择
exclude=compiz* *compiz* fusion-icon* #exclude这个选项是后来我自己加上去的,用来禁止这个软件仓库中的某些软件包的安装和更新,可以使用通配符,并以空格分隔,可以视情况需要自行添加
#baseurl=http://download.fedoraproject.org/pub/fedora/linux/releases/$releasever/Everything/$basearch/os/
#上面的一行baseurl第一个字符是’#’表示该行已经被注释,将不会被读取,这一行的意思是指定一个baseurl(源的镜像服务器地址)
#mirrorlist=http://mirrors.fedoraproject.org/mirrorlist?repo=fedora-$releasever&arch=$basearch
#上面的这一行是指定一个镜像服务器的地址列表,通常是开启的,本例中加了注释符号禁用了,我们可以试试,将$releasever和$basearch替换成自己对应的版本和架构,例如10和i386,在浏览器中打开,我们就能看到一长串镜可用的镜像服务器地址列表。
选择自己访问速度较快的镜像服务器地址复制并粘贴到repo文件中,我们就能获得较快的更新速度了,格式如下baseurl所示:
baseurl=
ftp://ftp.sfc.wide.ad.jp/pub/Linux/Fedora/releases/10/Everything/i386/os
http://ftp.chg.ru/pub/Linux/fedora/linux/releases/10/Everything/i386/os
http://ftp.yz.yamagata-u.ac.jp/pub/linux/fedora/linux/releases/10/Everything/i386/os
http://mirror.nus.edu.sg/fedora/releases/10/Everything/i386/os
http://mirror.yandex.ru/fedora/linux/releases/10/Everything/i386/os
http://ftp.twaren.net/Linux/Fedora/linux/releases/10/Everything/i386/os
http://ftp.itu.edu.tr/Mirror/Fedora/linux/releases/10/Everything/i386/os

enabled=1 #这个选项表示这个repo中定义的源是启用的,0为禁用
gpgcheck=1 #这个选项表示这个repo中下载的rpm将进行gpg的校验,已确定rpm包的来源是有效和安全的
gpgkey=file:///etc/pki/rpm-gpg/RPM-GPG-KEY-fedora-$basearch #定义用于校验的gpg密钥

##以下的软件仓库基本上用不到,选项含义同上
[fedora-debuginfo]
name=Fedora $releasever – $basearch – Debug
failovermethod=priority
#baseurl=http://download.fedoraproject.org/pub/fedora/linux/releases/$releasever/Everything/$basearch/debug/
mirrorlist=http://mirrors.fedoraproject.org/mirrorlist?repo=fedora-debug-$releasever&arch=$basearch
enabled=0
gpgcheck=1
gpgkey=file:///etc/pki/rpm-gpg/RPM-GPG-KEY-fedora-$basearch

[fedora-source]
name=Fedora $releasever – Source
failovermethod=priority
#baseurl=http://download.fedoraproject.org/pub/fedora/linux/releases/$releasever/Everything/source/SRPMS/
mirrorlist=http://mirrors.fedoraproject.org/mirrorlist?repo=fedora-source-$releasever&arch=$basearch
enabled=0
gpgcheck=1
gpgkey=file:///etc/pki/rpm-gpg/RPM-GPG-KEY-fedora-$basearch
[/bash]

转载自: http://www.cnblogs.com/sunth/archive/2011/04/14/2015653.html
转载自: http://www.cnblogs.com/xiaochaohuashengmi/archive/2011/10/09/2203916.html

centos7初装系统-ssh登录locale编码问题

勘误,之前这篇文章有错误    http://www.01happy.com/p3204/
问题不是系统自身编码问题,是不同系统的local登录衔接问题。

locale问题起因

登录 centos7 系统时,命令行模式下会出现一个警告:

[bash]
locale: Cannot set LC_CTYPE to default locale: No such file or directory
locale: Cannot set LC_ALL to default locale: No such file or directory
[/bash]

这个不是由于系统默认编码问题导致的,这个是因为两台电脑连接时,本地编码不能协调导致的,分析如下:

centos本机登录(没报错)

[root@localhost ~]# locale
LANG=en_US.UTF-8
LC_CTYPE="en_US.UTF-8"
LC_NUMERIC="en_US.UTF-8"
LC_TIME="en_US.UTF-8"
LC_COLLATE="en_US.UTF-8"
LC_MONETARY="en_US.UTF-8"
LC_MESSAGES="en_US.UTF-8"
LC_PAPER="en_US.UTF-8"
LC_NAME="en_US.UTF-8"
LC_ADDRESS="en_US.UTF-8"
LC_TELEPHONE="en_US.UTF-8"
LC_MEASUREMENT="en_US.UTF-8"
LC_IDENTIFICATION="en_US.UTF-8"
LC_ALL=
[root@localhost ~]#

mac本机登录(没报错)

mbpdeMacBook-Pro:~ cool$ locale
LANG=
LC_COLLATE="C"
LC_CTYPE="UTF-8"
LC_MESSAGES="C"
LC_MONETARY="C"
LC_NUMERIC="C"
LC_TIME="C"
LC_ALL=
mbpdeMacBook-Pro:~ cool$

mac连接centos登录(报错了)

[root@localhost ~]# locale
locale: Cannot set LC_CTYPE to default locale: No such file or directory
locale: Cannot set LC_ALL to default locale: No such file or directory
LANG=en_US.UTF-8
LC_CTYPE=UTF-8
LC_NUMERIC="en_US.UTF-8"
LC_TIME="en_US.UTF-8"
LC_COLLATE="en_US.UTF-8"
LC_MONETARY="en_US.UTF-8"
LC_MESSAGES="en_US.UTF-8"
LC_PAPER="en_US.UTF-8"
LC_NAME="en_US.UTF-8"
LC_ADDRESS="en_US.UTF-8"
LC_TELEPHONE="en_US.UTF-8"
LC_MEASUREMENT="en_US.UTF-8"
LC_IDENTIFICATION="en_US.UTF-8"
LC_ALL=
[root@localhost ~]# 

locale背景知识

locale基本含义

locale就是某一个地域内的人们的语言习惯和文化传统和生活习惯。一个地区的locale就是根据这几大类的习惯定义的,这些locale定 义文件放在/usr/share/i18n/locales目录下面,例如en_US, zh_CN and de_DE@euro都是locale的定义文件,这些文件都是用文本格式书写的,你可以用写字板打开,看看里边的内容,当然出了有限的注释以外,大部分 东西可能你都看不懂,因为是用的Unicode的字符索引方式。

cat /usr/share/i18n/locales/zh_CN
comment_char %
escape_char  /
%
% Chinese language locale for the Peoples Republic of China
%
% This work is based on ISO PDTR 14652, Unicode 3.0, locale definition
% file for zh_CN revision 1.0 ([email protected], 1999-04-28) and
% charmap file for GBK version 1.0 ([email protected]).
%
% The file is designed to work with multiple charsets.  To ease the
% maintance and adding support for new charsets, all characters are
% in UCS notation and presented in Unicode order.
%
% Changelog:
% Tue Jul 25 2000 Yong Li <[email protected]>
% - first version for glibc 2.2

。。。。。。
。。。

locale内容说明

[oracle@game ~]$ locale
LANG=en_US.UTF-8
LC_CTYPE="en_US.UTF-8"
LC_NUMERIC="en_US.UTF-8"
LC_TIME="en_US.UTF-8"
LC_COLLATE="en_US.UTF-8"
LC_MONETARY="en_US.UTF-8"
LC_MESSAGES="en_US.UTF-8"
LC_PAPER="en_US.UTF-8"
LC_NAME="en_US.UTF-8"
LC_ADDRESS="en_US.UTF-8"
LC_TELEPHONE="en_US.UTF-8"
LC_MEASUREMENT="en_US.UTF-8"
LC_IDENTIFICATION="en_US.UTF-8"
LC_ALL=en_US.UTF-8
[oracle@game ~]$ 

locale把按照所涉及到的文化传统的各个方面分成12个大类,这12个大类分别是: 

1、语言符号及其分类(LC_CTYPE) 
2、数字(LC_NUMERIC) 
3、比较和排序习惯(LC_COLLATE) 
4、时间显示格式(LC_TIME) 
5、货币单位(LC_MONETARY) 
6、信息主要是提示信息,错误信息,状态信息,标题,标签,按钮和菜单等(LC_MESSAGES) 
7、姓名书写方式(LC_NAME) 
8、地址书写方式(LC_ADDRESS) 
9、电话号码书写方式(LC_TELEPHONE) 
10、度量衡表达方式 (LC_MEASUREMENT) 
11、默认纸张尺寸大小(LC_PAPER) 
12、对locale自身包含信息的概述(LC_IDENTIFICATION)。

locale格式说明

zh_CN.GB2312到底是在说什么?

Locale是软件在运行时的语言环境, 它包括语言(Language), 地域 (Territory) 和字符集(Codeset)。

一个locale的书写格式为: 语言[_地域[.字符集]]。所以说呢,locale总是和一定的字符集相联系的。

下面举几个例子:

1、我说中文,身处中华人民共和国,使用国标2312字符集来表达字符。zh_CN.GB2312=中文_中华人民共和国+国标2312字符集。

2、我说中文,身处中华人民共和国,使用国标18030字符集来表达字符。zh_CN.GB18030=中文_中华人民共和国+国标18030字符集。

3、我说中文,身处中华人民共和国台湾省,使用国标Big5字符集来表达字符。zh_TW.BIG5=中文_台湾.大五码字符集

4、我说英文,身处大不列颠,使用ISO-8859-1字符集来表达字符。 en_GB.ISO-8859-1=英文_大不列颠.ISO-8859-1字符集

5、我说德语,身处德国,使用UTF-8字符集,习惯了欧洲风格。de_DE.UTF-8@euro=德语_德国.UTF-8字符集@按照欧洲习惯加以修正,注意不是[email protected],所以完全的locale表达方式是 [语言[_地域][.字符集] [@修正值]。

对于de_DE@euro的一点说明,@后边是修正项,也就是说你可以看到两个德国的locale:/usr/share/i18n/locales /de_DE@euro和/usr/share/i18n/locales/de_DE。

打开这两个locale定义,你就会知道它们的差别在于 de_DE@euro使用的是欧洲的排序、比较和缩进习惯,而de_DE用的是德国的标准习惯。

locale优先级说明

设定locale就是设定12大类的locale分类属性,即12个LC_*。除了这12个变量可以设定以外,为了简便起见,还有两个变量:LC_ALL和LANG。它们之间有一个优先级的关系:LC_ALL > LC_* >LANG可以这么说,LC_ALL是最上级设定或者强制设定,而LANG是默认设定值。

1、如果你设定了LC_ALL=zh_CN.UTF-8,那么不管LC_*和LANG设定成什么值,它们都会被强制服从LC_ALL的设定,成为 zh_CN.UTF-8。

2、假如你设定了LANG=zh_CN.UTF-8,而其他的LC_*=en_US.UTF-8,并且没有设定LC_ALL的话,那么系统的locale设定以LC_*=en_US.UTF-8。

3、假如你设定了LANG=zh_CN.UTF-8,而其他的LC_*,和LC_ALL均未设定的话,系统会将LC_*设定成默认值,也就是LANG的值zh_CN.UTF-8。

4、假如你设定了LANG=zh_CN.UTF-8,而其他的LC_CTYPE=en_US.UTF-8,其他的LC_*,和LC_ALL均未设定的话, 那么系统的locale设定将是:LC_CTYPE=en_US.UTF-8,其余的 LC_COLLATE,LC_MESSAGES等等均会采用默认值,也就是 LANG的值,也就是LC_COLLATE=LC_MESSAGES=……= LC_PAPER=LANG=zh_CN.UTF-8。

所以,locale是这样设定的: 

1、如果你需要一个纯中文的系统的话,设定LC_ALL= zh_CN.XXXX,或者LANG=zh_CN.XXXX都可以,当然你可以两个都设定,但正如上面所讲,LC_ALL的值将覆盖所有其他的locale设定,不要作无用功。

2、如果你只想要一个可以输入中文的环境,而保持菜单、标题,系统信息等等为英文界面,那么只需要设定 LC_CTYPE=zh_CN.XXXX,LANG=en_US.XXXX就可以了这样LC_CTYPE=zh_CN.XXXX,而LC_COLLATE=LC_MESSAGES=……= LC_PAPER=LANG=en_US.XXXX。

3、假如你高兴的话,可以把12个LC_*一一设定成你需要的值,打造一个古灵精怪的系统: LC_CTYPE=zh_CN.GBK/GBK(使用中文编码内码GBK字符集); LC_NUMERIC=en_GB.ISO-8859-1(使用大不列颠的数字系统) [email protected](德国的度量衡使用ISO-8859-15字符集) 罗马的地址书写方式,美国的纸张设定……。估计没人这么干吧。

4、假如你什么也不做的话,也就是LC_ALL,LANG和LC_*均不指定特定值的话,系统将采用POSIX作为lcoale,也就是 C  locale。

也就是说如果没有设置这些环境变量的时候,在系统安装好的时候这些环境变量是有默认值的,默认值是POSIX。(这应该只针对英文系统,装中文系统的话,这些变量的默认值应该不是POSIX了。)
http://pubs.opengroup.org/onlinepubs/007908799/xbd/locale.html
http://pubs.opengroup.org/onlinepubs/007908799/xbd/locale.html#tag_005_002
这有Locale和POSIX locale的说明,有兴趣自己研究一下吧。

我的理解是,locale就相当于一个编码字符集,POSIX字符集里没有中文编码,所有如果使用POSIX编码的字符集去打开中文文件的话,就会出现乱码。

另外LANG和LANGUAGE有什么区别呢?

LANG – Specifies the default locale for all unset locale variables
LANGUAGE – Most programs use this for the language of its interface
LANGUAGE是应用程序中的设置语言的选项。而LANG是优先级很低的一个全局变量,它指定所有与locale有关的变量的默认值。

locale基本命令

### 查看系统默认的语言设置
[root@toy ~]# locale


### 查看所有语言
[root@room9pc01 ~]# locale -a
### 或者 查看系统支持的汉语区域语言
[root@toy ~]# localectl list-locales| grep zh 


### 查看当前区域配置
[root@toy ~]# localectl status
   System Locale: LANG=zh_CN.utf8
     VC Keymap: cn

     X11 Layout: cn


### 设置区域语言,其实在 /etc/locale.conf 在这个文本文件中,默认就一行 LANG=en_US.UTF-8
[root@toy ~]# localectl set-locale  LANG=zh_CN.utf8
### 查看上一条命令设置好的区域语言,
### 注意 centos6 是这个文件 /etc/sysconfig/i18n ,centos7 是 /etc/locale.conf
[root@toy ~]# cat /etc/locale.conf 
LANG=zh_CN.utf8 


### 刷新bash 或者重启,使设置生效 ###

locale问题分析

1、根据优先级:先找LC_ALL的配置,发现没有,就开始找 LC_CTYPE 。
2、然后 LC_CTYPE=UTF-8 ,在centos中找不到这个配置项,所以报错。

### 可以通过locale -a查看到系统支持的语系,
[root@localhost ~]# locale -a
aa_DJ
aa_DJ.iso88591
aa_DJ.utf8
aa_ER
aa_ER@saaho
aa_ER.utf8
aa_ER.utf8@saaho
aa_ET
。。。
。。
。

locale: Cannot set LC_CTYPE to default locale: No such file or directory
locale: Cannot set LC_ALL to default locale: No such file or directory
这边两行的错误其实就是说LC_CTYPE这个编码文件找不到,然后LC_ALL也找不到。
3、因为前面两个都报错,所以默认就使用LANG的配置。

4、然后我们知道 /etc/sysconfig/i18n 和 /etc/sysconfig/i18n 中,都只设置了 LANG 变量,且系统连接时 LC_CTYPE 会将本机系统的值传递到远程主机的系统中。【LC_CTYPE  好像没有 设置过,应该是系统默认值】

locale问题解决方案

1、远程主机自己指定 LC_CTYPE 。在远程主机的本地化文件中添加  LC_CTYPE 的值,此优先级比客户端主机传递过来的值要高。

centos6下面全局语系的配置放在/etc/sysconfig/i18n文件,修改
$ vim /etc/sysconfig/i18n
增加   LC_CTYPE="en_US.UTF-8"
重启服务器,问题就解决了。


不过Centos7上没有/etc/sysconfig/i18n,
查了下有 /etc/locale.conf 文件起到同样的作用。
于是添加   LC_CTYPE="en_US.UTF-8"
重启服务器,问题就解决了。

2、取消客户端传递过来的 LC_CTYPE
在客户端编辑 vim /etc/ssh/ssh_config找到SendEnv LANG LC_*注释掉

3、修改客户端的  LC_CTYPE ,使得 LC_CTYPE= en_US.UTF-8,这样传递给远程主机时就能识别了。

4、在远程主机中,创建一个 UTF-8 的locale文件,这样子系统就能识别了,也就是可以找到该文件了。

举例:
编辑 /etc/locale.gen文件,反注释 en_US.UTF-8 UTF-8 一行.
执行生成命令  locale-gen
【locale-gen 好像在Ubuntu下可以,centos中没有这个命令】
http://manpages.ubuntu.com/manpages/bionic/man8/locale-gen.8.html


参考:

https://www.cloudbility.com/club/7195.html
https://www.jianshu.com/p/fb6c5d747700
https://www.jianshu.com/p/2b24861be987

https://blog.csdn.net/lemontree1945/article/details/80088986
https://www.cnblogs.com/xlmeng1988/archive/2013/01/16/locale.html

https://www.jianshu.com/p/2b24861be987
SSH-用screen恢复会话

你是不是经常需要 SSH 或者 telent 远程登录到 Linux 服务器?你是不是经常为一些长时间运行的任务而头疼,比如系统备份、ftp 传输等等。通常情况下我们都是为每一个这样的任务开一个远程终端窗口,因为他们执行的时间太长了。必须等待它执行完毕,在此期间可不能关掉窗口或者断开连接,否则这个任务就会被杀掉,一切半途而废了。

screen : 退出销毁操作

screen -ls 

There is a screen on:
    30339.pyapi (Detached)
1 Socket in /var/run/screen/S-root.

screen -r 30339        //进入要中断的screen

exit        //exit 或者 control +c 退出 screen


元凶:SIGHUP 信号

让我们来看看为什么关掉窗口/断开连接会使得正在运行的程序死掉。

在Linux/Unix中,有这样几个概念:

  • 进程组(process group):一个或多个进程的集合,每一个进程组有唯一一个进程组ID,即进程组长进程的ID。
  • 会话期(session):一个或多个进程组的集合,有唯一一个会话期首进程(session leader)。会话期ID为首进程的ID。
  • 会话期可以有一个单独的控制终端(controlling terminal)。与控制终端连接的会话期首进程叫做控制进程(controlling process)。当前与终端交互的进程称为前台进程组。其余进程组称为后台进程组。

根据POSIX.1定义:

  • 挂断信号(SIGHUP)默认的动作是终止程序。
  • 当终端接口检测到网络连接断开,将挂断信号发送给控制进程(会话期首进程)。
  • 如果会话期首进程终止,则该信号发送到该会话期前台进程组。
  • 一个进程退出导致一个孤儿进程组中产生时,如果任意一个孤儿进程组进程处于STOP状态,发送SIGHUP和SIGCONT信号到该进程组中所有进程。

因此当网络断开或终端窗口关闭后,控制进程收到SIGHUP信号退出,会导致该会话期内其他进程退出。

我们来看一个例子。打开两个SSH终端窗口,在其中一个运行top命令。

[root@tivf09 root]# top

在另一个终端窗口,找到top的进程ID为5180,其父进程ID为5128,即登录shell。

[root@tivf09 root]# ps -ef|grep top
root      5180  5128  0 01:03 pts/0    00:00:02 top
root      5857  3672  0 01:12 pts/2    00:00:00 grep top

使用pstree命令可以更清楚地看到这个关系:

[root@tivf09 root]# pstree -H 5180|grep top
|-sshd-+-sshd---bash---top

使用ps-xj命令可以看到,登录shell(PID 5128)和top在同一个会话期,shell为会话期首进程,所在进程组PGID为5128,top所在进程组PGID为5180,为前台进程组。

[root@tivf09 root]# ps -xj|grep 5128
 5126  5128  5128  5128 pts/0     5180 S        0   0:00 -bash
 5128  5180  5180  5128 pts/0     5180 S        0   0:50 top
 3672 18095 18094  3672 pts/2    18094 S        0   0:00 grep 5128

关闭第一个SSH窗口,在另一个窗口中可以看到top也被杀掉了。

[root@tivf09 root]# ps -ef|grep 5128
root     18699  3672  0 04:35 pts/2    00:00:00 grep 5128

如果我们可以忽略SIGHUP信号,关掉窗口应该就不会影响程序的运行了。nohup命令可以达到这个目的,如果程序的标准输出/标准错误是终端,nohup默认将其重定向到nohup.out文件。值得注意的是nohup命令只是使得程序忽略SIGHUP信号,还需要使用标记&把它放在后台运行。

nohup <command> [argument…] &

虽然nohup很容易使用,但还是比较“简陋”的,对于简单的命令能够应付过来,对于复杂的需要人机交互的任务就麻烦了。

其实我们可以使用一个更为强大的实用程序screen。流行的Linux发行版(例如Red Hat Enterprise Linux 4)通常会自带screen实用程序,如果没有的话,可以从GNU screen的官方网站下载。

[root@tivf06 ~]# rpm -qa|grep screen
xscreensaver-4.18-5.rhel4.11
screen-4.0.2-5

开始使用Screen

# 先在 服务器端 安装 screen
[root@ttsdy ~]# yum install screen

简单来说,Screen是一个可以在多个进程之间多路复用一个物理终端的窗口管理器。Screen中有会话的概念,用户可以在一个screen会话中创建多个screen窗口,在每一个screen窗口中就像操作一个真实的telnet/SSH连接窗口那样。在screen中创建一个新的窗口有这样几种方式:

1.直接在命令行键入screen命令

[bash]
[root@tivf06 ~]# screen
[/bash]

Screen将创建一个执行shell的全屏窗口。你可以执行任意shell程序,就像在ssh窗口中那样。在该窗口中键入exit退出该窗口,如果这是该screen会话的唯一窗口,该screen会话退出,否则screen自动切换到前一个窗口。

2.Screen命令后跟你要执行的程序。
[root@tivf06 ~]# screen vi test.c

Screen创建一个执行vi test.c的单窗口会话,退出vi将退出该窗口/会话。

3.以上两种方式都创建新的screen会话。我们还可以在一个已有screen会话中创建新的窗口。在当前screen窗口中键入C-a c,即Ctrl键+a键,之后再按下c键,screen 在该会话内生成一个新的窗口并切换到该窗口。

screen还有更高级的功能。你可以不中断screen窗口中程序的运行而暂时断开(detach)screen会话,并在随后时间重新连接(attach)该会话,重新控制各窗口中运行的程序。例如,我们打开一个screen窗口编辑/tmp/abc文件:

[root@tivf06 ~]# screen vi /tmp/abc

之后我们想暂时退出做点别的事情,比如出去散散步,那么在screen窗口键入C-a d,Screen会给出detached提示:

暂时中断会话

半个小时之后回来了,找到该screen会话:

[root@tivf06 ~]# screen -ls
There is a screen on:
        16582.pts-1.tivf06      (Detached)
1 Socket in /tmp/screens/S-root.

重新连接会话:

[root@tivf06 ~]# screen -r 16582

看看出现什么了,太棒了,一切都在。继续干吧。

你可能注意到给screen发送命令使用了特殊的键组合C-a。这是因为我们在键盘上键入的信息是直接发送给当前screen窗口,必须用其他方式向screen窗口管理器发出命令,默认情况下,screen接收以C-a开始的命令。这种命令形式在screen中叫做键绑定(key binding),C-a叫做命令字符(command character)。

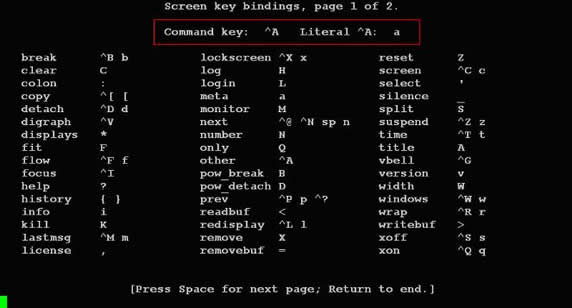
可以通过C-a ?来查看所有的键绑定,常用的键绑定有:

Screen常用选项

使用键绑定C-a ?命令可以看到, 默认的命令字符(Command key)为C-a,转义C-a(literal ^a)的字符为a:

Screen 常用选项

因为screen把C-a看作是screen命令的开始,所以如果你想要screen窗口接收到C-a字符,就要输入C-a a。Screen也允许你使用-e选项设置自己的命令字符和转义字符,其格式为:

-exy x为命令字符,y为转义命令字符的字符

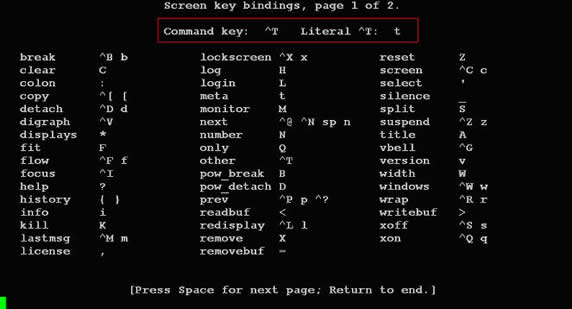
下面命令启动的screen会话指定了命令字符为C-t,转义C-t的字符为t,通过C-t ?命令可以看到该变化。

[root@tivf18 root]# screen -e^tt
自定义命令字符和转义字符

其他常用的命令选项有:

下例显示当前有两个处于detached状态的screen会话,你可以使用screen -r <screen_pid>重新连接上:

[root@tivf18 root]# screen –ls
There are screens on:
        8736.pts-1.tivf18       (Detached)
        8462.pts-0.tivf18       (Detached)
2 Sockets in /root/.screen.
 
[root@tivf18 root]# screen –r 8736

如果由于某种原因其中一个会话死掉了(例如人为杀掉该会话),这时screen -list会显示该会话为dead状态。使用screen -wipe命令清除该会话:

[root@tivf18 root]# kill -9 8462
[root@tivf18 root]# screen -ls  
There are screens on:
        8736.pts-1.tivf18       (Detached)
        8462.pts-0.tivf18       (Dead ???)
Remove dead screens with 'screen -wipe'.
2 Sockets in /root/.screen.
 
[root@tivf18 root]# screen -wipe
There are screens on:
        8736.pts-1.tivf18       (Detached)
        8462.pts-0.tivf18       (Removed)
1 socket wiped out.
1 Socket in /root/.screen.
 
[root@tivf18 root]# screen -ls  
There is a screen on:
        8736.pts-1.tivf18       (Detached)
1 Socket in /root/.screen.
 
[root@tivf18 root]#

-d –m 选项是一对很有意思的搭档。他们启动一个开始就处于断开模式的会话。你可以在随后需要的时候连接上该会话。有时候这是一个很有用的功能,比如我们可以使用它调试后台程序。该选项一个更常用的搭配是:-dmS sessionname

启动一个初始状态断开的screen会话:

[root@tivf06 tianq]# screen -dmS mygdb gdb execlp_test

连接该会话:

[root@tivf06 tianq]# screen -r mygdb

管理你的远程会话

先来看看如何使用screen解决SIGHUP问题,比如现在我们要ftp传输一个大文件。如果按老的办法,SSH登录到系统,直接ftp命令开始传输,之后。。如果网络速度还可以,恭喜你,不用等太长时间了;如果网络不好,老老实实等着吧,只能传输完毕再断开SSH连接了。让我们使用screen来试试。

SSH登录到系统,在命令行键入screen。

[root@tivf18 root]# screen

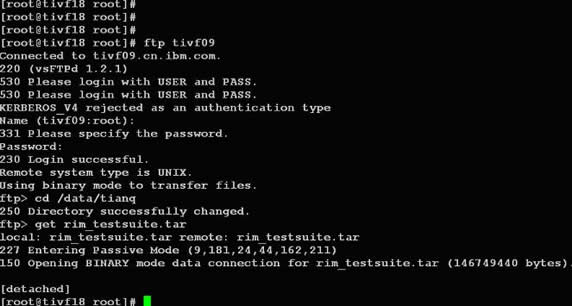
在screen shell窗口中输入ftp命令,登录,开始传输。不愿意等了?OK,在窗口中键入C-a d:

管理你的远程会话

然后。。退出SSH登录?随你怎样,只要别杀掉screen会话。

是不是很方便?更进一步,其实我们可以利用screen这种功能来管理你的远程会话,保存你所有的工作内容。你是不是每次登录到系统都要开很多窗口,然后每天都要重复打开关闭这些窗口?让screen来帮你“保存”吧,你只需要打开一个ssh窗口,创建需要的screen窗口,退出的时候C-a d“保存”你的工作,下次登录后直接screen -r <screen_pid>就可以了。

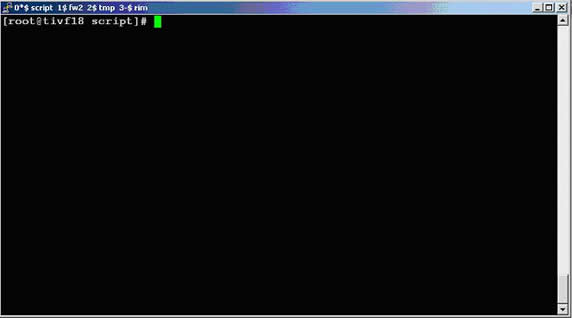
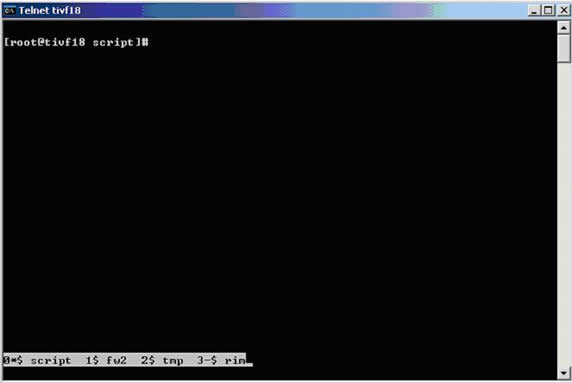
最好能给每个窗口起一个名字,这样好记些。使用C-a A给窗口起名字。使用C-a w可以看到这些窗口名字,可能名字出现的位置不同。使用putty:

putty

使用telnet:

telnet

更多Screen功能

Screen提供了丰富强大的定制功能。你可以在Screen的默认两级配置文件/etc/screenrc和$HOME/.screenrc中指定更多,例如设定screen选项,定制绑定键,设定screen会话自启动窗口,启用多用户模式,定制用户访问权限控制等等。如果你愿意的话,也可以自己指定screen配置文件。

以多用户功能为例,screen默认是以单用户模式运行的,你需要在配置文件中指定multiuser on 来打开多用户模式,通过acl*(acladd,acldel,aclchg...)命令,你可以灵活配置其他用户访问你的screen会话。更多配置文件内容请参考screen的man页。

参考资料

转载自:https://www.ibm.com/developerworks/cn/linux/l-cn-screen/

yum-Warning: RPMDB altered outside of yum

The warning means that you ran rpm directly instead of using yum.

Actually that was not required, the warning clears itself as soon as it appears. You only see it once, then yum internally checks the consistency and resets the warning so unless you then rerun rpm to install/uninstall something then you shouldn’t see the warning again.