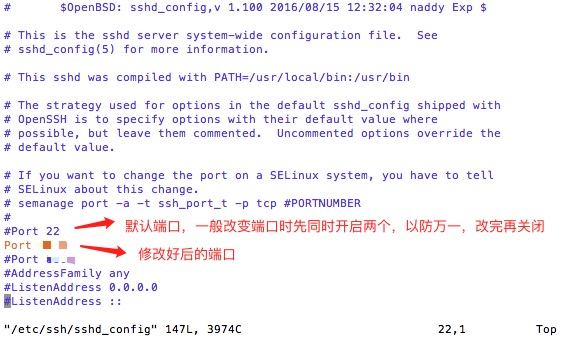
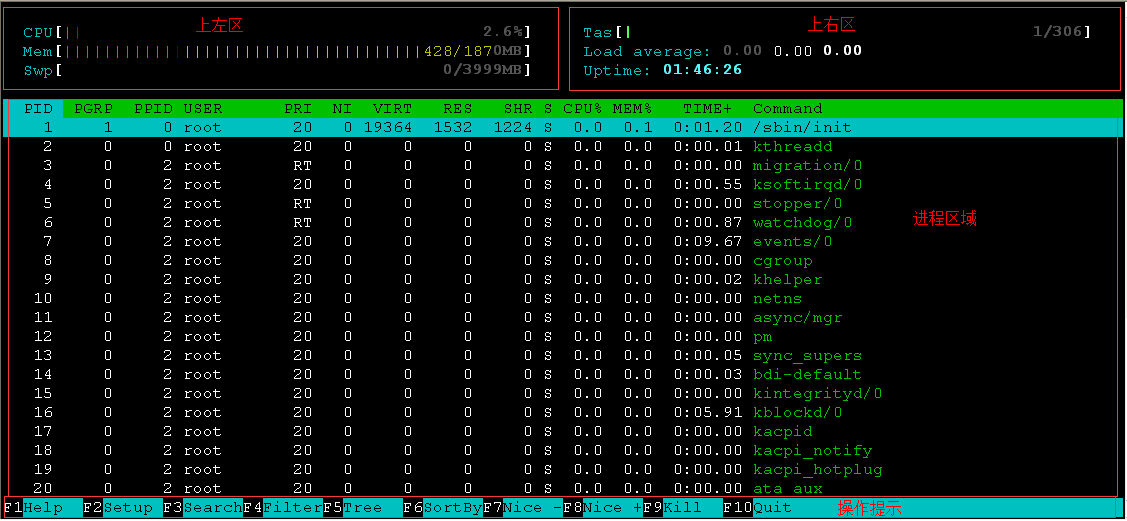
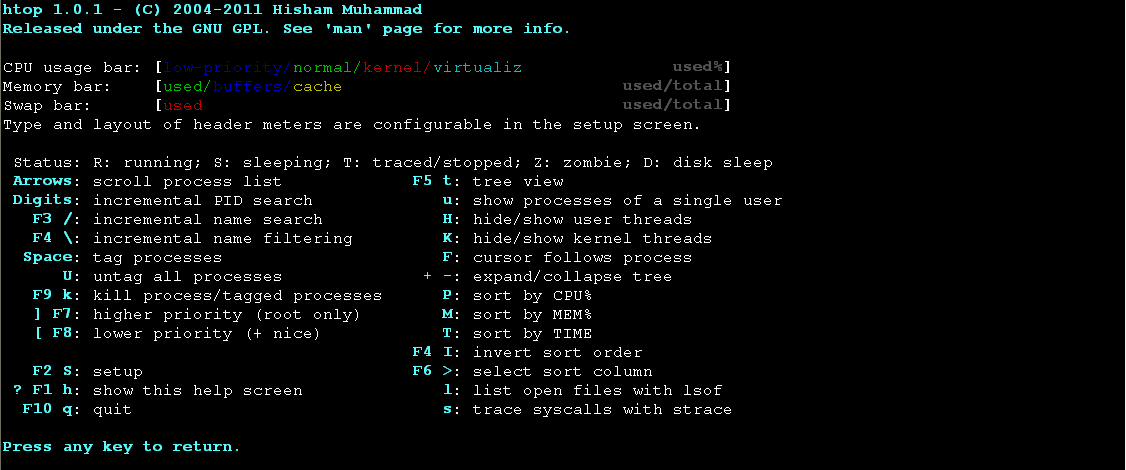
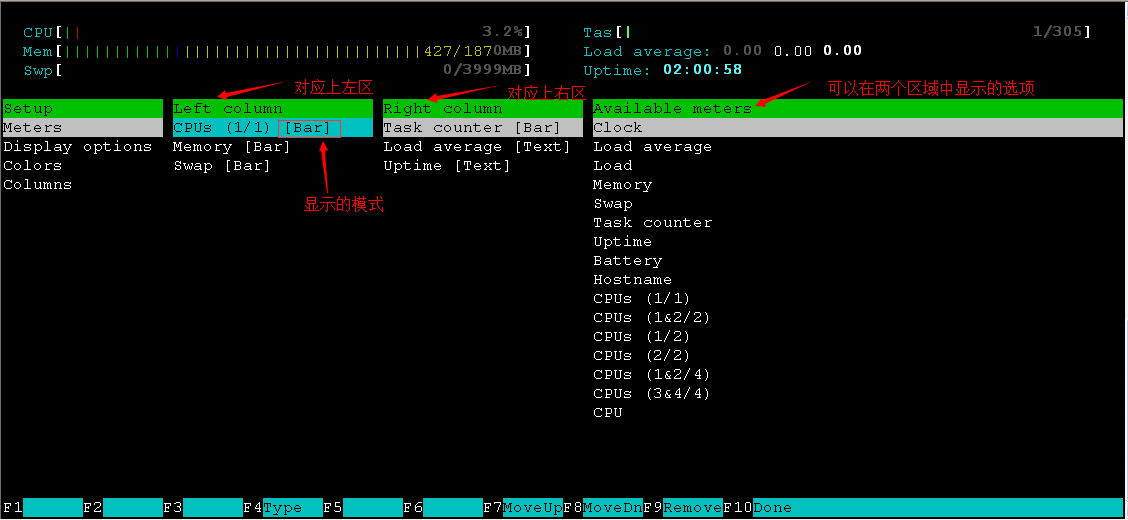
quick start(快速上手):
查看SSH服务是否开启
[root@localhost ~]# sudo ps -e | grep ssh
 1128 ?        00:00:00 sshd
[root@localhost ~]#
如果没有反应或者其他结果,再试着开启SSH服务。
使用命令
sudo /etc/init.d/ssh start来开启服务
如果没有安装SSH服务,此时需要安装 SSH服务。
yum install openssh-server -y
启动sshd服务
如果没有启动,则需要启动该服务:
systemctl start sshd.service  其实.service可不写,直接 systemctl restart sshd

重启 sshd 服务:
systemctl restart sshd.service

设置服务开启自启:
systemctl enable sshd.service
使用ssh
### -p 后面是端口号  | 再后面是  用户名@服务器地址 | -v 是 输出连接信息,方便查找连接失败原因
ssh -p 22 [email protected]  -v
详情介绍:
mac下利用 终端 Terminal ,调用 shell 的新建远程 连接 方法,进行 SSH 连接。
普通连接方式:
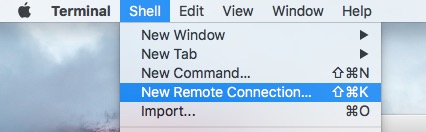
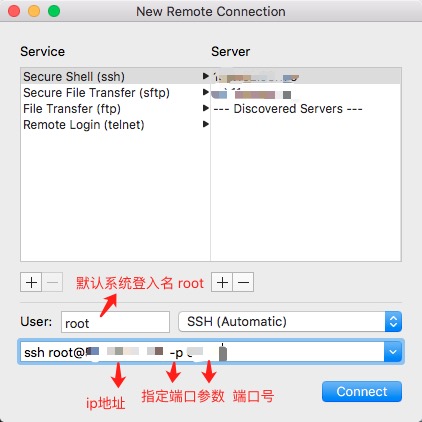
直接用 ssh 登录 远程服务器
# root是远程服务器的默认管理员账户,所以用root登录,登录完成后,可以分配其他用户账号。
# 128.128.128.128 是远程 服务器ip地址
# -p 是指定 远程ssh服务器 端口后,默认22端口,如果 不是22 端口 需要设置 -p 参数
# -v 是打印 ssh 运行过程中的 日志文件,方便发现错误,可以不设置
ssh [email protected] -p 12880 -v
也可以参看:
https://www.cnblogs.com/ftl1012/p/ssh.html
https://www.cnblogs.com/jiarenanhao/p/9938280.html
ssh — OpenSSH SSH client (remote login program)
| ssh |
[-46AaCfGgKkMNnqsTtVvXxYy] [-b bind_address] [-c cipher_spec] [-D[bind_address:]port] [-E log_file] [-e escape_char] [-F configfile] [-I pkcs11] [-iidentity_file] [-J destination] [-L address] [-l login_name] [-m mac_spec] [-O ctl_cmd] [-ooption] [-p port] [-Q query_option] [-R address] [-S ctl_path] [-W host:port] [-wlocal_tun[:remote_tun]] destination [command] |
ssh (SSH client) is a program for logging into a remote machine and for executing commands on a remote machine. It is intended to provide secure encrypted communications between two untrusted hosts over an insecure network. X11 connections, arbitrary TCP ports and UNIX-domain sockets can also be forwarded over the secure channel.
ssh connects and logs into the specified destination, which may be specified as either [user@]hostname or a URI of the form ssh:// [user@]hostname[:port]. The user must prove his/her identity to the remote machine using one of several methods (see below).
If a command is specified, it is executed on the remote host instead of a login shell.
The options are as follows:
- -4
- Forces ssh to use IPv4 addresses only.
- -6
- Forces ssh to use IPv6 addresses only.
- -A
- Enables forwarding of the authentication agent connection. This can also be specified on a per-host basis in a configuration file.
Agent forwarding should be enabled with caution. Users with the ability to bypass file permissions on the remote host (for the agent’s UNIX-domain socket) can access the local agent through the forwarded connection. An attacker cannot obtain key material from the agent, however they can perform operations on the keys that enable them to authenticate using the identities loaded into the agent.
- -a
- Disables forwarding of the authentication agent connection.
- -b bind_address
- Use bind_address on the local machine as the source address of the connection. Only useful on systems with more than one address.
- -C
- Requests compression of all data (including stdin, stdout, stderr, and data for forwarded X11, TCP and UNIX-domain connections). The compression algorithm is the same used by gzip(1). Compression is desirable on modem lines and other slow connections, but will only slow down things on fast networks. The default value can be set on a host-by-host basis in the configuration files; see theCompression option.
- -c cipher_spec
- Selects the cipher specification for encrypting the session. cipher_spec is a comma-separated list of ciphers listed in order of preference. See the Cipherskeyword in ssh_config(5) for more information.
- -D [bind_address:]port
- Specifies a local “dynamic” application-level port forwarding. This works by allocating a socket to listen to port on the local side, optionally bound to the specified bind_address. Whenever a connection is made to this port, the connection is forwarded over the secure channel, and the application protocol is then used to determine where to connect to from the remote machine. Currently the SOCKS4 and SOCKS5 protocols are supported, and ssh will act as a SOCKS server. Only root can forward privileged ports. Dynamic port forwardings can also be specified in the configuration file.
IPv6 addresses can be specified by enclosing the address in square brackets. Only the superuser can forward privileged ports. By default, the local port is bound in accordance with the GatewayPorts setting. However, an explicitbind_address may be used to bind the connection to a specific address. Thebind_address of “localhost” indicates that the listening port be bound for local use only, while an empty address or ‘*’ indicates that the port should be available from all interfaces.
- -E log_file
- Append debug logs to log_file instead of standard error.
- -e escape_char
- Sets the escape character for sessions with a pty (default: ‘
~’). The escape character is only recognized at the beginning of a line. The escape character followed by a dot (‘.’) closes the connection; followed by control-Z suspends the connection; and followed by itself sends the escape character once. Setting the character to “none” disables any escapes and makes the session fully transparent.
- -F configfile
- Specifies an alternative per-user configuration file. If a configuration file is given on the command line, the system-wide configuration file (/etc/ssh/ssh_config) will be ignored. The default for the per-user configuration file is ~/.ssh/config.
- -f
- Requests ssh to go to background just before command execution. This is useful if ssh is going to ask for passwords or passphrases, but the user wants it in the background. This implies -n. The recommended way to start X11 programs at a remote site is with something like ssh -f host xterm.
If the ExitOnForwardFailure configuration option is set to “yes”, then a client started with -f will wait for all remote port forwards to be successfully established before placing itself in the background.
- -G
- Causes ssh to print its configuration after evaluating Host and Match blocks and exit.
- -g
- Allows remote hosts to connect to local forwarded ports. If used on a multiplexed connection, then this option must be specified on the master process.
- -I pkcs11
- Specify the PKCS#11 shared library ssh should use to communicate with a PKCS#11 token providing the user’s private RSA key.
- -i identity_file
- Selects a file from which the identity (private key) for public key authentication is read. The default is ~/.ssh/id_dsa, ~/.ssh/id_ecdsa, ~/.ssh/id_ed25519 and~/.ssh/id_rsa. Identity files may also be specified on a per-host basis in the configuration file. It is possible to have multiple -i options (and multiple identities specified in configuration files). If no certificates have been explicitly specified by the CertificateFile directive, ssh will also try to load certificate information from the filename obtained by appending -cert.pub to identity filenames.
- -J destination
- Connect to the target host by first making a ssh connection to the jump host described by destination and then establishing a TCP forwarding to the ultimate destination from there. Multiple jump hops may be specified separated by comma characters. This is a shortcut to specify a ProxyJump configuration directive.
- -K
- Enables GSSAPI-based authentication and forwarding (delegation) of GSSAPI credentials to the server.
- -k
- Disables forwarding (delegation) of GSSAPI credentials to the server.
- -L [bind_address:]port:host:hostport
- -L [bind_address:]port:remote_socket
- -L local_socket:host:hostport
- -L local_socket:remote_socket
- Specifies that connections to the given TCP port or Unix socket on the local (client) host are to be forwarded to the given host and port, or Unix socket, on the remote side. This works by allocating a socket to listen to either a TCP port on the local side, optionally bound to the specified bind_address, or to a Unix socket. Whenever a connection is made to the local port or socket, the connection is forwarded over the secure channel, and a connection is made to either host port hostport, or the Unix socket remote_socket, from the remote machine.
Port forwardings can also be specified in the configuration file. Only the superuser can forward privileged ports. IPv6 addresses can be specified by enclosing the address in square brackets.
By default, the local port is bound in accordance with the GatewayPorts setting. However, an explicit bind_address may be used to bind the connection to a specific address. The bind_address of “localhost” indicates that the listening port be bound for local use only, while an empty address or ‘*’ indicates that the port should be available from all interfaces.
- -l login_name
- Specifies the user to log in as on the remote machine. This also may be specified on a per-host basis in the configuration file.
- -M
- Places the ssh client into “master” mode for connection sharing. Multiple -Moptions places ssh into “master” mode with confirmation required before slave connections are accepted. Refer to the description of ControlMaster inssh_config(5) for details.
- -m mac_spec
- A comma-separated list of MAC (message authentication code) algorithms, specified in order of preference. See the MACs keyword for more information.
- -N
- Do not execute a remote command. This is useful for just forwarding ports.
- -n
- Redirects stdin from /dev/null (actually, prevents reading from stdin). This must be used when ssh is run in the background. A common trick is to use this to run X11 programs on a remote machine. For example, ssh -n shadows.cs.hut.fi emacs & will start an emacs on shadows.cs.hut.fi, and the X11 connection will be automatically forwarded over an encrypted channel. The ssh program will be put in the background. (This does not work if ssh needs to ask for a password or passphrase; see also the -f option.)
- -O ctl_cmd
- Control an active connection multiplexing master process. When the -O option is specified, the ctl_cmd argument is interpreted and passed to the master process. Valid commands are: “check” (check that the master process is running), “forward” (request forwardings without command execution), “cancel” (cancel forwardings), “exit” (request the master to exit), and “stop” (request the master to stop accepting further multiplexing requests).
- -o option
- Can be used to give options in the format used in the configuration file. This is useful for specifying options for which there is no separate command-line flag. For full details of the options listed below, and their possible values, seessh_config(5).
AddKeysToAgent

AddressFamily

BatchMode

BindAddress

CanonicalDomains

CanonicalizeFallbackLocal

CanonicalizeHostname

CanonicalizeMaxDots

CanonicalizePermittedCNAMEs

CertificateFile

ChallengeResponseAuthentication

CheckHostIP

Ciphers

ClearAllForwardings

Compression

ConnectionAttempts

ConnectTimeout

ControlMaster

ControlPath

ControlPersist

DynamicForward

EscapeChar

ExitOnForwardFailure

FingerprintHash

ForwardAgent

ForwardX11

ForwardX11Timeout

ForwardX11Trusted

GatewayPorts

GlobalKnownHostsFile

GSSAPIAuthentication

GSSAPIDelegateCredentials

HashKnownHosts

Host

HostbasedAuthentication

HostbasedKeyTypes

HostKeyAlgorithms

HostKeyAlias

HostName

IdentitiesOnly

IdentityAgent

IdentityFile

Include

IPQoS

KbdInteractiveAuthentication

KbdInteractiveDevices

KexAlgorithms

LocalCommand

LocalForward

LogLevel

MACs

Match

NoHostAuthenticationForLocalhost

NumberOfPasswordPrompts

PasswordAuthentication

PermitLocalCommand

PKCS11Provider

Port

PreferredAuthentications

ProxyCommand

ProxyJump

ProxyUseFdpass

PubkeyAcceptedKeyTypes

PubkeyAuthentication

RekeyLimit

RemoteCommand

RemoteForward

RequestTTY

SendEnv

ServerAliveInterval

ServerAliveCountMax

StreamLocalBindMask

StreamLocalBindUnlink

StrictHostKeyChecking

TCPKeepAlive

Tunnel

TunnelDevice

UpdateHostKeys

UsePrivilegedPort

User

UserKnownHostsFile

VerifyHostKeyDNS

VisualHostKey

XAuthLocation
- -p port
- Port to connect to on the remote host. This can be specified on a per-host basis in the configuration file.
- -Q query_option
- Queries ssh for the algorithms supported for the specified version 2. The available features are: cipher (supported symmetric ciphers), cipher-auth(supported symmetric ciphers that support authenticated encryption), mac(supported message integrity codes), kex (key exchange algorithms), key (key types), key-cert (certificate key types), key-plain (non-certificate key types), and protocol-version (supported SSH protocol versions).
- -q
- Quiet mode. Causes most warning and diagnostic messages to be suppressed.
- -R [bind_address:]port:host:hostport
- -R [bind_address:]port:local_socket
- -R remote_socket:host:hostport
- -R remote_socket:local_socket
- -R [bind_address:]port
- Specifies that connections to the given TCP port or Unix socket on the remote (server) host are to be forwarded to the local side.
This works by allocating a socket to listen to either a TCP port or to a Unix socket on the remote side. Whenever a connection is made to this port or Unix socket, the connection is forwarded over the secure channel, and a connection is made from the local machine to either an explicit destination specified by host porthostport, or local_socket, or, if no explicit destination was specified, ssh will act as a SOCKS 4/5 proxy and forward connections to the destinations requested by the remote SOCKS client.
Port forwardings can also be specified in the configuration file. Privileged ports can be forwarded only when logging in as root on the remote machine. IPv6 addresses can be specified by enclosing the address in square brackets.
By default, TCP listening sockets on the server will be bound to the loopback interface only. This may be overridden by specifying a bind_address. An emptybind_address, or the address ‘*’, indicates that the remote socket should listen on all interfaces. Specifying a remote bind_address will only succeed if the server’s GatewayPorts option is enabled (see sshd_config(5)).
If the port argument is ‘0’, the listen port will be dynamically allocated on the server and reported to the client at run time. When used together with -O forward the allocated port will be printed to the standard output.
- -S ctl_path
- Specifies the location of a control socket for connection sharing, or the string “none” to disable connection sharing. Refer to the description of ControlPathand ControlMaster in ssh_config(5) for details.
- -s
- May be used to request invocation of a subsystem on the remote system. Subsystems facilitate the use of SSH as a secure transport for other applications (e.g. sftp(1)). The subsystem is specified as the remote command.
- -T
- Disable pseudo-terminal allocation.
- -t
- Force pseudo-terminal allocation. This can be used to execute arbitrary screen-based programs on a remote machine, which can be very useful, e.g. when implementing menu services. Multiple -t options force tty allocation, even if sshhas no local tty.
- -V
- Display the version number and exit.
- -v
- Verbose mode. Causes ssh to print debugging messages about its progress. This is helpful in debugging connection, authentication, and configuration problems. Multiple -v options increase the verbosity. The maximum is 3.
- -W host:port
- Requests that standard input and output on the client be forwarded to host onport over the secure channel. Implies -N, -T, ExitOnForwardFailure andClearAllForwardings, though these can be overridden in the configuration file or using -o command line options.
- -w local_tun[:remote_tun]
- Requests tunnel device forwarding with the specified tun(4) devices between the client (local_tun) and the server (remote_tun).
The devices may be specified by numerical ID or the keyword “any”, which uses the next available tunnel device. If remote_tun is not specified, it defaults to “any”. See also the Tunnel and TunnelDevice directives in ssh_config(5). If theTunnel directive is unset, it is set to the default tunnel mode, which is “point-to-point”.
- -X
- Enables X11 forwarding. This can also be specified on a per-host basis in a configuration file.
X11 forwarding should be enabled with caution. Users with the ability to bypass file permissions on the remote host (for the user’s X authorization database) can access the local X11 display through the forwarded connection. An attacker may then be able to perform activities such as keystroke monitoring.
For this reason, X11 forwarding is subjected to X11 SECURITY extension restrictions by default. Please refer to the ssh -Y option and the ForwardX11Trusted directive in ssh_config(5) for more information.
- -x
- Disables X11 forwarding.
- -Y
- Enables trusted X11 forwarding. Trusted X11 forwardings are not subjected to the X11 SECURITY extension controls.
- -y
- Send log information using the syslog(3) system module. By default this information is sent to stderr.
ssh may additionally obtain configuration data from a per-user configuration file and a system-wide configuration file. The file format and configuration options are described inssh_config(5).
The OpenSSH SSH client supports SSH protocol 2.
The methods available for authentication are: GSSAPI-based authentication, host-based authentication, public key authentication, challenge-response authentication, and password authentication. Authentication methods are tried in the order specified above, thoughPreferredAuthentications can be used to change the default order.
Host-based authentication works as follows: If the machine the user logs in from is listed in /etc/hosts.equiv or /etc/shosts.equiv on the remote machine, and the user names are the same on both sides, or if the files ~/.rhosts or ~/.shosts exist in the user’s home directory on the remote machine and contain a line containing the name of the client machine and the name of the user on that machine, the user is considered for login. Additionally, the server must be able to verify the client’s host key (see the description of /etc/ssh/ssh_known_hostsand ~/.ssh/known_hosts, below) for login to be permitted. This authentication method closes security holes due to IP spoofing, DNS spoofing, and routing spoofing. [Note to the administrator: /etc/hosts.equiv, ~/.rhosts, and the rlogin/rsh protocol in general, are inherently insecure and should be disabled if security is desired.]
Public key authentication works as follows: The scheme is based on public-key cryptography, using cryptosystems where encryption and decryption are done using separate keys, and it is unfeasible to derive the decryption key from the encryption key. The idea is that each user creates a public/private key pair for authentication purposes. The server knows the public key, and only the user knows the private key. ssh implements public key authentication protocol automatically, using one of the DSA, ECDSA, Ed25519 or RSA algorithms. The HISTORY section of ssl(8) contains a brief discussion of the DSA and RSA algorithms.
The file ~/.ssh/authorized_keys lists the public keys that are permitted for logging in. When the user logs in, the ssh program tells the server which key pair it would like to use for authentication. The client proves that it has access to the private key and the server checks that the corresponding public key is authorized to accept the account.
The server may inform the client of errors that prevented public key authentication from succeeding after authentication completes using a different method. These may be viewed by increasing the LogLevel to DEBUG or higher (e.g. by using the -v flag).
The user creates his/her key pair by running ssh-keygen(1). This stores the private key in ~/.ssh/id_dsa (DSA), ~/.ssh/id_ecdsa (ECDSA), ~/.ssh/id_ed25519 (Ed25519), or~/.ssh/id_rsa (RSA) and stores the public key in ~/.ssh/id_dsa.pub (DSA),~/.ssh/id_ecdsa.pub (ECDSA), ~/.ssh/id_ed25519.pub (Ed25519), or ~/.ssh/id_rsa.pub(RSA) in the user’s home directory. The user should then copy the public key to~/.ssh/authorized_keys in his/her home directory on the remote machine. The authorized_keys file corresponds to the conventional ~/.rhosts file, and has one key per line, though the lines can be very long. After this, the user can log in without giving the password.
A variation on public key authentication is available in the form of certificate authentication: instead of a set of public/private keys, signed certificates are used. This has the advantage that a single trusted certification authority can be used in place of many public/private keys. See the CERTIFICATES section of ssh-keygen(1) for more information.
The most convenient way to use public key or certificate authentication may be with an authentication agent. See ssh-agent(1) and (optionally) the AddKeysToAgent directive inssh_config(5) for more information.
Challenge-response authentication works as follows: The server sends an arbitrary “challenge” text, and prompts for a response. Examples of challenge-response authentication include BSD Authentication (see login.conf(5)) and PAM (some non-OpenBSD systems).
Finally, if other authentication methods fail, ssh prompts the user for a password. The password is sent to the remote host for checking; however, since all communications are encrypted, the password cannot be seen by someone listening on the network.
ssh automatically maintains and checks a database containing identification for all hosts it has ever been used with. Host keys are stored in ~/.ssh/known_hosts in the user’s home directory. Additionally, the file /etc/ssh/ssh_known_hosts is automatically checked for known hosts. Any new hosts are automatically added to the user’s file. If a host’s identification ever changes, ssh warns about this and disables password authentication to prevent server spoofing or man-in-the-middle attacks, which could otherwise be used to circumvent the encryption. The StrictHostKeyChecking option can be used to control logins to machines whose host key is not known or has changed.
When the user’s identity has been accepted by the server, the server either executes the given command in a non-interactive session or, if no command has been specified, logs into the machine and gives the user a normal shell as an interactive session. All communication with the remote command or shell will be automatically encrypted.
If an interactive session is requested ssh by default will only request a pseudo-terminal (pty) for interactive sessions when the client has one. The flags -T and -t can be used to override this behaviour.
If a pseudo-terminal has been allocated the user may use the escape characters noted below.
If no pseudo-terminal has been allocated, the session is transparent and can be used to reliably transfer binary data. On most systems, setting the escape character to “none” will also make the session transparent even if a tty is used.
The session terminates when the command or shell on the remote machine exits and all X11 and TCP connections have been closed.
When a pseudo-terminal has been requested, ssh supports a number of functions through the use of an escape character.
A single tilde character can be sent as ~~ or by following the tilde by a character other than those described below. The escape character must always follow a newline to be interpreted as special. The escape character can be changed in configuration files using theEscapeChar configuration directive or on the command line by the -e option.
The supported escapes (assuming the default ‘~’) are:
- ~.
- Disconnect.
- ~^Z
- Background ssh.
- ~#
- List forwarded connections.
- ~&
- Background ssh at logout when waiting for forwarded connection / X11 sessions to terminate.
- ~?
- Display a list of escape characters.
- ~B
- Send a BREAK to the remote system (only useful if the peer supports it).
- ~C
- Open command line. Currently this allows the addition of port forwardings using the -L, -R and -D options (see above). It also allows the cancellation of existing port-forwardings with -KL[bind_address:]port for local, -KR[bind_address:]port for remote and -KD[bind_address:]port for dynamic port-forwardings. !commandallows the user to execute a local command if the PermitLocalCommand option is enabled in ssh_config(5). Basic help is available, using the -h option.
- ~R
- Request rekeying of the connection (only useful if the peer supports it).
- ~V
- Decrease the verbosity (LogLevel) when errors are being written to stderr.
- ~v
- Increase the verbosity (LogLevel) when errors are being written to stderr.
Forwarding of arbitrary TCP connections over the secure channel can be specified either on the command line or in a configuration file. One possible application of TCP forwarding is a secure connection to a mail server; another is going through firewalls.
In the example below, we look at encrypting communication between an IRC client and server, even though the IRC server does not directly support encrypted communications. This works as follows: the user connects to the remote host using ssh, specifying a port to be used to forward connections to the remote server. After that it is possible to start the service which is to be encrypted on the client machine, connecting to the same local port, and sshwill encrypt and forward the connection.
The following example tunnels an IRC session from client machine “127.0.0.1” (localhost) to remote server “server.example.com”:
$ ssh -f -L 1234:localhost:6667 server.example.com sleep 10
$ irc -c '#users' -p 1234 pinky 127.0.0.1
This tunnels a connection to IRC server “server.example.com”, joining channel “#users”, nickname “pinky”, using port 1234. It doesn’t matter which port is used, as long as it’s greater than 1023 (remember, only root can open sockets on privileged ports) and doesn’t conflict with any ports already in use. The connection is forwarded to port 6667 on the remote server, since that’s the standard port for IRC services.
The -f option backgrounds ssh and the remote command “sleep 10” is specified to allow an amount of time (10 seconds, in the example) to start the service which is to be tunnelled. If no connections are made within the time specified, ssh will exit.
If the ForwardX11 variable is set to “yes” (or see the description of the -X, -x, and -Y options above) and the user is using X11 (the DISPLAY environment variable is set), the connection to the X11 display is automatically forwarded to the remote side in such a way that any X11 programs started from the shell (or command) will go through the encrypted channel, and the connection to the real X server will be made from the local machine. The user should not manually set DISPLAY. Forwarding of X11 connections can be configured on the command line or in configuration files.
The DISPLAY value set by ssh will point to the server machine, but with a display number greater than zero. This is normal, and happens because ssh creates a “proxy” X server on the server machine for forwarding the connections over the encrypted channel.
ssh will also automatically set up Xauthority data on the server machine. For this purpose, it will generate a random authorization cookie, store it in Xauthority on the server, and verify that any forwarded connections carry this cookie and replace it by the real cookie when the connection is opened. The real authentication cookie is never sent to the server machine (and no cookies are sent in the plain).
If the ForwardAgent variable is set to “yes” (or see the description of the -A and -a options above) and the user is using an authentication agent, the connection to the agent is automatically forwarded to the remote side.
When connecting to a server for the first time, a fingerprint of the server’s public key is presented to the user (unless the option StrictHostKeyChecking has been disabled). Fingerprints can be determined using ssh-keygen(1):
$ ssh-keygen -l -f /etc/ssh/ssh_host_rsa_key
If the fingerprint is already known, it can be matched and the key can be accepted or rejected. If only legacy (MD5) fingerprints for the server are available, the ssh-keygen(1) -Eoption may be used to downgrade the fingerprint algorithm to match.
Because of the difficulty of comparing host keys just by looking at fingerprint strings, there is also support to compare host keys visually, using random art. By setting the VisualHostKeyoption to “yes”, a small ASCII graphic gets displayed on every login to a server, no matter if the session itself is interactive or not. By learning the pattern a known server produces, a user can easily find out that the host key has changed when a completely different pattern is displayed. Because these patterns are not unambiguous however, a pattern that looks similar to the pattern remembered only gives a good probability that the host key is the same, not guaranteed proof.
To get a listing of the fingerprints along with their random art for all known hosts, the following command line can be used:
$ ssh-keygen -lv -f ~/.ssh/known_hosts
If the fingerprint is unknown, an alternative method of verification is available: SSH fingerprints verified by DNS. An additional resource record (RR), SSHFP, is added to a zonefile and the connecting client is able to match the fingerprint with that of the key presented.
In this example, we are connecting a client to a server, “host.example.com”. The SSHFP resource records should first be added to the zonefile for host.example.com:
$ ssh-keygen -r host.example.com.
The output lines will have to be added to the zonefile. To check that the zone is answering fingerprint queries:
$ dig -t SSHFP host.example.com
Finally the client connects:
$ ssh -o "VerifyHostKeyDNS ask" host.example.com
[...]
Matching host key fingerprint found in DNS.
Are you sure you want to continue connecting (yes/no)?
See the VerifyHostKeyDNS option in ssh_config(5) for more information.
ssh contains support for Virtual Private Network (VPN) tunnelling using the tun(4) network pseudo-device, allowing two networks to be joined securely. The sshd_config(5)configuration option PermitTunnel controls whether the server supports this, and at what level (layer 2 or 3 traffic).
The following example would connect client network 10.0.50.0/24 with remote network 10.0.99.0/24 using a point-to-point connection from 10.1.1.1 to 10.1.1.2, provided that the SSH server running on the gateway to the remote network, at 192.168.1.15, allows it.
On the client:
# ssh -f -w 0:1 192.168.1.15 true
# ifconfig tun0 10.1.1.1 10.1.1.2 netmask 255.255.255.252
# route add 10.0.99.0/24 10.1.1.2
On the server:
# ifconfig tun1 10.1.1.2 10.1.1.1 netmask 255.255.255.252
# route add 10.0.50.0/24 10.1.1.1
Client access may be more finely tuned via the /root/.ssh/authorized_keys file (see below) and the PermitRootLogin server option. The following entry would permit connections ontun(4) device 1 from user “jane” and on tun device 2 from user “john”, if PermitRootLogin is set to “forced-commands-only”:
tunnel="1",command="sh /etc/netstart tun1" ssh-rsa ... jane
tunnel="2",command="sh /etc/netstart tun2" ssh-rsa ... john
Since an SSH-based setup entails a fair amount of overhead, it may be more suited to temporary setups, such as for wireless VPNs. More permanent VPNs are better provided by tools such as ipsecctl(8) and isakmpd(8).
ssh will normally set the following environment variables:
DISPLAY- The
DISPLAY variable indicates the location of the X11 server. It is automatically set by ssh to point to a value of the form “hostname:n”, where “hostname” indicates the host where the shell runs, and ‘n’ is an integer ≥ 1. ssh uses this special value to forward X11 connections over the secure channel. The user should normally not set DISPLAY explicitly, as that will render the X11 connection insecure (and will require the user to manually copy any required authorization cookies).
HOME- Set to the path of the user’s home directory.
LOGNAME- Synonym for
USER; set for compatibility with systems that use this variable.
MAIL- Set to the path of the user’s mailbox.
PATH- Set to the default
PATH, as specified when compiling ssh.
SSH_ASKPASS- If ssh needs a passphrase, it will read the passphrase from the current terminal if it was run from a terminal. If ssh does not have a terminal associated with it but
DISPLAY andSSH_ASKPASS are set, it will execute the program specified by SSH_ASKPASS and open an X11 window to read the passphrase. This is particularly useful when calling ssh from a .xsession or related script. (Note that on some machines it may be necessary to redirect the input from /dev/null to make this work.)
SSH_AUTH_SOCK- Identifies the path of a UNIX-domain socket used to communicate with the agent.
SSH_CONNECTION- Identifies the client and server ends of the connection. The variable contains four space-separated values: client IP address, client port number, server IP address, and server port number.
SSH_ORIGINAL_COMMAND- This variable contains the original command line if a forced command is executed. It can be used to extract the original arguments.
SSH_TTY- This is set to the name of the tty (path to the device) associated with the current shell or command. If the current session has no tty, this variable is not set.
SSH_TUNNEL- Optionally set by sshd(8) to contain the interface names assigned if tunnel forwarding was requested by the client.
SSH_USER_AUTH- Optionally set by sshd(8), this variable may contain a pathname to a file that lists the authentication methods successfully used when the session was established, including any public keys that were used.
TZ- This variable is set to indicate the present time zone if it was set when the daemon was started (i.e. the daemon passes the value on to new connections).
USER- Set to the name of the user logging in.
Additionally, ssh reads ~/.ssh/environment, and adds lines of the format “VARNAME=value” to the environment if the file exists and users are allowed to change their environment. For more information, see the PermitUserEnvironment option in sshd_config(5).
- ~/.rhosts
- This file is used for host-based authentication (see above). On some machines this file may need to be world-readable if the user’s home directory is on an NFS partition, because sshd(8) reads it as root. Additionally, this file must be owned by the user, and must not have write permissions for anyone else. The recommended permission for most machines is read/write for the user, and not accessible by others.
- ~/.shosts
- This file is used in exactly the same way as .rhosts, but allows host-based authentication without permitting login with rlogin/rsh.
- ~/.ssh/
- This directory is the default location for all user-specific configuration and authentication information. There is no general requirement to keep the entire contents of this directory secret, but the recommended permissions are read/write/execute for the user, and not accessible by others.
- ~/.ssh/authorized_keys
- Lists the public keys (DSA, ECDSA, Ed25519, RSA) that can be used for logging in as this user. The format of this file is described in the sshd(8) manual page. This file is not highly sensitive, but the recommended permissions are read/write for the user, and not accessible by others.
- ~/.ssh/config
- This is the per-user configuration file. The file format and configuration options are described in ssh_config(5). Because of the potential for abuse, this file must have strict permissions: read/write for the user, and not writable by others.
- ~/.ssh/environment
- Contains additional definitions for environment variables; see ENVIRONMENT, above.
- ~/.ssh/id_dsa
- ~/.ssh/id_ecdsa
- ~/.ssh/id_ed25519
- ~/.ssh/id_rsa
- Contains the private key for authentication. These files contain sensitive data and should be readable by the user but not accessible by others (read/write/execute).ssh will simply ignore a private key file if it is accessible by others. It is possible to specify a passphrase when generating the key which will be used to encrypt the sensitive part of this file using AES-128.
- ~/.ssh/id_dsa.pub
- ~/.ssh/id_ecdsa.pub
- ~/.ssh/id_ed25519.pub
- ~/.ssh/id_rsa.pub
- Contains the public key for authentication. These files are not sensitive and can (but need not) be readable by anyone.
- ~/.ssh/known_hosts
- Contains a list of host keys for all hosts the user has logged into that are not already in the systemwide list of known host keys. See sshd(8) for further details of the format of this file.
- ~/.ssh/rc
- Commands in this file are executed by ssh when the user logs in, just before the user’s shell (or command) is started. See the sshd(8) manual page for more information.
- /etc/hosts.equiv
- This file is for host-based authentication (see above). It should only be writable by root.
- /etc/shosts.equiv
- This file is used in exactly the same way as hosts.equiv, but allows host-based authentication without permitting login with rlogin/rsh.
- /etc/ssh/ssh_config
- Systemwide configuration file. The file format and configuration options are described in ssh_config(5).
- /etc/ssh/ssh_host_key
- /etc/ssh/ssh_host_dsa_key
- /etc/ssh/ssh_host_ecdsa_key
- /etc/ssh/ssh_host_ed25519_key
- /etc/ssh/ssh_host_rsa_key
- These files contain the private parts of the host keys and are used for host-based authentication.
- /etc/ssh/ssh_known_hosts
- Systemwide list of known host keys. This file should be prepared by the system administrator to contain the public host keys of all machines in the organization. It should be world-readable. See sshd(8) for further details of the format of this file.
- /etc/ssh/sshrc
- Commands in this file are executed by ssh when the user logs in, just before the user’s shell (or command) is started. See the sshd(8) manual page for more information.
ssh exits with the exit status of the remote command or with 255 if an error occurred.
scp(1), sftp(1), ssh-add(1), ssh-agent(1), ssh-keygen(1), ssh-keyscan(1), tun(4),ssh_config(5), ssh-keysign(8), sshd(8)
S. Lehtinen and C. Lonvick, The Secure Shell (SSH) Protocol Assigned Numbers, RFC 4250,January 2006.
T. Ylonen and C. Lonvick, The Secure Shell (SSH) Protocol Architecture, RFC 4251, January 2006.
T. Ylonen and C. Lonvick, The Secure Shell (SSH) Authentication Protocol, RFC 4252,January 2006.
T. Ylonen and C. Lonvick, The Secure Shell (SSH) Transport Layer Protocol, RFC 4253,January 2006.
T. Ylonen and C. Lonvick, The Secure Shell (SSH) Connection Protocol, RFC 4254, January 2006.
J. Schlyter and W. Griffin, Using DNS to Securely Publish Secure Shell (SSH) Key Fingerprints, RFC 4255, January 2006.
F. Cusack and M. Forssen, Generic Message Exchange Authentication for the Secure Shell Protocol (SSH), RFC 4256, January 2006.
J. Galbraith and P. Remaker, The Secure Shell (SSH) Session Channel Break Extension, RFC 4335, January 2006.
M. Bellare, T. Kohno, and C. Namprempre, The Secure Shell (SSH) Transport Layer Encryption Modes, RFC 4344, January 2006.
B. Harris, Improved Arcfour Modes for the Secure Shell (SSH) Transport Layer Protocol, RFC 4345, January 2006.
M. Friedl, N. Provos, and W. Simpson, Diffie-Hellman Group Exchange for the Secure Shell (SSH) Transport Layer Protocol, RFC 4419, March 2006.
J. Galbraith and R. Thayer, The Secure Shell (SSH) Public Key File Format, RFC 4716,November 2006.
D. Stebila and J. Green, Elliptic Curve Algorithm Integration in the Secure Shell Transport Layer, RFC 5656, December 2009.
A. Perrig and D. Song, Hash Visualization: a New Technique to improve Real-World Security,1999, International Workshop on Cryptographic Techniques and E-Commerce (CrypTEC ’99).
OpenSSH is a derivative of the original and free ssh 1.2.12 release by Tatu Ylonen. Aaron Campbell, Bob Beck, Markus Friedl, Niels Provos, Theo de Raadt and Dug Song removed many bugs, re-added newer features and created OpenSSH. Markus Friedl contributed the support for SSH protocol versions 1.5 and 2.0.