一、买域名和服务器主机(或网站空间)
1、购买一台服务器主机(vps),购买网站空间也可以。(服务器主机用处更多,不仅仅可以建网站,网站空间的话只能搭建网站了)
楼主购买的是vps 主机,方便以后的个性化需求和维护。
2、想好一个网站名(域名),或者 不买域名 直接用 ip 访问 网站。
去域名 公司购买 域名:
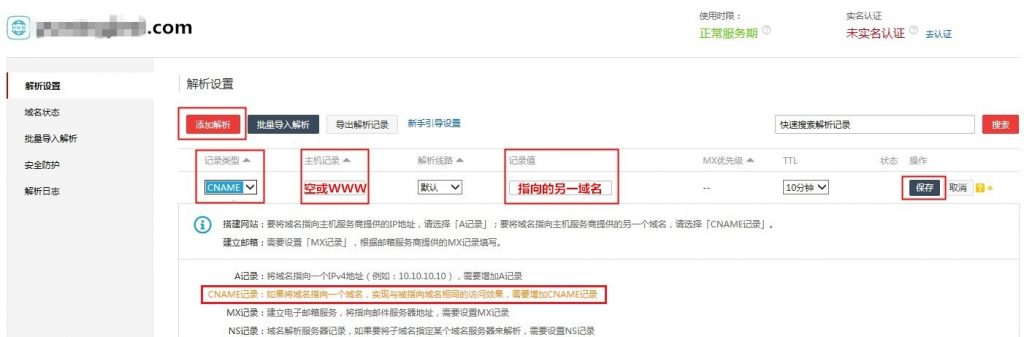
然后设置 域名 解析 A记录。
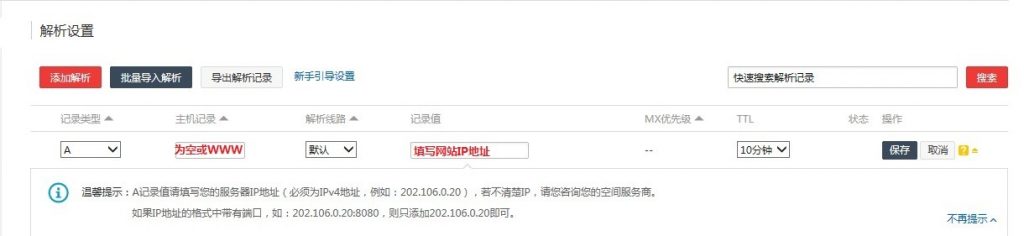
大陆地区购买的域名可能需要先实名认证一下吧,请留意。
有些服务器厂家可能提供了,空间,只能用域名跳转,解析方式是cname
配置vps主机,搭建网站服务器环境。
楼主,用 centos7 系统镜像 部署的 服务器。部署完 后,直接 reboot 重启 服务器 就行了。
二、远程操作centos7配置网站空间
1、利用SSH远程 登入 centos7,方便后续操作。
SSH远程连接入门
2、加固 centos7 安全性:
(1)、更新centos7系统。
(2)、解决系统编码问题。
(3)、开启 防火墙。
# systemctl start firewalld
3、安装VNC软件,进行远程访问
(为了提高安全性,使用SSH端口转发,登入服务器)
vnc远程连接配置与入门
4、安装 nginx+php+mysql 软件
centos7 安装nginx
centos7 安装php7
centos7 安装mysql
三、安装wordpress
1、新建一个nginx配置文件
为了方便后续操作统一,可以用vnc访问服务器,在/etc/nginx/conf.d
文件夹下面,创建一个 wp.conf
文件内容如下:
server {
    listen       80;
    server_name  example.net , www.example.net;

    #charset koi8-r;
    #access_log  /var/log/nginx/host.access.log  main;

    root   /var/www/www.example.net;  #wordpress location
    index index.php index.html index.htm;


    location / {

        # try_files $uri $uri/ =404;
         try_files $uri $uri/ /index.php?q=$uri&args;

    }

    error_page  404              /404.html;

    # redirect server error pages to the static page /50x.html
    #
    error_page   500 502 503 504  /50x.html;
    location = /50x.html {
        root   /usr/share/nginx/html;
    }

    # proxy the PHP scripts to Apache listening on 127.0.0.1:80
    #
    #location ~ \.php$ {
    #    proxy_pass   http://127.0.0.1;
    #}

    # pass the PHP scripts to FastCGI server listening on 127.0.0.1:9000
    #
    location ~ \.php$ {
        try_files $uri =404;
        fastcgi_pass   127.0.0.1:9000;
      # fastcgi_pass unix:/var/run/php-fpm/php-fpm.sock;
        fastcgi_index  index.php;
        fastcgi_param  SCRIPT_FILENAME  $document_root$fastcgi_script_name;
        include        fastcgi_params;
    }

    # deny access to .htaccess files, if Apache's document root
    # concurs with nginx's one
    #
    #location ~ /\.ht {
    #    deny  all;
    #}

     location ~ ^/\.user\.ini {
        deny all;
     }

}
需要修改两处地方
# 第一处 server_name ,如果买了域名了,将域名 替换到下面的 地方,如果没有买 直接填入 远程主机 ip
  server_name  example.net , www.example.net;

# 第二处 root 网站存放目录 ,为了 方便 统一管理,我们就简单改成  root   /var/www/wp.com;
 root   /var/www/www.example.net;  #wordpress location
配置完成后,运行
nginx -s reload
重新加载 配置文件。
2、新建一个数据库和数据库用户
(也可以用mysql 客户端 直接新建 数据库 )
In the example below, testdb is the name of the database, testuser is the user, and passwordis the user’s password.
create database testdb;
create user 'testuser'@'localhost' identified by 'password';
grant all on testdb.* to 'testuser' identified by 'password';
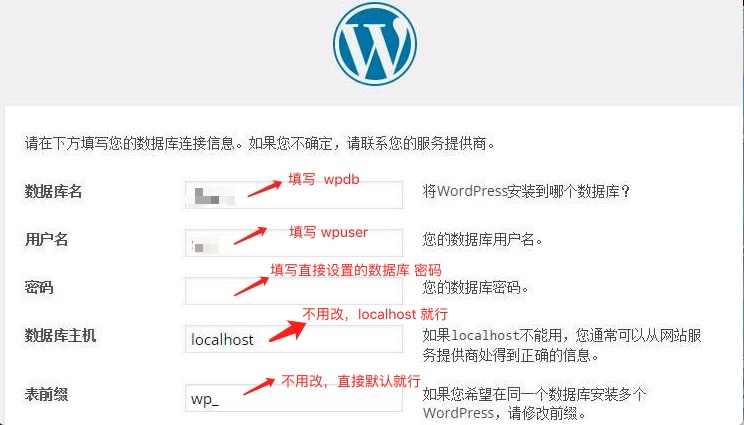
【为了方便后续操作中,实际将 testdb 取名为 wpdb ,testuser 取名 wpuser,password 自己设置一个 ,别忘记了,后面安装 wordpress 需要输入】
3、下载 wordpress
用 VNC 直接 使用 服务器的 浏览器,下载 wordpress。然后 解压到 /var/www/ 目录下 ,并将 解压的文件夹 重命名为 wp.com
4、更改 wordpress 文件夹权限。
可以使用 SSH 或者 vnc 调用终端
# 设置文件夹权限
chmod 755 -R /var/www/wp.com
# 设置文件夹所有者
chown -R apache:apache  /var/www/wp.com
5、浏览器输入 域名 或者 ip,就可以直接 访问了。
然后进行一些 简单设置 就可以 完成了。
后面就可以自己设置了,wordpress 就已经安装完成了。后面就是看 个人 爱好,装一些 wordpress 插件了。