-
Advanced SystemCare
Advanced SystemCare是一款能分析系统性能瓶颈的优化软件。它通过对系统全方位的诊断,找到系统性能的瓶颈所在,然后有针对性地进行修改、优化。优化后系统性能和网络速度都会有明显提升。
- 平常使用的时候感觉不错,就记录一下。
Category: 操作系统
mac系统问题和优化-显示隐藏文件的脚本
mac系统默认情况下无法查看隐藏文件,如果有需要可以使用脚本,显示隐藏文件。
脚本源代码如下:
display dialog "隐藏/显示隐藏文件" buttons {"可见", "隐藏"} with icon 2 with title "Switch to presentation mode" default button 1

set switch to button returned of result

if switch is "隐藏" then
	do shell script "defaults write com.apple.finder AppleShowAllFiles -bool false;
KillAll Finder"

else
	do shell script "defaults write com.apple.finder AppleShowAllFiles -bool true;
KillAll Finder"

end if
复制脚本源代码,然后 打开 Launchpad —>其他—>Script Editor
复制代码然后运行就可以了。或者选 文件 导出 成 application 也可以。
centos初装系统-安全性加固
转载自:https://www.linode.com/docs/security/securing-your-server/
In the Getting Started guide, you learned how to deploy a Linux distribution, boot your Linode and perform basic administrative tasks. Now it’s time to harden your Linode against unauthorized access.
Update Your System–FrequentlyPermalink
Keeping your software up to date is the single biggest security precaution you can take for any operating system. Software updates range from critical vulnerability patches to minor bug fixes, and many software vulnerabilities are actually patched by the time they become public.
Automatic Security UpdatesPermalink
There are arguments for and against automatic updates on servers. Fedora’s Wikihas a good breakdown of the pros and cons, but the risk of automatic updates will be minimal if you limit them to security updates. Not all package managers make that easy or possible, though.
The practicality of automatic updates is something you must judge for yourself because it comes down to what you do with your Linode. Bear in mind that automatic updates apply only to packages sourced from repositories, not self-compiled applications. You may find it worthwhile to have a test environment that replicates your production server. Updates can be applied there and reviewed for issues before being applied to the live environment.
- CentOS uses yum-cron for automatic updates.
- Debian and Ubuntu use unattended upgrades.
- Fedora uses dnf-automatic.
Add a Limited User AccountPermalink
Up to this point, you have accessed your Linode as the root user, which has unlimited privileges and can execute any command–even one that could accidentally disrupt your server. We recommend creating a limited user account and using that at all times. Administrative tasks will be done using sudo to temporarily elevate your limited user’s privileges so you can administer your server.
Note
Not all Linux distributions includesudoon the system by default, but all the images provided by Linode have sudo in their package repositories. If you get the outputsudo: command not found, install sudo before continuing.
To add a new user, first log in to your Linode via SSH.
CentOS / FedoraPermalink
- Create the user, replacing
example_userwith your desired username, and assign a password:useradd example_user && passwd example_user - Add the user to the
wheelgroup for sudo privileges:usermod -aG wheel example_userCaution
In CentOS 6 a wheel group is disabled by default for sudo access. You must to configure it manually. Type from root:/usr/sbin/visudo. Then find the line# %wheeland uncomment this line. To began typing in vi, pressa. To save and exit pressEscape, then type:w(press enter),:q(press enter)
UbuntuPermalink
- Create the user, replacing
example_userwith your desired username. You’ll then be asked to assign the user a password:adduser example_user - Add the user to the
sudogroup so you’ll have administrative privileges:adduser example_user sudo
DebianPermalink
- Debian does not include
sudoby default so it must be installed:apt install sudo - Create the user, replacing
example_userwith your desired username. You’ll then be asked to assign the user a password:adduser example_user - Add the user to the
sudogroup so you’ll have administrative privileges:adduser example_user sudo - After creating your limited user, disconnect from your Linode:
exit - Log back in as your new user. Replace
example_userwith your username, and the example IP address with your Linode’s IP address:ssh [email protected]
Now you can administer your Linode from your new user account instead of root. Nearly all superuser commands can be executed with sudo (example: sudo iptables -L -nv) and those commands will be logged to /var/log/auth.log.
Harden SSH AccessPermalink
By default, password authentication is used to connect to your Linode via SSH. A cryptographic key-pair is more secure because a private key takes the place of a password, which is generally much more difficult to brute-force. In this section we’ll create a key-pair and configure the Linode to not accept passwords for SSH logins.
Create an Authentication Key-pairPermalink
- This is done on your local computer, not your Linode, and will create a 4096-bit RSA key-pair. During creation, you will be given the option to encrypt the private key with a passphrase. This means that it cannot be used without entering the passphrase, unless you save it to your local desktop’s keychain manager. We suggest you use the key-pair with a passphrase, but you can leave this field blank if you don’t want to use one.Linux / OS X
Caution
If you’ve already created an RSA key-pair, this command will overwrite it, potentially locking you out of other systems. If you’ve already created a key-pair, skip this step. To check for existing keys, runls ~/.ssh/id_rsa*.ssh-keygen -b 4096Press Enter to use the default names
id_rsaandid_rsa.pubin/home/your_username/.sshbefore entering your passphrase.Windows
This can be done using PuTTY as outlined in our guide: Use Public Key Authentication with SSH.
- Upload the public key to your Linode. Replace
example_userwith the name of the user you plan to administer the server as, and203.0.113.10with your Linode’s IP address.LinuxFrom your local computer:ssh-copy-id [email protected]OS X
On your Linode (while signed in as your limited user):
mkdir -p ~/.ssh && sudo chmod -R 700 ~/.ssh/From your local computer:
scp ~/.ssh/id_rsa.pub [email protected]:~/.ssh/authorized_keysNote
ssh-copy-idis available in Homebrew if you prefer it over SCP. Install withbrew install ssh-copy-id.Windows
- Option 1: This can be done using WinSCP. In the login window, enter your Linode’s public IP address as the hostname, and your non-root username and password. Click Login to connect.Once WinSCP has connected, you’ll see two main sections. The section on the left shows files on your local computer and the section on the right shows files on your Linode. Using the file explorer on the left, navigate to the file where you’ve saved your public key, select the public key file, and click Upload in the toolbar above.You’ll be prompted to enter a path where you’d like to place the file on your Linode. Upload the file to
/home/example_user/.ssh/authorized_keys, replacingexample_userwith your username. - Option 2: Copy the public key directly from the PuTTY key generator into the terminal emulator connected to your Linode (as a non-root user):
mkdir ~/.ssh; nano ~/.ssh/authorized_keysThe above command will open a blank file called
authorized_keysin a text editor. Copy the public key into the text file, making sure it is copied as a single line exactly as it was generated by PuTTY. Press CTRL+X, then Y, then Enter to save the file.
Finally, you’ll want to set permissions for the public key directory and the key file itself:
sudo chmod 700 -R ~/.ssh && chmod 600 ~/.ssh/authorized_keysThese commands provide an extra layer of security by preventing other users from accessing the public key directory as well as the file itself. For more information on how this works, see our guide on how to modify file permissions.
- Option 1: This can be done using WinSCP. In the login window, enter your Linode’s public IP address as the hostname, and your non-root username and password. Click Login to connect.Once WinSCP has connected, you’ll see two main sections. The section on the left shows files on your local computer and the section on the right shows files on your Linode. Using the file explorer on the left, navigate to the file where you’ve saved your public key, select the public key file, and click Upload in the toolbar above.You’ll be prompted to enter a path where you’d like to place the file on your Linode. Upload the file to
- Now exit and log back into your Linode. If you specified a passphrase for your private key, you’ll need to enter it.
SSH Daemon OptionsPermalink
- Disallow root logins over SSH. This requires all SSH connections be by non-root users. Once a limited user account is connected, administrative privileges are accessible either by using
sudoor changing to a root shell usingsu -.- /etc/ssh/sshd_config
# Authentication: ... PermitRootLogin no - Disable SSH password authentication. This requires all users connecting via SSH to use key authentication. Depending on the Linux distribution, the line
PasswordAuthenticationmay need to be added, or uncommented by removing the leading#.- /etc/ssh/sshd_config
# Change to no to disable tunnelled clear text passwords
PasswordAuthentication no
Note
You may want to leave password authentication enabled if you connect to your Linode from many different computers. This will allow you to authenticate with a password instead of generating and uploading a key-pair for every device. - Listen on only one internet protocol. The SSH daemon listens for incoming connections over both IPv4 and IPv6 by default. Unless you need to SSH into your Linode using both protocols, disable whichever you do not need. This does not disable the protocol system-wide, it is only for the SSH daemon.Use the option:
AddressFamily inetto listen only on IPv4.AddressFamily inet6to listen only on IPv6.
The
AddressFamilyoption is usually not in thesshd_configfile by default. Add it to the end of the file:echo 'AddressFamily inet' | sudo tee -a /etc/ssh/sshd_config - Restart the SSH service to load the new configuration.If you’re using a Linux distribution which uses systemd (CentOS 7, Debian 8, Fedora, Ubuntu 15.10+)
sudo systemctl restart sshdIf your init system is SystemV or Upstart (CentOS 6, Debian 7, Ubuntu 14.04):
sudo service ssh restart
Use Fail2Ban for SSH Login ProtectionPermalink
Fail2Ban is an application that bans IP addresses from logging into your server after too many failed login attempts. Since legitimate logins usually take no more than three tries to succeed (and with SSH keys, no more than one), a server being spammed with unsuccessful logins indicates attempted malicious access.
Fail2Ban can monitor a variety of protocols including SSH, HTTP, and SMTP. By default, Fail2Ban monitors SSH only, and is a helpful security deterrent for any server since the SSH daemon is usually configured to run constantly and listen for connections from any remote IP address.
For complete instructions on installing and configuring Fail2Ban, see our guide: Securing Your Server with Fail2ban.
Remove Unused Network-Facing ServicesPermalink
Most Linux distributions install with running network services which listen for incoming connections from the internet, the loopback interface, or a combination of both. Network-facing services which are not needed should be removed from the system to reduce the attack surface of both running processes and installed packages.
Determine Running ServicesPermalink
To see your Linode’s running network services:
sudo ss -atpu
The following is an example of the output given by ss, and shows that the SSH daemon (sshd) is listening and connected. Note that because distributions run different services by default, your output will differ.
Netid State Recv-Q Send-Q Local Address:Port Peer Address:Port tcp LISTEN 0 128 *:ssh *:* users:(("sshd",pid=3675,fd=3)) tcp ESTAB 0 208 203.0.113.1:ssh 198.51.100.2:54820 users:(("sshd",pid=3698,fd=3)) tcp LISTEN 0 128 :::ssh :::* users:(("sshd",pid=3675,fd=4)) TCPPermalink
See the Peer Address:Port column of the ss readout. The process sshd is listening on *:*, which translates into any incoming IPv4 address to any port, and over any network interface. The next line shows an established SSH connection from IP address 198.51.100.2 via ephemeral port 54820. The last line, :::*denotes the sshd process listening for any incoming SSH connections over IPv6 to any port, and again over any network interface.
UDPPermalink
UDP sockets are stateless, meaning they are either open or closed and every process’s connection is independent of those which occurred before and after. This is in contrast to TCP connection states such as LISTEN, ESTABLISHED and CLOSE_WAIT. The ss output above shows no UDP connections.
Determine Which Services to RemovePermalink
A basic TCP and UDP nmap scan of your Linode without a firewall enabled would show SSH and possibly other services listening for incoming connections. By configuring a firewall you can filter those ports to your requirements. Ideally, the unused services should be disabled.
You will likely be administering your server primarily through an SSH connection, so that service needs to stay. As mentioned above, RSA keys and Fail2Ban can help protect SSH. System services like chronyd, systemd-resolved, and dnsmasqare usually listening on localhost and only occasionally contacting the outside world. Services like this are part of your operating system and will cause problems if removed and not properly substituted.
However, some services are unnecessary and should be removed unless you have a specific need for them. Some examples could be Exim, Apache and RPC.
Uninstall the Listening ServicesPermalink
How to remove the offending packages will differ depending on your distribution’s package manager.
Arch
sudo pacman -Rs package_name
CentOS
sudo yum remove package_name
Debian / Ubuntu
sudo apt purge package_name
Fedora
sudo dnf remove package_name
Run ss -atup again to verify that the unwanted services are no longer running.
Configure a FirewallPermalink
Using a firewall to block unwanted inbound traffic to your Linode provides a highly effective security layer. By being very specific about the traffic you allow in, you can prevent intrusions and network mapping. A best practice is to allow only the traffic you need, and deny everything else. See our documentation on some of the most common firewall applications:
- Iptables is the controller for netfilter, the Linux kernel’s packet filtering framework. Iptables is included in most Linux distributions by default.
- FirewallD is the iptables controller available for the CentOS / Fedora family of distributions.
- UFW provides an iptables frontend for Debian and Ubuntu.
Next StepsPermalink
These are the most basic steps to harden any Linux server, but further security layers will depend on its intended use. Additional techniques can include application configurations, using intrusion detection or installing a form of access control.
Now you can begin setting up your Linode for any purpose you choose. We have a library of documentation to assist you with a variety of topics ranging from migration from shared hosting to enabling two-factor authentication to hosting a website.
See Also
centos初装系统-修改timezone
It may be better to use the same timezone which a majority of your users are located in, or that you live in to make log file timestamps more sensible.
Debian / Ubuntu
[bash]dpkg-reconfigure tzdata[/bash]
Arch Linux and CentOS 7
View the list of available time zones.
[bash]timedatectl list-timezones[/bash]
Use the Up, Down, Page Up and Page Down keys to navigate. Find the time zone which you want. Remember it, write it down or copy it as a mouse selection. Then press q to exit the list.
To set the time zone:
[bash]timedatectl set-timezone ‘America/New_York'[/bash]
Gentoo
View the list of available time zones.
[bash]ls /usr/share/zoneinfo[/bash]
Write the selected time zone to the /etc/timezone file.
Example (for Eastern Standard Time):
[bash]echo "EST" > /etc/timezone[/bash]
Configure the sys-libs/timezone-data package, which will set /etc/localtimeappropriately.
[bash]emerge –config sys-libs/timezone-data[/bash]
Check the Time
View the current date and time according to your server.
[bash]date[/bash]
The output should look similar to: Thu Feb 16 12:17:52 EST 2012.
转载自:https://www.linode.com/docs/getting-started/
centos初装系统-修改hostname
你系统的主机名应该是唯一的。 有些人用行星,哲学家或动物命名他们的服务器。 请注意,除了为系统本身提供名称之外,主机名与托管在其上的网站或电子邮件服务没有任何关系。 您的主机名不应该是“www”或任何太普通的名字。如果您想为您的系统分配一个完全合格的域名,请参阅我们的关于使用您系统的主机文件的指南。如果您想为您的系统分配一个完全合格的域名,请参阅我们的关于使用您系统的主机文件的指南。
Arch / CentOS 7 / Debian 8 / Fedora / Ubuntu 16.04 and above
Replace example_hostname with one of your choice.
[bash]hostnamectl set-hostname example_hostname[/bash]
Debian 7 / Slackware / Ubuntu 14.04
Replace example_hostname with one of your choice.
[bash]
echo "example_hostname" > /etc/hostname
hostname -F /etc/hostname
[/bash]
Note
Debian and Ubuntu include a line in their hosts file for a loopback domain by default (127.0.1.1), but even though they’re closely related, the commands above to set a hostname don’t change the loopback domain.
The result is the message when using sudo commands: sudo: unable to resolve host . To fix this, add your hostname to the hosts file as shown in the last example here.
CentOS 6
Replace hostname with one of your choice.
[bash]
echo "HOSTNAME=example_hostname" >> /etc/sysconfig/network
hostname "hostname"
[/bash]
Gentoo
Enter the following commands to set the hostname, replacing example_hostnamewith the hostname of your choice:
[bash]
echo "HOSTNAME=\"example_hostname\"" > /etc/conf.d/hostname
/etc/init.d/hostname restart
[/bash]
转载自:https://www.linode.com/docs/getting-started/
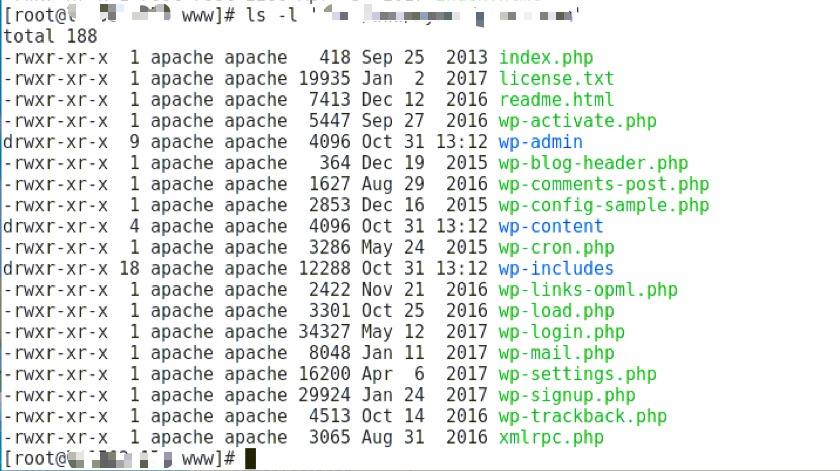
bash-文件-linux设置文件权限
对指定 文件夹 文件 读写 全开放
chmod 777 -R 文件夹 (递归调用,使子文件 文件夹也是这个权限)
对指定 文件夹 ,设置 文件 文件夹 用户组 和用户 ;就是文件所有者
chown -R apache:apache 文件夹 (递归调用,使子文件 文件夹也是这个权限)
最后 设置好
chmod 755 -R 文件夹 (递归调用,使子文件 文件夹也是这个权限)
ls –l 文件夹 (可以查看文件 权限 用户组)
vnc-远程连接配置与入门(全攻略)
一、VNC简介
VNC (Virtual Network Console)是虚拟网络控制台的缩写。它 是一款优秀的远程控制工具软件,由著名的 AT&T 的欧洲研究实验室开发的。VNC 是在基于 UNIX 和 Linux 操作系统的免费的开源软件,远程控制能力强大,高效实用,其性能可以和 Windows 和 MAC 中的任何远程控制软件媲美。 在 Linux 中,VNC 包括以下四个命令:vncserver,vncviewer,vncpasswd,和 vncconnect。大多数情况下用户只需要其中的两个命令:vncserver 和 vncviewer。
VNC基本上是由两部分组成:一部分是客户端的应用程序(vncviewer);另外一部分是服务器端的应用程序(vncserver)。VNC的基本运行原理和一些Windows下的远程控制软件很相像。VNC的服务器端应用程序在UNIX和Linux操作系统中适应性很强,图形用户界面十分友好,看上去和Windows下的软件界面也很类似。在任何安装了客户端的应用程序(vncviewer)的Linux平台的计算机都能十分方便地和安装了服务器端的应用程序(vncserver)的计算机相互连接。另外,服务器端 (vncserver)还内建了Java Web接口,这样用户通过服务器端对其他计算机的操作就能通过Netscape显示出来了,这样的操作过程和显示方式比较直观方便。
二、配置vnc客户端
楼主下载的是:VNC Viewer
https://www.realvnc.com/en/connect/download/viewer/
下载完,直接安装就行了。
三、centos7配置vnc服务器端
# 1、下载linux桌面环境
yum groupinstall "GNOME Desktop"

# 2、安装tigervnc 服务端软件
yum install tigervnc-server

# 3、拷贝 vnc 配置文件
# In CentOS 7.0 there is change in the vncserver configuration file.
# Before ContOS 7.0 it was  /etc/sysconfig/vncservers and now
# it have changed in /lib/systemd/system/[email protected].
# Next I will use the original file and create the configuration file as shown:

cp /lib/systemd/system/[email protected] /etc/systemd/system/vncserver@:1.service
重点步骤:
# 4、编辑vnc配置文件
# Replace the string <USER> with appropriate vncuser’s username.
# In my case I will be using the user root:
vi /etc/systemd/system/vncserver@:1.service
旧版 vnc 配置文件:
# ... 前面一大堆文字

[Service]
Type=forking
# Clean any existing files in /tmp/.X11-unix environment
ExecStartPre=/bin/sh -c '/usr/bin/vncserver -kill %i > /dev/null 2>&1 || :'
#ExecStart=/sbin/runuser -l  -c "/usr/bin/vncserver %i"
#PIDFile=/home//.vnc/%H%i.pid
ExecStart=/sbin/runuser -l srijan -c "/usr/bin/vncserver %i"
PIDFile=/home/srijan/.vnc/%H%i.pid
ExecStop=/bin/sh -c '/usr/bin/vncserver -kill %i > /dev/null 2>&1 || :'
新版 VNC 配置文件:
# The vncserver service unit file
#
# Quick HowTo:
# 1. Copy this file to /etc/systemd/system/[email protected]
# 2. Replace  with the actual user name and edit vncserver
#    parameters appropriately
#   ("User=" and "/home//.vnc/%H%i.pid")
# 3. Run `systemctl daemon-reload`
# 4. Run `systemctl enable vncserver@:.service`
#
# DO NOT RUN THIS SERVICE if your local area network is
# untrusted!  For a secure way of using VNC, you should
# limit connections to the local host and then tunnel from
# the machine you want to view VNC on (host A) to the machine
# whose VNC output you want to view (host B)
#
# [user@hostA ~]$ ssh -v -C -L 590N:localhost:590M hostB
#
# this will open a connection on port 590N of your hostA to hostB's port 590M
# (in fact, it ssh-connects to hostB and then connects to localhost (on hostB).
# See the ssh man page for details on port forwarding)
#
# You can then point a VNC client on hostA at vncdisplay N of localhost and with
# the help of ssh, you end up seeing what hostB makes available on port 590M
#
# Use "-nolisten tcp" to prevent X connections to your VNC server via TCP.
#
# Use "-localhost" to prevent remote VNC clients connecting except when
# doing so through a secure tunnel.  See the "-via" option in the
# `man vncviewer' manual page.

[Unit]
Description=Remote desktop service (VNC)
After=syslog.target network.target

[Service]
Type=forking
User=

# Clean any existing files in /tmp/.X11-unix environment
ExecStartPre=-/usr/bin/vncserver -kill %i
ExecStart=/usr/bin/vncserver %i
PIDFile=/home//.vnc/%H%i.pid
ExecStop=-/usr/bin/vncserver -kill %i

[Install]
WantedBy=multi-user.target
新版vnc配置文件,有一个坑
User=
#改成 User=root

PIDFile=/home//.vnc/%H%i.pid
# 改成 PIDFile=/root/.vnc/%H%i.pid
# 普通用户的话,目录都是 /home/用户名
# root 用户的目录是 /root
# 注意啊 这个是坑爹 的地方
5、配置防火墙
firewall-cmd --permanent --zone=public --add-service vnc-server
firewall-cmd --reload
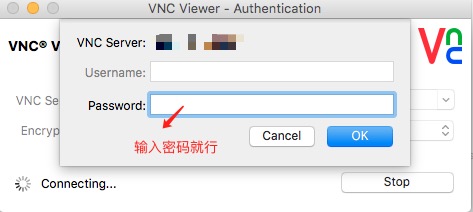
6、启动 vncserver ;就是开启 VNC 服务器,开启的同时,先让你设置个密码(这个密码是客户端需要输入的记住)
[root@server1 ~]# vncserver

You will require a password to access your desktops.

Password:<--yourvncpassword
Verify:<--yourvncpassword
xauth:  file /home/srijan/.Xauthority does not exist

New 'server1.example.com:1 (srijan)' desktop is server1.example.com:1

Creating default startup script /home/kishore/.vnc/xstartup
Starting applications specified in /home/kishore/.vnc/xstartup
Log file is /home/srijan/.vnc/server1.example.com:1.log

[root@server1 ~]#
其实这个时候,vnc服务器 已经可以运行了。
这里的配置的数字1,其实就是 从 VNC 端口 5900开始的,数字1 代表 5901端口,可接收远程连接请求。
7、设置开机自启动
Now make the service enabled on after every reboot with root credentials:
systemctl daemon-reload
systemctl enable vncserver@:1.service
reboot
systemctl start vncserver@:1.service
8、常见报错问题:(网上的解答,不靠谱,尝试了很多,最终看文档,明白了)
[root@localhost system]# systemctl start vncserver@:1.service
Job for vncserver@:1.service failed. See ‘systemctl status vncserver@:1.service’ and ‘journ
alctl -xn’ for details.[root@localhost system]# systemctl status vncserver@:1.service
vncserver@:1.service - Remote desktop service (VNC)
Loaded: loaded (/etc/systemd/system/vncserver@:1.service; enabled)
Active: failed (Result: exit-code) since Thu 2015-04-23 16:04:58 CST; 14s ago
Process: 24764 ExecStart=/sbin/runuser -l root -c /usr/bin/vncserver :1 -geometry 1280x10
24 -depth 24 (code=exited, status=98) Process: 24760 ExecStartPre=/bin/sh -c /usr/bin/vncserver -kill %1 > /dev/null 2>&1 || :
(code=exited, status=0/SUCCESS)
Apr 23 16:04:58 localhost.localdomain systemd[1]: vncserver@:1.service: control proces…98
Apr 23 16:04:58 localhost.localdomain systemd[1]: Failed to start Remote desktop servi…).
Apr 23 16:04:58 localhost.localdomain systemd[1]: Unit vncserver@:1.service entered fa…e.
Hint: Some lines were ellipsized, use -l to show in full.
[root@localhost system]#
解决方法:
1、可能是 临时文件 问题。
rm -rf /tmp/.X11-unix
2、可能是端口被占用问题,或者死锁了。
[root@testdb ~]# lsof -i:5901
COMMAND   PID USER   FD   TYPE DEVICE SIZE/OFF NODE NAME
Xvnc    17513 root    9u  IPv4 365529      0t0  TCP localhost:5901 (LISTEN)
Xvnc    17513 root   10u  IPv6 365530      0t0  TCP localhost:5901 (LISTEN)
[root@testdb ~]# kill 17513
[root@testdb ~]#
重新启动系统,就可以啦。
其实直接用命令行启动VNC服务端最方便,使用了很多次,没有报错过
[root@testdb ~]# vncserver -h

usage: vncserver [:<number>] [-name <desktop-name>] [-depth <depth>]
                 [-geometry <width>x<height>]
                 [-pixelformat rgbNNN|bgrNNN]
                 [-fp <font-path>]
                 [-cc <visual>]
                 [-fg]
                 [-autokill]
                 [-noxstartup]
                 [-xstartup <file>]
                 <Xvnc-options>...

       vncserver -kill <X-display>

       vncserver -list

[root@testdb ~]#
# 启动 vnc 服务端 5901端口(分配一个窗口) 命令
vncserver :1
# 关闭 vnc 服务端 5901 端口(一个窗口) 命令
vncserver -kill :1
# 查看 当前 有 多少个 vnc 窗口 命令
vncserver -list
##########   下面就是命令行 能看到的结果
#  TigerVNC server sessions:
#
#   X DISPLAY #	  PROCESS ID
#    :1		    18936
##################################
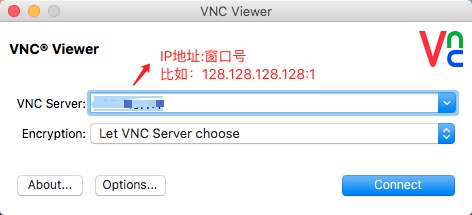
四、客户端连接操作

五、VNC安全加固,使用ssh隧道连接登录
利用ssh 登入centos7系统,或者用vnc登录也行。
[root@testdb ~]# ls -a
.                Downloads                                   Pictures
..               .esd_auth                                   .pki
anaconda-ks.cfg  Firefox_wallpaper.png                       Public
.bash_history    get-pip.py                                  .ssh
.bash_logout     .gvfs                                       .tcshrc
.bash_profile    html.tar.gz                                 Templates
.bashrc          .ICEauthority                               Videos
.cache           .local                                      .viminfo
.config          .mozilla                                    .vnc
.cshrc           Music                                       .Xauthority
Desktop          mysql57-community-release-el7-8.noarch.rpm
Documents        .mysql_history
[root@li1582-175 ~]# cd .vnc
[root@li1582-175 .vnc]# ls -a
.       li1582-175.members.linode.com:1.log  passwd
..      li1582-175.members.linode.com:2.log  xstartup
config  localhost.localdomain:1.log
[root@testdb .vnc]# vim config
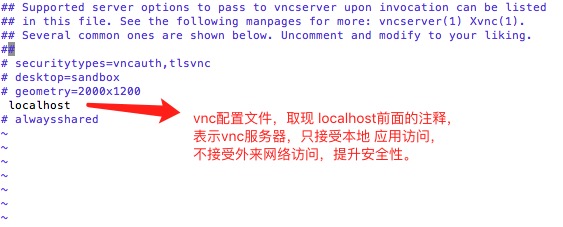
vim编辑完文件后,保存并重启VNC服务端。
#关闭vnc服务器,
vncserver -kill :1
#重启vnc服务器
vncserver :1
客户端操作如下:
1、SSH本地端口转发。VNC远程连接过程中需要保持一直在后台运行。
假定服务器ip 是 128.128.128.128
假定服务器SSH 端口是 8888
ssh -v -C -L 5901:localhost:5901 [email protected] -p 8888
2、登录vnc客户端:
只需将vnc服务器填本机即可。
VNC SERVER:127.0.0.1:1
部分内容参考自:https://www.howtoforge.com/vnc-server-installation-on-centos-7
yum-配置与入门
yum 的配置文件分为两部分:main 和repository
- main 部分定义了全局配置选项,整个yum 配置文件应该只有一个main。常位于/etc/yum.conf 中。
- repository 部分定义了每个源/服务器的具体配置,可以有一到多个。常位于/etc/yum.repo.d 目录下的各文件中。
参考:https://www.cnblogs.com/mchina/archive/2013/01/04/2842275.html
一、yum的配置文件
[bash]
[root@tomy ~]# cat /etc/yum.conf
[main]
cachedir=/var/cache/yum/$basearch/$releasever #yum下载的RPM包的缓存目录
keepcache=0 #缓存是否保存,1保存,0不保存。
debuglevel=2 #调试级别(0-10),默认为2(具体调试级别的应用,我也不了解)。
logfile=/var/log/yum.log #yum的日志文件所在的位置
exactarch=1 #在更新的时候,是否允许更新不同版本的RPM包,比如是否在i386上更新i686的RPM包
obsoletes=1 #这是一个update的参数,具体请参阅yum(8),简单的说就是相当于upgrade,允许更新陈旧的RPM包
gpgcheck=1 #是否检查GPG(GNU Private Guard),一种密钥方式签名。
plugins=1 #是否允许使用插件,默认是0不允许,但是我们一般会用yum-fastestmirror这个插件。
installonly_limit=5 #允许保留多少个内核包
bugtracker_url=http://bugs.centos.org/set_project.php?project_id=23&ref=http://bugs.centos.org/bug_report_page.php?category=yum
distroverpkg=centos-release
# This is the default, if you make this bigger yum won’t see if the metadata
# is newer on the remote and so you’ll “gain” the bandwidth of not having to
# download the new metadata and “pay” for it by yum not having correct
# information.
# It is esp. important, to have correct metadata, for distributions like
# Fedora which don’t keep old packages around. If you don’t like this checking
# interupting your command line usage, it’s much better to have something
# manually check the metadata once an hour (yum-updatesd will do this).
# metadata_expire=90m
# PUT YOUR REPOS HERE OR IN separate files named file.repo
# in /etc/yum.repos.d
[/bash]
二、 yum的详细使用方法
yum是什么
yum = Yellow dog Updater, Modified
主要功能是更方便的添加/删除/更新RPM包.
它能自动解决包的倚赖性问题.
它能便于管理大量系统的更新问题
yum特点
可以同时配置多个资源库(Repository)
简洁的配置文件(/etc/yum.conf
自动解决增加或删除rpm包时遇到的倚赖性问题
使用方便
保持与RPM数据库的一致性
[bash]
yum安装
CentOS自带(yum-*.noarch.rpm)
#rpm -ivh yum-*.noarch.rpm
在第一次启用yum之前首先需要导入系统的RPM-GPG-KEY:
#rpm –import /usr/share/doc/centos-release-3(4)/RPM-GPG-KEY-CentOS-3(4)
yum指令
注:当第一次使用yum或yum资源库有更新时,yum会自动下载所有所需的headers放置于/var/cache/yum目录下,所需时间可能较长.
rpm包的更新
检查可更新的rpm包
#yum check-update
更新所有的rpm包
#yum update
更新指定的rpm包,如更新kernel和kernel source
#yum update kernel kernel-source
大规模的版本升级,与yum update不同的是,连旧的淘汰的包也升级
#yum upgrade
rpm包的安装和删除
安装rpm包,如xmms-mp3
#yum install xmms-mp3
删除rpm包,包括与该包有倚赖性的包
#yum remove licq
注:同时会提示删除licq-gnome,licq-qt,licq-text
yum暂存(/var/cache/yum/)的相关参数
清除暂存中rpm包文件
#yum clean packages
清除暂存中rpm头文件
#yum clearn headers
清除暂存中旧的rpm头文件
#yum clean oldheaders
清除暂存中旧的rpm头文件和包文件
#yum clearn 或#yum clearn all
注:相当于yum clean packages + yum clean oldheaders
包列表
列出资源库中所有可以安装或更新的rpm包
#yum list
列出资源库中特定的可以安装或更新以及已经安装的rpm包
#yum list mozilla#yum list mozilla*
注:可以在rpm包名中使用匹配符,如列出所有以mozilla开头的rpm包
列出资源库中所有可以更新的rpm包
#yum list updates
列出已经安装的所有的rpm包
#yum list installed
列出已经安装的但是不包含在资源库中的rpm包
#yum list extras
注:通过其它网站下载安装的rpm包
rpm包信息显示(info参数同list)
列出资源库中所有可以安装或更新的rpm包的信息
#yum info
列出资源库中特定的可以安装或更新以及已经安装的rpm包的信息
#yum info mozilla#yum info mozilla*
注:可以在rpm包名中使用匹配符,如列出所有以mozilla开头的rpm包的信息
列出资源库中所有可以更新的rpm包的信息
#yum info updates
列出已经安装的所有的rpm包的信息
#yum info installed
列出已经安装的但是不包含在资源库中的rpm包的信息
#yum info extras
注:通过其它网站下载安装的rpm包的信息
搜索rpm包
搜索匹配特定字符的rpm包
#yum search mozilla
注:在rpm包名,包描述等中搜索
搜索有包含特定文件名的rpm包
#yum provides realplay
增加资源库
例如:增加rpm.livna.org作为资源库
安装Livna.org rpms GPG key
#rpm –import http://rpm.livna.org/RPM-LIVNA-GPG-KEY
检查GPG Key
# rpm -qa gpg-pubkey*
显示Key信息
#rpm -qi gpg-pubkey-a109b1ec-3f6e28d5
(注:如果要删除Key,使用#rpm -e gpg-pubkey-a109b1ec-3f6e28d5)
yum常用的命令
# yum install xxx 安装xxx软件
# yum info xxx 查看xxx软件的信息
# yum remove xxx 删除软件包
# yum list 列出软件包
# yum clean 清除缓冲和就的包
# yum provides xxx 以xxx为关键字搜索包(提供的信息为关键字)
# yum search xxx 搜索软件包(以名字为关键字)
# yum groupupdate xxx
# yum grouplist xxx
# yum groupremove xxx
这三个都是一组为单位进行升级 列表和删除的操作。。比如 “Mysql Database”就是一个组会同时操作相关的所有软件包;
# yum update 系统升级
# yum list available 列出所有升级源上的包;
# yum list updates 列出所有升级源上的可以更新包;
# yum list installed 列出已经安装的包;
# yun update kernel 升级内核;
yum常用的源
1) 自动选择最快的源
由于yum中有的mirror速度是非常慢的,如果yum选择了这个mirror,这个时候yum就会非常慢,对此,可以下载fastestmirror插件,它会自动选择最快的mirror:
#yum install yum-fastestmirror
配置文件:(一般不用动)/etc/yum/pluginconf.d/fastestmirror.conf
你的yum镜像的速度测试记录文件:/var/cache/yum/timedhosts.txt
(2)使用图形界面的yum
如果觉得命令行的yum不方便,那么可以使用图形化的yumex,这个看起来更方便,因为可以自由地选择软件仓库:
#yum install yumex
然后在系统工具中就可以看到yum extender了。实际上系统自带的“添加/删除程序“也可以实现图形化的软件安装,但有些yumex的功能它没有。
[/bash]
三、*.repo文件详解
什么是repo文件?【下面提到的是Fedora系统,和centos 类似,都是linux系统】
[bash]
repo文件是Fedora中yum源(软件仓库)的配置文件,通常一个repo文件定义了一个或者多个软件仓库的细节内容,例如我们将从哪里下载需要安装或者升级的软件包,repo文件中的设置内容将被yum读取和应用!
我们以一份系统自带的repo文件做为实例来探讨(#号后面是我加的注释):
[fedora] #方括号里面的是软件源的名称,将被yum取得并识别
name=Fedora $releasever – $basearch #这里也定义了软件 仓库的名称,通常是为了方便阅读配置文件,一般没什么作用,$releasever变量定义了发行版本,通常是8,9,10等数字,$basearch变 量定义了系统的架构,可以是i386、x86_64、ppc等值,这两个变量根据当前系统的版本架构不同而有不同的取值,这可以方便yum升级的时候选择 适合当前系统的软件包,以下同……
failovermethod=priority #failovermethod 有两个值可以选择,priority是默认值,表示从列出的baseurl中顺序选择镜像服务器地址,roundrobin表示在列出的服务器中随机选择
exclude=compiz* *compiz* fusion-icon* #exclude这个选项是后来我自己加上去的,用来禁止这个软件仓库中的某些软件包的安装和更新,可以使用通配符,并以空格分隔,可以视情况需要自行添加
#baseurl=http://download.fedoraproject.org/pub/fedora/linux/releases/$releasever/Everything/$basearch/os/
#上面的一行baseurl第一个字符是’#’表示该行已经被注释,将不会被读取,这一行的意思是指定一个baseurl(源的镜像服务器地址)
#mirrorlist=http://mirrors.fedoraproject.org/mirrorlist?repo=fedora-$releasever&arch=$basearch
#上面的这一行是指定一个镜像服务器的地址列表,通常是开启的,本例中加了注释符号禁用了,我们可以试试,将$releasever和$basearch替换成自己对应的版本和架构,例如10和i386,在浏览器中打开,我们就能看到一长串镜可用的镜像服务器地址列表。
选择自己访问速度较快的镜像服务器地址复制并粘贴到repo文件中,我们就能获得较快的更新速度了,格式如下baseurl所示:
baseurl=
ftp://ftp.sfc.wide.ad.jp/pub/Linux/Fedora/releases/10/Everything/i386/os
http://ftp.chg.ru/pub/Linux/fedora/linux/releases/10/Everything/i386/os
http://ftp.yz.yamagata-u.ac.jp/pub/linux/fedora/linux/releases/10/Everything/i386/os
http://mirror.nus.edu.sg/fedora/releases/10/Everything/i386/os
http://mirror.yandex.ru/fedora/linux/releases/10/Everything/i386/os
http://ftp.twaren.net/Linux/Fedora/linux/releases/10/Everything/i386/os
http://ftp.itu.edu.tr/Mirror/Fedora/linux/releases/10/Everything/i386/os
enabled=1 #这个选项表示这个repo中定义的源是启用的,0为禁用
gpgcheck=1 #这个选项表示这个repo中下载的rpm将进行gpg的校验,已确定rpm包的来源是有效和安全的
gpgkey=file:///etc/pki/rpm-gpg/RPM-GPG-KEY-fedora-$basearch #定义用于校验的gpg密钥
##以下的软件仓库基本上用不到,选项含义同上
[fedora-debuginfo]
name=Fedora $releasever – $basearch – Debug
failovermethod=priority
#baseurl=http://download.fedoraproject.org/pub/fedora/linux/releases/$releasever/Everything/$basearch/debug/
mirrorlist=http://mirrors.fedoraproject.org/mirrorlist?repo=fedora-debug-$releasever&arch=$basearch
enabled=0
gpgcheck=1
gpgkey=file:///etc/pki/rpm-gpg/RPM-GPG-KEY-fedora-$basearch
[fedora-source]
name=Fedora $releasever – Source
failovermethod=priority
#baseurl=http://download.fedoraproject.org/pub/fedora/linux/releases/$releasever/Everything/source/SRPMS/
mirrorlist=http://mirrors.fedoraproject.org/mirrorlist?repo=fedora-source-$releasever&arch=$basearch
enabled=0
gpgcheck=1
gpgkey=file:///etc/pki/rpm-gpg/RPM-GPG-KEY-fedora-$basearch
[/bash]
转载自: http://www.cnblogs.com/sunth/archive/2011/04/14/2015653.html
转载自: http://www.cnblogs.com/xiaochaohuashengmi/archive/2011/10/09/2203916.html
centos7初装系统-ssh登录locale编码问题
勘误,之前这篇文章有错误 http://www.01happy.com/p3204/
问题不是系统自身编码问题,是不同系统的local登录衔接问题。
locale问题起因
登录 centos7 系统时,命令行模式下会出现一个警告:
[bash]
locale: Cannot set LC_CTYPE to default locale: No such file or directory
locale: Cannot set LC_ALL to default locale: No such file or directory
[/bash]
这个不是由于系统默认编码问题导致的,这个是因为两台电脑连接时,本地编码不能协调导致的,分析如下:
centos本机登录(没报错)
[root@localhost ~]# locale
LANG=en_US.UTF-8
LC_CTYPE="en_US.UTF-8"
LC_NUMERIC="en_US.UTF-8"
LC_TIME="en_US.UTF-8"
LC_COLLATE="en_US.UTF-8"
LC_MONETARY="en_US.UTF-8"
LC_MESSAGES="en_US.UTF-8"
LC_PAPER="en_US.UTF-8"
LC_NAME="en_US.UTF-8"
LC_ADDRESS="en_US.UTF-8"
LC_TELEPHONE="en_US.UTF-8"
LC_MEASUREMENT="en_US.UTF-8"
LC_IDENTIFICATION="en_US.UTF-8"
LC_ALL=
[root@localhost ~]#
mac本机登录(没报错)
mbpdeMacBook-Pro:~ cool$ locale
LANG=
LC_COLLATE="C"
LC_CTYPE="UTF-8"
LC_MESSAGES="C"
LC_MONETARY="C"
LC_NUMERIC="C"
LC_TIME="C"
LC_ALL=
mbpdeMacBook-Pro:~ cool$
mac连接centos登录(报错了)
[root@localhost ~]# locale
locale: Cannot set LC_CTYPE to default locale: No such file or directory
locale: Cannot set LC_ALL to default locale: No such file or directory
LANG=en_US.UTF-8
LC_CTYPE=UTF-8
LC_NUMERIC="en_US.UTF-8"
LC_TIME="en_US.UTF-8"
LC_COLLATE="en_US.UTF-8"
LC_MONETARY="en_US.UTF-8"
LC_MESSAGES="en_US.UTF-8"
LC_PAPER="en_US.UTF-8"
LC_NAME="en_US.UTF-8"
LC_ADDRESS="en_US.UTF-8"
LC_TELEPHONE="en_US.UTF-8"
LC_MEASUREMENT="en_US.UTF-8"
LC_IDENTIFICATION="en_US.UTF-8"
LC_ALL=
[root@localhost ~]#
locale背景知识
locale基本含义
locale就是某一个地域内的人们的语言习惯和文化传统和生活习惯。一个地区的locale就是根据这几大类的习惯定义的,这些locale定 义文件放在/usr/share/i18n/locales目录下面,例如en_US, zh_CN and de_DE@euro都是locale的定义文件,这些文件都是用文本格式书写的,你可以用写字板打开,看看里边的内容,当然出了有限的注释以外,大部分 东西可能你都看不懂,因为是用的Unicode的字符索引方式。
cat /usr/share/i18n/locales/zh_CN
comment_char %
escape_char  /
%
% Chinese language locale for the Peoples Republic of China
%
% This work is based on ISO PDTR 14652, Unicode 3.0, locale definition
% file for zh_CN revision 1.0 ([email protected], 1999-04-28) and
% charmap file for GBK version 1.0 ([email protected]).
%
% The file is designed to work with multiple charsets.  To ease the
% maintance and adding support for new charsets, all characters are
% in UCS notation and presented in Unicode order.
%
% Changelog:
% Tue Jul 25 2000 Yong Li <[email protected]>
% - first version for glibc 2.2

。。。。。。
。。。
locale内容说明
[oracle@game ~]$ locale
LANG=en_US.UTF-8
LC_CTYPE="en_US.UTF-8"
LC_NUMERIC="en_US.UTF-8"
LC_TIME="en_US.UTF-8"
LC_COLLATE="en_US.UTF-8"
LC_MONETARY="en_US.UTF-8"
LC_MESSAGES="en_US.UTF-8"
LC_PAPER="en_US.UTF-8"
LC_NAME="en_US.UTF-8"
LC_ADDRESS="en_US.UTF-8"
LC_TELEPHONE="en_US.UTF-8"
LC_MEASUREMENT="en_US.UTF-8"
LC_IDENTIFICATION="en_US.UTF-8"
LC_ALL=en_US.UTF-8
[oracle@game ~]$

locale把按照所涉及到的文化传统的各个方面分成12个大类,这12个大类分别是:

1、语言符号及其分类(LC_CTYPE)
2、数字(LC_NUMERIC)
3、比较和排序习惯(LC_COLLATE)
4、时间显示格式(LC_TIME)
5、货币单位(LC_MONETARY)
6、信息主要是提示信息,错误信息,状态信息,标题,标签,按钮和菜单等(LC_MESSAGES)
7、姓名书写方式(LC_NAME)
8、地址书写方式(LC_ADDRESS)
9、电话号码书写方式(LC_TELEPHONE)
10、度量衡表达方式 (LC_MEASUREMENT)
11、默认纸张尺寸大小(LC_PAPER)
12、对locale自身包含信息的概述(LC_IDENTIFICATION)。
locale格式说明
zh_CN.GB2312到底是在说什么?
Locale是软件在运行时的语言环境, 它包括语言(Language), 地域 (Territory) 和字符集(Codeset)。
一个locale的书写格式为: 语言[_地域[.字符集]]。所以说呢,locale总是和一定的字符集相联系的。
下面举几个例子:
1、我说中文,身处中华人民共和国,使用国标2312字符集来表达字符。zh_CN.GB2312=中文_中华人民共和国+国标2312字符集。
2、我说中文,身处中华人民共和国,使用国标18030字符集来表达字符。zh_CN.GB18030=中文_中华人民共和国+国标18030字符集。
3、我说中文,身处中华人民共和国台湾省,使用国标Big5字符集来表达字符。zh_TW.BIG5=中文_台湾.大五码字符集
4、我说英文,身处大不列颠,使用ISO-8859-1字符集来表达字符。 en_GB.ISO-8859-1=英文_大不列颠.ISO-8859-1字符集
5、我说德语,身处德国,使用UTF-8字符集,习惯了欧洲风格。de_DE.UTF-8@euro=德语_德国.UTF-8字符集@按照欧洲习惯加以修正,注意不是[email protected],所以完全的locale表达方式是 [语言[_地域][.字符集] [@修正值]。
对于de_DE@euro的一点说明,@后边是修正项,也就是说你可以看到两个德国的locale:/usr/share/i18n/locales /de_DE@euro和/usr/share/i18n/locales/de_DE。
打开这两个locale定义,你就会知道它们的差别在于 de_DE@euro使用的是欧洲的排序、比较和缩进习惯,而de_DE用的是德国的标准习惯。
locale优先级说明
设定locale就是设定12大类的locale分类属性,即12个LC_*。除了这12个变量可以设定以外,为了简便起见,还有两个变量:LC_ALL和LANG。它们之间有一个优先级的关系:LC_ALL > LC_* >LANG。可以这么说,LC_ALL是最上级设定或者强制设定,而LANG是默认设定值。
1、如果你设定了LC_ALL=zh_CN.UTF-8,那么不管LC_*和LANG设定成什么值,它们都会被强制服从LC_ALL的设定,成为 zh_CN.UTF-8。
2、假如你设定了LANG=zh_CN.UTF-8,而其他的LC_*=en_US.UTF-8,并且没有设定LC_ALL的话,那么系统的locale设定以LC_*=en_US.UTF-8。
3、假如你设定了LANG=zh_CN.UTF-8,而其他的LC_*,和LC_ALL均未设定的话,系统会将LC_*设定成默认值,也就是LANG的值zh_CN.UTF-8。
4、假如你设定了LANG=zh_CN.UTF-8,而其他的LC_CTYPE=en_US.UTF-8,其他的LC_*,和LC_ALL均未设定的话, 那么系统的locale设定将是:LC_CTYPE=en_US.UTF-8,其余的 LC_COLLATE,LC_MESSAGES等等均会采用默认值,也就是 LANG的值,也就是LC_COLLATE=LC_MESSAGES=……= LC_PAPER=LANG=zh_CN.UTF-8。
所以,locale是这样设定的:
1、如果你需要一个纯中文的系统的话,设定LC_ALL= zh_CN.XXXX,或者LANG=zh_CN.XXXX都可以,当然你可以两个都设定,但正如上面所讲,LC_ALL的值将覆盖所有其他的locale设定,不要作无用功。
2、如果你只想要一个可以输入中文的环境,而保持菜单、标题,系统信息等等为英文界面,那么只需要设定 LC_CTYPE=zh_CN.XXXX,LANG=en_US.XXXX就可以了。这样LC_CTYPE=zh_CN.XXXX,而LC_COLLATE=LC_MESSAGES=……= LC_PAPER=LANG=en_US.XXXX。
3、假如你高兴的话,可以把12个LC_*一一设定成你需要的值,打造一个古灵精怪的系统: LC_CTYPE=zh_CN.GBK/GBK(使用中文编码内码GBK字符集); LC_NUMERIC=en_GB.ISO-8859-1(使用大不列颠的数字系统) [email protected](德国的度量衡使用ISO-8859-15字符集) 罗马的地址书写方式,美国的纸张设定……。估计没人这么干吧。
4、假如你什么也不做的话,也就是LC_ALL,LANG和LC_*均不指定特定值的话,系统将采用POSIX作为lcoale,也就是 C locale。
也就是说如果没有设置这些环境变量的时候,在系统安装好的时候这些环境变量是有默认值的,默认值是POSIX。(这应该只针对英文系统,装中文系统的话,这些变量的默认值应该不是POSIX了。)
http://pubs.opengroup.org/onlinepubs/007908799/xbd/locale.html
http://pubs.opengroup.org/onlinepubs/007908799/xbd/locale.html#tag_005_002
这有Locale和POSIX locale的说明,有兴趣自己研究一下吧。
我的理解是,locale就相当于一个编码字符集,POSIX字符集里没有中文编码,所有如果使用POSIX编码的字符集去打开中文文件的话,就会出现乱码。
另外LANG和LANGUAGE有什么区别呢?
LANG – Specifies the default locale for all unset locale variables
LANGUAGE – Most programs use this for the language of its interface
LANGUAGE是应用程序中的设置语言的选项。而LANG是优先级很低的一个全局变量,它指定所有与locale有关的变量的默认值。
locale基本命令
### 查看系统默认的语言设置
[root@toy ~]# locale


### 查看所有语言
[root@room9pc01 ~]# locale -a
### 或者 查看系统支持的汉语区域语言
[root@toy ~]# localectl list-locales| grep zh


### 查看当前区域配置
[root@toy ~]# localectl status
   System Locale: LANG=zh_CN.utf8
     VC Keymap: cn

     X11 Layout: cn


### 设置区域语言,其实在 /etc/locale.conf 在这个文本文件中,默认就一行 LANG=en_US.UTF-8
[root@toy ~]# localectl set-locale  LANG=zh_CN.utf8
### 查看上一条命令设置好的区域语言,
### 注意 centos6 是这个文件 /etc/sysconfig/i18n ,centos7 是 /etc/locale.conf
[root@toy ~]# cat /etc/locale.conf
LANG=zh_CN.utf8


### 刷新bash 或者重启,使设置生效 ###
locale问题分析
1、根据优先级:先找LC_ALL的配置,发现没有,就开始找 LC_CTYPE 。
2、然后 LC_CTYPE=UTF-8 ,在centos中找不到这个配置项,所以报错。
### 可以通过locale -a查看到系统支持的语系,
[root@localhost ~]# locale -a
aa_DJ
aa_DJ.iso88591
aa_DJ.utf8
aa_ER
aa_ER@saaho
aa_ER.utf8
aa_ER.utf8@saaho
aa_ET
。。。
。。
。
locale: Cannot set LC_CTYPE to default locale: No such file or directory
locale: Cannot set LC_ALL to default locale: No such file or directory
这边两行的错误其实就是说LC_CTYPE这个编码文件找不到,然后LC_ALL也找不到。
3、因为前面两个都报错,所以默认就使用LANG的配置。
4、然后我们知道 /etc/sysconfig/i18n 和 /etc/sysconfig/i18n 中,都只设置了 LANG 变量,且系统连接时 LC_CTYPE 会将本机系统的值传递到远程主机的系统中。【LC_CTYPE 好像没有 设置过,应该是系统默认值】
locale问题解决方案
1、远程主机自己指定 LC_CTYPE 。在远程主机的本地化文件中添加 LC_CTYPE 的值,此优先级比客户端主机传递过来的值要高。
centos6下面全局语系的配置放在/etc/sysconfig/i18n文件,修改
$ vim /etc/sysconfig/i18n
增加   LC_CTYPE="en_US.UTF-8"
重启服务器,问题就解决了。


不过Centos7上没有/etc/sysconfig/i18n,
查了下有 /etc/locale.conf 文件起到同样的作用。
于是添加   LC_CTYPE="en_US.UTF-8"
重启服务器,问题就解决了。
2、取消客户端传递过来的 LC_CTYPE
在客户端编辑 vim /etc/ssh/ssh_config找到SendEnv LANG LC_*注释掉
3、修改客户端的 LC_CTYPE ,使得 LC_CTYPE= en_US.UTF-8,这样传递给远程主机时就能识别了。
4、在远程主机中,创建一个 UTF-8 的locale文件,这样子系统就能识别了,也就是可以找到该文件了。
举例:
编辑 /etc/locale.gen文件,反注释 en_US.UTF-8 UTF-8 一行.
执行生成命令  locale-gen
【locale-gen 好像在Ubuntu下可以,centos中没有这个命令】
http://manpages.ubuntu.com/manpages/bionic/man8/locale-gen.8.html
参考:
https://www.cloudbility.com/club/7195.html
https://www.jianshu.com/p/fb6c5d747700
https://www.jianshu.com/p/2b24861be987
https://blog.csdn.net/lemontree1945/article/details/80088986
https://www.cnblogs.com/xlmeng1988/archive/2013/01/16/locale.html
https://www.jianshu.com/p/2b24861be987
centos7初装系统-更新系统
新装的centos7 系统,第一次 使用时,我们需要 更新一下 系统,解决之前可能存在的漏洞。
[bash]
# 检查系统更新
yum check-update
# 正式更新系统
yum update
[/bash]