SSM小项目-(2)-配置整合SSM

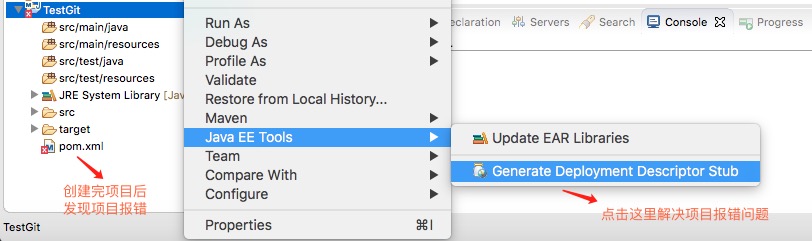
有时配置文件会报错,主要是网络读取不到文件的原因。可以先clean project ,然后再重新update project。报错举例:

- schema_reference.4: Failed to read schema document 'http://www.springframework.org/schema/tx/spring- tx-4.3.xsd', because 1) could not find the document; 2) the document could not be read; 3) the root element of the document is not <xsd:schema>.

一、配置Web.xml

<?xml version="1.0" encoding="UTF-8"?>
<web-app xmlns:xsi="http://www.w3.org/2001/XMLSchema-instance"
	xmlns="http://java.sun.com/xml/ns/javaee"
	xsi:schemaLocation="http://java.sun.com/xml/ns/javaee http://java.sun.com/xml/ns/javaee/web-app_2_5.xsd"
	id="WebApp_ID" version="2.5">
	
	<!--1、启动Spring的容器  -->
	<!-- needed for ContextLoaderListener -->
	<context-param>
		<param-name>contextConfigLocation</param-name>
		<param-value>classpath:springIOC.xml</param-value>
	</context-param>

	<!-- Bootstraps the root web application context before servlet initialization -->
	<listener>
		<listener-class>org.springframework.web.context.ContextLoaderListener</listener-class>
	</listener>
	
	<!--2、springmvc的前端控制器,拦截所有请求  -->
	<!-- The front controller of this Spring Web application, responsible for handling all application requests -->
	<servlet>
		<servlet-name>springMVC</servlet-name>
		<servlet-class>org.springframework.web.servlet.DispatcherServlet</servlet-class>
		<load-on-startup>1</load-on-startup>
	</servlet>

	<!-- Map all requests to the DispatcherServlet for handling -->
	<servlet-mapping>
		<servlet-name>springMVC</servlet-name>
		<url-pattern>/</url-pattern>
	</servlet-mapping>
	
	<!-- 3、字符编码过滤器,一定要放在所有过滤器之前 -->
	<filter>
		<filter-name>CharacterEncodingFilter</filter-name>
		<filter-class>org.springframework.web.filter.CharacterEncodingFilter</filter-class>
		<init-param>
			<param-name>encoding</param-name>
			<param-value>utf-8</param-value>
		</init-param>
		<init-param>
			<param-name>forceRequestEncoding</param-name>
			<param-value>true</param-value>
		</init-param>
		<init-param>
			<param-name>forceResponseEncoding</param-name>
			<param-value>true</param-value>
		</init-param>
	</filter>
	<filter-mapping>
		<filter-name>CharacterEncodingFilter</filter-name>
		<url-pattern>/*</url-pattern>
	</filter-mapping>
	
	<!-- 4、使用Rest风格的URI,将页面普通的post请求转为指定的delete或者put请求 -->
	<filter>
		<filter-name>HiddenHttpMethodFilter</filter-name>
		<filter-class>org.springframework.web.filter.HiddenHttpMethodFilter</filter-class>
	</filter>
	<filter-mapping>
		<filter-name>HiddenHttpMethodFilter</filter-name>
		<url-pattern>/*</url-pattern>
	</filter-mapping>
<!-- 5、直接支持put请求的拦截器,即在put请求时将请求体数据封装成map,并让springmvc能够通过request.getParameter(属性名) 来获取数据 -->
	<filter>
		<filter-name>HttpPutFormContentFilter</filter-name>
		<filter-class>org.springframework.web.filter.HttpPutFormContentFilter</filter-class>
	</filter>
	<filter-mapping>
		<filter-name>HttpPutFormContentFilter</filter-name>
		<url-pattern>/*</url-pattern>
	</filter-mapping>
	
</web-app>

二、配置springmvc

与web.xml目录同级下创建,springMVC-servlet.xml ,这是根据web.xml中配置的springMVC 得来的。

<?xml version="1.0" encoding="UTF-8"?>
<beans xmlns="http://www.springframework.org/schema/beans"
	xmlns:xsi="http://www.w3.org/2001/XMLSchema-instance"
	xmlns:context="http://www.springframework.org/schema/context"
	xmlns:mvc="http://www.springframework.org/schema/mvc"
	xsi:schemaLocation="http://www.springframework.org/schema/mvc http://www.springframework.org/schema/mvc/spring-mvc-4.3.xsd
		http://www.springframework.org/schema/beans http://www.springframework.org/schema/beans/spring-beans-3.2.xsd
		http://www.springframework.org/schema/context http://www.springframework.org/schema/context/spring-context-4.3.xsd">

	<!--SpringMVC的配置文件,包含网站跳转逻辑的控制,配置  -->
	<context:component-scan base-package="com.ssm.crud" use-default-filters="false">
		<!--只扫描控制器。  -->
		<context:include-filter type="annotation" expression="org.springframework.stereotype.Controller"/>
	</context:component-scan>
	
	<!--配置视图解析器,方便页面返回  -->
	<bean class="org.springframework.web.servlet.view.InternalResourceViewResolver">
		<property name="prefix" value="/WEB-INF/views/"></property>
		<property name="suffix" value=".jsp"></property>
	</bean>
	
	<!--两个标准配置  -->
	<!-- 将springmvc不能处理的请求交给tomcat -->
	<mvc:default-servlet-handler/>
	<!-- 能支持springmvc更高级的一些功能,JSR303校验,快捷的ajax...映射动态请求 -->
	<mvc:annotation-driven/>

</beans>

三、配置spring容器

因为web.xml已经定义了:spring的容器名是 springIOC,路径是类的根目录。
所以开发的时候,就在src/main/resources  目录下创建 springIOC.xml 配置文件。 

<?xml version="1.0" encoding="UTF-8"?>
<beans xmlns="http://www.springframework.org/schema/beans"
	xmlns:xsi="http://www.w3.org/2001/XMLSchema-instance"
	xmlns:context="http://www.springframework.org/schema/context"
	xmlns:aop="http://www.springframework.org/schema/aop"
	xmlns:tx="http://www.springframework.org/schema/tx"
	xsi:schemaLocation="http://www.springframework.org/schema/aop http://www.springframework.org/schema/aop/spring-aop-4.3.xsd
		http://www.springframework.org/schema/beans http://www.springframework.org/schema/beans/spring-beans-3.2.xsd
		http://www.springframework.org/schema/tx http://www.springframework.org/schema/tx/spring-tx-4.3.xsd
		http://www.springframework.org/schema/context http://www.springframework.org/schema/context/spring-context-4.3.xsd">

	<context:component-scan base-package="com.ssm.crud">
		<context:exclude-filter type="annotation"
			expression="org.springframework.stereotype.Controller" />
	</context:component-scan>

	<!-- Spring的配置文件,这里主要配置和业务逻辑有关的 -->
	<!--=================== 数据源,事务控制,xxx ================-->
	<context:property-placeholder location="classpath:dbconfig.properties" />
	<bean id="pooledDataSource" class="org.springframework.jdbc.datasource.DriverManagerDataSource">
		<property name="url" value="${jdbc.url}" />
		<property name="driverClassName" value="${jdbc.driver}" />
		<property name="username" value="${jdbc.user}" />
		<property name="password" value="${jdbc.password}" />
	</bean>

	<!--================== 配置和MyBatis的整合=============== -->
	<bean id="sqlSessionFactory" class="org.mybatis.spring.SqlSessionFactoryBean">
		<!-- 指定mybatis全局配置文件的位置 -->
		<property name="configLocation" value="classpath:mybatis-config.xml"></property>
		<property name="dataSource" ref="pooledDataSource"></property>
		<!-- 指定mybatis,mapper文件的位置 -->
		<property name="mapperLocations" value="classpath:mapper/*.xml"></property>
	</bean>

	<!-- 配置扫描器,将mybatis接口的实现加入到ioc容器中 -->
	<bean class="org.mybatis.spring.mapper.MapperScannerConfigurer">
		<!--扫描所有dao接口的实现,加入到ioc容器中 -->
		<property name="basePackage" value="com.ssm.crud.mapper"></property>
	</bean>
	
	<!-- 配置一个可以执行批量的sqlSession -->
	<bean id="sqlSession" class="org.mybatis.spring.SqlSessionTemplate">
		<constructor-arg name="sqlSessionFactory" ref="sqlSessionFactory"></constructor-arg>
		<constructor-arg name="executorType" value="BATCH"></constructor-arg>
	</bean>
	<!--=============================================  -->

	<!-- ===============事务控制的配置 ================-->
	<bean id="transactionManager" class="org.springframework.jdbc.datasource.DataSourceTransactionManager">
		<!--控制住数据源  -->
		<property name="dataSource" ref="pooledDataSource"></property>
	</bean>
	<!--开启基于注解的事务,使用xml配置形式的事务(必要主要的都是使用配置式)  -->
	<aop:config>
		<!-- 切入点表达式  固定为:execution()  
		内部参数【 *(代表返回值类型所以)  com.ssm.crud.service..(代表这个包及下面的子包)  *(紧跟前面的这个星号,代表类中的所有方法)  (..)(紧跟前面的这个标记,代表方法里面的参数 任意多)  】-->
		<aop:pointcut expression="execution(* com.ssm.crud.service..*(..))" id="txPoint"/>
		<!-- 配置事务增强  txAdvice:代表事务切入规则  txPoint:代表切入哪些方法 -->
		<aop:advisor advice-ref="txAdvice" pointcut-ref="txPoint"/>
	</aop:config>
	
	<!--配置事务增强,也就是 事务如何切入  -->
	<tx:advice id="txAdvice" transaction-manager="transactionManager">
		<tx:attributes>
			<!-- 所有方法都是事务方法 -->
			<tx:method name="*"/>
			<!--以get开始的所有方法 ,认为都是查询方法,可以调优,写成 read only = true -->
			<tx:method name="get*" read-only="true"/>
		</tx:attributes>
	</tx:advice>
	
	<!-- Spring配置文件的核心点(数据源、与mybatis的整合,事务控制) -->
	
</beans>

四、配置mybatis.xml和数据库属性文件

mybatis-config.xml

<?xml version="1.0" encoding="UTF-8"?>
<!DOCTYPE configuration
  PUBLIC "-//mybatis.org//DTD Config 3.0//EN"
  "http://mybatis.org/dtd/mybatis-3-config.dtd">
<configuration>
	<settings>
		<setting name="mapUnderscoreToCamelCase" value="true"/>
	</settings>
	
	<typeAliases>
		<package name="com.ssm.crud.bean"/>
	</typeAliases>
	

</configuration>

dbconfig.properties

##### 	<!-- http://jingyan.baidu.com/article/b7001fe197a3f60e7282dd8d.html 中文数据库存取乱码问题 ,在 xml文件中 & 要转义成 &amp; 而到了properties中就直接用&就行了 -->
jdbc.url=jdbc:mysql://localhost:3306/ssm_crud?useUnicode=true&characterEncoding=UTF-8
jdbc.driver=com.mysql.jdbc.Driver
jdbc.user=root
jdbc.password=Cool123!

五、搭建数据库

tbl_emp

emp_id     emp_name   gender   email     d_id

tbl_dept

dept_id      dept_name

六、mybatis自动生成代码(MBG)

1、先导入mybatis-generator-core.jar 包。
在pom.xml中,添加依赖【前面已经添加好了】

<!-- MBG -->
<!-- https://mvnrepository.com/artifact/org.mybatis.generator/mybatis-generator-core -->
<dependency>
	<groupId>org.mybatis.generator</groupId>
	<artifactId>mybatis-generator-core</artifactId>
	<version>1.3.5</version>
</dependency>

2、添加 mbg.xml 配置文件

特别提醒:下面的路径写错的话,MBG 就会无法生成,虽然 运行没有报错。

linux系统下:  targetProject=”./src/main/java”
Windows系统下:targetProject=”.\src\main\java”

<?xml version="1.0" encoding="UTF-8"?>
<!DOCTYPE generatorConfiguration
  PUBLIC "-//mybatis.org//DTD MyBatis Generator Configuration 1.0//EN"
  "http://mybatis.org/dtd/mybatis-generator-config_1_0.dtd">
<generatorConfiguration>

	<context id="DB2Tables" targetRuntime="MyBatis3">
		<commentGenerator>
			<property name="suppressAllComments" value="true" />
		</commentGenerator>
		<!-- 配置数据库连接 -->
		<jdbcConnection 
		    driverClass="com.mysql.jdbc.Driver"
			connectionURL="jdbc:mysql://localhost:3306/ssm_crud" 
			userId="root"
			password="Cool123!">
		</jdbcConnection>

		<javaTypeResolver>
			<property name="forceBigDecimals" value="false" />
		</javaTypeResolver>

		<!-- 指定javaBean生成的位置 -->
		<javaModelGenerator 
		    targetPackage="com.ssm.crud.bean"
			targetProject="./src/main/java">
			<property name="enableSubPackages" value="true" />
			<property name="trimStrings" value="true" />
		</javaModelGenerator>

		<!--指定sql映射文件生成的位置 -->
		<sqlMapGenerator 
	    	targetPackage="mapper" 
		    targetProject="./src/main/resources">
			<property name="enableSubPackages" value="true" />
		</sqlMapGenerator>

		<!-- 指定dao接口生成的位置,mapper接口 -->
		<javaClientGenerator 
		    type="XMLMAPPER"
			targetPackage="com.ssm.crud.mapper" 
			targetProject="./src/main/java">
			<property name="enableSubPackages" value="true" />
		</javaClientGenerator>


		<!-- table指定每个表的生成策略 -->
		<table tableName="tbl_emp" domainObjectName="Employee"></table>
		<table tableName="tbl_dept" domainObjectName="Department"></table>
	</context>
</generatorConfiguration>

3、执行生成代码

package com.ssm.crud.test;

import java.io.File;
import java.util.ArrayList;
import java.util.List;

import org.mybatis.generator.api.MyBatisGenerator;
import org.mybatis.generator.config.Configuration;
import org.mybatis.generator.config.xml.ConfigurationParser;
import org.mybatis.generator.internal.DefaultShellCallback;

public class MBGTest {

	public static void main(String[] args) throws Exception {
		List<String> warnings = new ArrayList<String>();
		boolean overwrite = true;
		File configFile = new File("mbg.xml");
		ConfigurationParser cp = new ConfigurationParser(warnings);
		Configuration config = cp.parseConfiguration(configFile);
		DefaultShellCallback callback = new DefaultShellCallback(overwrite);
		MyBatisGenerator myBatisGenerator = new MyBatisGenerator(config,
				callback, warnings);
		myBatisGenerator.generate(null);
		System.out.println("hhh");
	}
}

七、修改mybatis的生成文件实现关联查询

目的是使:查询employee时,能够顺便获取到 department。

1、修改bean

Employee.java

package com.ssm.crud.bean;

public class Employee {
    private Integer empId;

    private String empName;

    private String gender;

    private String email;

    private Integer dId;

    public Integer getEmpId() {
        return empId;
    }

    public void setEmpId(Integer empId) {
        this.empId = empId;
    }

    public String getEmpName() {
        return empName;
    }

    public void setEmpName(String empName) {
        this.empName = empName == null ? null : empName.trim();
    }

    public String getGender() {
        return gender;
    }

    public void setGender(String gender) {
        this.gender = gender == null ? null : gender.trim();
    }

    public String getEmail() {
        return email;
    }

    public void setEmail(String email) {
        this.email = email == null ? null : email.trim();
    }

    public Integer getdId() {
        return dId;
    }

    public void setdId(Integer dId) {
        this.dId = dId;
    }
    
    //添加 Department 属性,用于关联查询
    private Department department;

	public Department getDepartment() {
		return department;
	}

	public void setDepartment(Department department) {
		this.department = department;
	}


	//生成自定义构造器 ,顺便 附带 无参构造器
	public Employee(Integer empId, String empName, String gender, String email, Integer dId) {
		super();
		this.empId = empId;
		this.empName = empName;
		this.gender = gender;
		this.email = email;
		this.dId = dId;
	}

	public Employee() {
		super();
	}
	
	
}

Department.java

package com.ssm.crud.bean;

public class Department {
    private Integer deptId;

    private String deptName;

    public Integer getDeptId() {
        return deptId;
    }

    public void setDeptId(Integer deptId) {
        this.deptId = deptId;
    }

    public String getDeptName() {
        return deptName;
    }

    public void setDeptName(String deptName) {
        this.deptName = deptName == null ? null : deptName.trim();
    }

    
    //创建构造器时,一定要带上 无参构造器,出于mybatis的 赋值原因
	public Department(Integer deptId, String deptName) {
		super();
		this.deptId = deptId;
		this.deptName = deptName;
	}
    
    public Department(){
    	
    }
}

2、修改Dao接口文件

package com.ssm.crud.mapper;

import com.ssm.crud.bean.Employee;
import com.ssm.crud.bean.EmployeeExample;
import java.util.List;
import org.apache.ibatis.annotations.Param;

public interface EmployeeMapper {
    long countByExample(EmployeeExample example);

    int deleteByExample(EmployeeExample example);

    int deleteByPrimaryKey(Integer empId);

    int insert(Employee record);

    int insertSelective(Employee record);

    List<Employee> selectByExample(EmployeeExample example);

    Employee selectByPrimaryKey(Integer empId);

    int updateByExampleSelective(@Param("record") Employee record, @Param("example") EmployeeExample example);

    int updateByExample(@Param("record") Employee record, @Param("example") EmployeeExample example);

    int updateByPrimaryKeySelective(Employee record);

    int updateByPrimaryKey(Employee record);
    
    
    // 为了 提供 关联查询,自己添加的 两个接口 方法
    List<Employee> selectByExampleWithDept(EmployeeExample example);
    Employee selectByPrimaryKeyWithDept(Integer empId);
}

3、修改sql映射文件

<?xml version="1.0" encoding="UTF-8"?>
<!DOCTYPE mapper PUBLIC "-//mybatis.org//DTD Mapper 3.0//EN" "http://mybatis.org/dtd/mybatis-3-mapper.dtd">
<mapper namespace="com.ssm.crud.mapper.EmployeeMapper">
  <resultMap id="BaseResultMap" type="com.ssm.crud.bean.Employee">
    <id column="emp_id" jdbcType="INTEGER" property="empId" />
    <result column="emp_name" jdbcType="VARCHAR" property="empName" />
    <result column="gender" jdbcType="CHAR" property="gender" />
    <result column="email" jdbcType="VARCHAR" property="email" />
    <result column="d_id" jdbcType="INTEGER" property="dId" />
  </resultMap>
  <sql id="Example_Where_Clause">
    <where>
      <foreach collection="oredCriteria" item="criteria" separator="or">
        <if test="criteria.valid">
          <trim prefix="(" prefixOverrides="and" suffix=")">
            <foreach collection="criteria.criteria" item="criterion">
              <choose>
                <when test="criterion.noValue">
                  and ${criterion.condition}
                </when>
                <when test="criterion.singleValue">
                  and ${criterion.condition} #{criterion.value}
                </when>
                <when test="criterion.betweenValue">
                  and ${criterion.condition} #{criterion.value} and #{criterion.secondValue}
                </when>
                <when test="criterion.listValue">
                  and ${criterion.condition}
                  <foreach close=")" collection="criterion.value" item="listItem" open="(" separator=",">
                    #{listItem}
                  </foreach>
                </when>
              </choose>
            </foreach>
          </trim>
        </if>
      </foreach>
    </where>
  </sql>
  <sql id="Update_By_Example_Where_Clause">
    <where>
      <foreach collection="example.oredCriteria" item="criteria" separator="or">
        <if test="criteria.valid">
          <trim prefix="(" prefixOverrides="and" suffix=")">
            <foreach collection="criteria.criteria" item="criterion">
              <choose>
                <when test="criterion.noValue">
                  and ${criterion.condition}
                </when>
                <when test="criterion.singleValue">
                  and ${criterion.condition} #{criterion.value}
                </when>
                <when test="criterion.betweenValue">
                  and ${criterion.condition} #{criterion.value} and #{criterion.secondValue}
                </when>
                <when test="criterion.listValue">
                  and ${criterion.condition}
                  <foreach close=")" collection="criterion.value" item="listItem" open="(" separator=",">
                    #{listItem}
                  </foreach>
                </when>
              </choose>
            </foreach>
          </trim>
        </if>
      </foreach>
    </where>
  </sql>
  <sql id="Base_Column_List">
    emp_id, emp_name, gender, email, d_id
  </sql>
  
  <!-- 自动创建的是 查询员工不带部门信息的 -->
  <select id="selectByExample" parameterType="com.ssm.crud.bean.EmployeeExample" resultMap="BaseResultMap">
    select
    <if test="distinct">
      distinct
    </if>
    <include refid="Base_Column_List" />
    from tbl_emp
    <if test="_parameter != null">
      <include refid="Example_Where_Clause" />
    </if>
    <if test="orderByClause != null">
      order by ${orderByClause}
    </if>
  </select>
  <select id="selectByPrimaryKey" parameterType="java.lang.Integer" resultMap="BaseResultMap">
    select 
    <include refid="Base_Column_List" />
    from tbl_emp
    where emp_id = #{empId,jdbcType=INTEGER}
  </select>
  <delete id="deleteByPrimaryKey" parameterType="java.lang.Integer">
    delete from tbl_emp
    where emp_id = #{empId,jdbcType=INTEGER}
  </delete>
  <delete id="deleteByExample" parameterType="com.ssm.crud.bean.EmployeeExample">
    delete from tbl_emp
    <if test="_parameter != null">
      <include refid="Example_Where_Clause" />
    </if>
  </delete>
  <insert id="insert" parameterType="com.ssm.crud.bean.Employee">
    insert into tbl_emp (emp_id, emp_name, gender, 
      email, d_id)
    values (#{empId,jdbcType=INTEGER}, #{empName,jdbcType=VARCHAR}, #{gender,jdbcType=CHAR}, 
      #{email,jdbcType=VARCHAR}, #{dId,jdbcType=INTEGER})
  </insert>
  <insert id="insertSelective" parameterType="com.ssm.crud.bean.Employee">
    insert into tbl_emp
    <trim prefix="(" suffix=")" suffixOverrides=",">
      <if test="empId != null">
        emp_id,
      </if>
      <if test="empName != null">
        emp_name,
      </if>
      <if test="gender != null">
        gender,
      </if>
      <if test="email != null">
        email,
      </if>
      <if test="dId != null">
        d_id,
      </if>
    </trim>
    <trim prefix="values (" suffix=")" suffixOverrides=",">
      <if test="empId != null">
        #{empId,jdbcType=INTEGER},
      </if>
      <if test="empName != null">
        #{empName,jdbcType=VARCHAR},
      </if>
      <if test="gender != null">
        #{gender,jdbcType=CHAR},
      </if>
      <if test="email != null">
        #{email,jdbcType=VARCHAR},
      </if>
      <if test="dId != null">
        #{dId,jdbcType=INTEGER},
      </if>
    </trim>
  </insert>
  <select id="countByExample" parameterType="com.ssm.crud.bean.EmployeeExample" resultType="java.lang.Long">
    select count(*) from tbl_emp
    <if test="_parameter != null">
      <include refid="Example_Where_Clause" />
    </if>
  </select>
  <update id="updateByExampleSelective" parameterType="map">
    update tbl_emp
    <set>
      <if test="record.empId != null">
        emp_id = #{record.empId,jdbcType=INTEGER},
      </if>
      <if test="record.empName != null">
        emp_name = #{record.empName,jdbcType=VARCHAR},
      </if>
      <if test="record.gender != null">
        gender = #{record.gender,jdbcType=CHAR},
      </if>
      <if test="record.email != null">
        email = #{record.email,jdbcType=VARCHAR},
      </if>
      <if test="record.dId != null">
        d_id = #{record.dId,jdbcType=INTEGER},
      </if>
    </set>
    <if test="_parameter != null">
      <include refid="Update_By_Example_Where_Clause" />
    </if>
  </update>
  <update id="updateByExample" parameterType="map">
    update tbl_emp
    set emp_id = #{record.empId,jdbcType=INTEGER},
      emp_name = #{record.empName,jdbcType=VARCHAR},
      gender = #{record.gender,jdbcType=CHAR},
      email = #{record.email,jdbcType=VARCHAR},
      d_id = #{record.dId,jdbcType=INTEGER}
    <if test="_parameter != null">
      <include refid="Update_By_Example_Where_Clause" />
    </if>
  </update>
  <update id="updateByPrimaryKeySelective" parameterType="com.ssm.crud.bean.Employee">
    update tbl_emp
    <set>
      <if test="empName != null">
        emp_name = #{empName,jdbcType=VARCHAR},
      </if>
      <if test="gender != null">
        gender = #{gender,jdbcType=CHAR},
      </if>
      <if test="email != null">
        email = #{email,jdbcType=VARCHAR},
      </if>
      <if test="dId != null">
        d_id = #{dId,jdbcType=INTEGER},
      </if>
    </set>
    where emp_id = #{empId,jdbcType=INTEGER}
  </update>
  <update id="updateByPrimaryKey" parameterType="com.ssm.crud.bean.Employee">
    update tbl_emp
    set emp_name = #{empName,jdbcType=VARCHAR},
      gender = #{gender,jdbcType=CHAR},
      email = #{email,jdbcType=VARCHAR},
      d_id = #{dId,jdbcType=INTEGER}
    where emp_id = #{empId,jdbcType=INTEGER}
  </update>
  
  
   <!--  ****** 自定义的 带部门信息 的两种查询  ******  -->
   <sql id="WithDept_Column_List">
  	e.emp_id, e.emp_name, e.gender, e.email, e.d_id,d.dept_id,d.dept_name
  </sql>
   <!--   List<Employee> selectByExampleWithDept(EmployeeExample example);
    Employee selectByPrimaryKeyWithDept(Integer empId); 
    -->
 <resultMap type="com.ssm.crud.bean.Employee" id="WithDeptResultMap">
  	<id column="emp_id" jdbcType="INTEGER" property="empId" />
    <result column="emp_name" jdbcType="VARCHAR" property="empName" />
    <result column="gender" jdbcType="CHAR" property="gender" />
    <result column="email" jdbcType="VARCHAR" property="email" />
    <result column="d_id" jdbcType="INTEGER" property="dId" />
    <!-- 指定联合查询出的部门字段的封装 -->
    <association property="department" javaType="com.ssm.crud.bean.Department">
    	<id column="dept_id" property="deptId"/>
    	<result column="dept_name" property="deptName"/>
    </association>
  </resultMap>
   <!-- 查询员工同时带部门信息 -->
  <select id="selectByExampleWithDept" resultMap="WithDeptResultMap">
	   select
	    <if test="distinct">
	      distinct
	    </if>
	    <include refid="WithDept_Column_List" />
		FROM tbl_emp e
		left join tbl_dept d on e.`d_id`=d.`dept_id`
	    <if test="_parameter != null">
	      <include refid="Example_Where_Clause" />
	    </if>
	    <if test="orderByClause != null">
	      order by ${orderByClause}
	    </if>
  </select>
  <select id="selectByPrimaryKeyWithDept" resultMap="WithDeptResultMap">
   	select 
    <include refid="WithDept_Column_List" />
    FROM tbl_emp e
	left join tbl_dept d on e.`d_id`=d.`dept_id`
    where emp_id = #{empId,jdbcType=INTEGER}
  </select>
  
  
</mapper>

八、Junit单元测试

需要在Maven中的pom.xml中,导入 junit.jar 包。

  <!--  一开始这里初始化 Junit 版本为3 ,
        当 eclipse 创建测试用例时,我选4版本的用例,发现又添加了Junit4 依赖包
        为了统一,我就在这里 改成 Juin4 依赖包,这样 eclipse创建 单元测试时就不会 重新添加依赖包了 -->
        <!-- https://mvnrepository.com/artifact/junit/junit -->
        <dependency>
            <groupId>junit</groupId>
            <artifactId>junit</artifactId>
            <version>4.12</version>
            <scope>test</scope>
        </dependency>

方法一:代码加载spring容器

package com.ssm.crud.test;

import java.io.IOException;
import org.junit.Test;
import org.springframework.context.ApplicationContext;
import org.springframework.context.support.ClassPathXmlApplicationContext;
import com.ssm.crud.mapper.DepartmentMapper;
import com.ssm.crud.mapper.EmployeeMapper;


public class CodeTest {
	
	DepartmentMapper departmentMapper;

	@Test
	public void testCRUD() throws IOException{

	    //1、创建SpringIOC容器  ,这个地方 却可以 正确加载 路径 xxx/target/classes/springIOC.xml
		
		//1、创建SpringIOC容器
		ApplicationContext ioc = new ClassPathXmlApplicationContext("springIOC.xml");
		//2、从容器中获取mapper
		EmployeeMapper bean = ioc.getBean(EmployeeMapper.class);
		
		System.out.println(bean.selectByPrimaryKey(1));
       		
	}

}

方法二:自动加载spring容器

需要在Maven的pom.xml中导入 spring-test.jar 包。

<!--Spring-test 单元测试 适配框架,用于在单元测试时,无需初始化就可以使用Spring 容器,及Spring注解 -->
<!-- https://mvnrepository.com/artifact/org.springframework/spring-test -->
<dependency>
	<groupId>org.springframework</groupId>
	<artifactId>spring-test</artifactId>
	<version>4.3.7.RELEASE</version>
</dependency>
package com.ssm.crud.test;

import java.io.IOException;

import org.apache.ibatis.session.SqlSession;
import org.junit.Test;
import org.junit.runner.RunWith;
import org.springframework.beans.factory.annotation.Autowired;
import org.springframework.test.context.ContextConfiguration;
import org.springframework.test.context.junit4.SpringJUnit4ClassRunner;

import com.ssm.crud.mapper.DepartmentMapper;
import com.ssm.crud.mapper.EmployeeMapper;


/**
 * 测试dao层的工作
 * @author lfy
 *推荐Spring的项目就可以使用Spring的单元测试,可以自动注入我们需要的组件
 *1、导入SpringTest模块
 *2、@ContextConfiguration指定Spring配置文件的位置
 *3、直接autowired要使用的组件即可
 */

//@RunWith这个是 junit-4.jar包 提供的注解, 而 SpringJUnit4ClassRunner.class 是spring-test 提供的类
@RunWith(SpringJUnit4ClassRunner.class)

//@ContextConfiguration 这个是 spring-test.jar包 提供的注解 , 用于启动 spring容器,方便直接获取spring容器中的bean
@ContextConfiguration(locations={"classpath:springIOC.xml"})
public class AnnotationTest {
	
	
	@Autowired
	DepartmentMapper departmentMapper;
	
	@Autowired
	EmployeeMapper employeeMapper;
	
	@Autowired
	SqlSession sqlSession;
	

	/**
	 * 测试DepartmentMapper
	 */

	@Test
	public void testCRUD() throws IOException{
	    

          System.out.println(employeeMapper.selectByPrimaryKey(1));


		//1、插入几个部门
		departmentMapper.insertSelective(new Department(null, "开发部"));
		departmentMapper.insertSelective(new Department(null, "测试部"));
		
		//2、生成员工数据,测试员工插入
		employeeMapper.insertSelective(new Employee(null, "Jerry", "M", "[email protected]", 1));
		
		//3、批量插入多个员工;批量,使用可以执行批量操作的sqlSession。
		
//		for(){
//			employeeMapper.insertSelective(new Employee(null, , "M", "[email protected]", 1));
//		}
		EmployeeMapper mapper = sqlSession.getMapper(EmployeeMapper.class);
		for(int i = 0;i<1000;i++){
			String uid = UUID.randomUUID().toString().substring(0,5)+i;
			mapper.insertSelective(new Employee(null,uid, "M", uid+"@atguigu.com", 1));
		}
		System.out.println("批量完成");


	}

}

ps:关于加载log4j,也可以采用如下方法

public class JUnit4ClassRunner extends SpringJUnit4ClassRunner {
    static {
      try {
        // classpath 是 二进制 class文件 的执行根路径
        Log4jConfigurer.initLogging("classpath:log4j.xml");
      } catch (FileNotFoundException ex) {
        System.err.println("Cannot Initialize log4j");
      }
    }
    public JUnit4ClassRunner(Class<?> clazz) throws InitializationError {
      super(clazz);
    }
  }
@RunWith(JUnit4ClassRunner.class)
@ContextConfiguration(locations = "classpath:springIOC.xml")

public class AnnotationTest {
    ...
}

Junit加载spring的runner(SpringJUnit4ClassRunner)要优先于spring加载log4j【log4j的自动默认加载功能】,因此采用普通方法,无法实现spring先加载log4j后被Junit加载。所以我们需要新建JUnit4ClassRunner类,修改SpringJUnit4ClassRunner加载log4j的策略。这样加载log4j就会优先于加载spring了。

数据库单元测试通过以后,就可以开始写web页面了。

SSM小项目-(1)-Eclipse搭建基于Maven的Web工程

最新方法搭建maven工程


特别注意:以下这一大块文字是后期修改勘误的,maven工程新建时应该选择:webapp项目,这样后面就会自动出现,web-xml文件和目录了。

本文章下面的配置使系统自动生成WebContent目录,其实这个操作不需要可以直接删除WebContent目录,然后运行maven clean,maven update project 来重建web 目录 ,修复项目错误因为maven的web工程自带了src/main/webapp/WEB-INF/web.xml,以后所有的web文件都可以直接放到web-app目录中。

此外我这里默认生成的webapp/WEB-INF/web.xml 是2.3版本的。

<!DOCTYPE web-app PUBLIC
 "-//Sun Microsystems, Inc.//DTD Web Application 2.3//EN"
 "http://java.sun.com/dtd/web-app_2_3.dtd" >

<web-app>
  <display-name>Archetype Created Web Application</display-name>
</web-app>

如果要修改的话,可以参看下文中的 可以点击项目,右键Properties  找到 Project Facet , 找到 Dynamic web 可以选择 3.1 版本,点击保存。但是因为bug,好像修改不了web.xml的里面的版本号。怎么办:

第一步:找到项目文件夹:有一个隐藏文件夹  .setting

查看隐藏文件夹下的文件:

org.eclipse.core.resources.prefs
org.eclipse.jdt.core.prefs
org.eclipse.m2e.core.prefs
org.eclipse.wst.common.component
org.eclipse.wst.common.project.facet.core.xml
org.eclipse.wst.jsdt.ui.superType.container
org.eclipse.wst.jsdt.ui.superType.name
org.eclipse.wst.validation.prefs

需要修改的文件是 org.eclipse.wst.common.project.facet.core.xml

<?xml version="1.0" encoding="UTF-8"?>
<faceted-project>
  <fixed facet="wst.jsdt.web"/>
  <installed facet="java" version="1.7"/>
  <installed facet="jst.web" version="2.3"/>
  <installed facet="wst.jsdt.web" version="1.0"/>
</faceted-project>

将它改成:

<?xml version="1.0" encoding="UTF-8"?>
<faceted-project>
  <fixed facet="wst.jsdt.web"/>
  <installed facet="java" version="1.7"/>
  <installed facet="jst.web" version="3.1"/>
  <installed facet="wst.jsdt.web" version="1.0"/>
</faceted-project>

第二步:在web.xml中,用3.1的版本信息,替换掉2.3的版本信息。

<?xml version="1.0" encoding="UTF-8"?>
<web-app xmlns:xsi="http://www.w3.org/2001/XMLSchema-instance" xmlns="http://xmlns.jcp.org/xml/ns/javaee" xsi:schemaLocation="http://xmlns.jcp.org/xml/ns/javaee http://xmlns.jcp.org/xml/ns/javaee/web-app_3_1.xsd" id="WebApp_ID" version="3.1">
  <display-name>Archetype Created Web Application</display-name>
 
</web-app>


参考自:创建maven项目是其中的group id和artifact id怎么填写

         groupid和artifactId被统称为“坐标”是为了保证项目唯一性而提出的,如果你要把你项目弄到maven本地仓库去,你想要找到你的项目就必须根据这两个id去查找。
groupId一般分为多个段,这里我只说两段,第一段为域,第二段为公司名称。域又分为org、com、cn等等许多,其中org为非营利组织,com为商业组织。举个apache公司的tomcat项目例子:这个项目的groupId是org.apache,它的域是org(因为tomcat是非营利项目),公司名称是apache,artigactId是tomcat。
比如我创建一个项目,我一般会将groupId设置为cn.pq,cn表示域为中国,pq是我个人姓名缩写,artifactId设置为testProj,表示你这个项目的名称是testProj,依照这个设置,你的包结构最好是cn.pq.testProj打头的,如果有个StudentPeng,它的全路径就是cn.pq.testProj.StudentPeng

参考自:maven中packing类型  jar、war、pom 的区别

pom是maven依赖文件
jar是java普通项目打包
war是java web项目打包
pom:打出来可以作为其他项目的maven依赖,在工程A中添加工程B的pom,A就可以使用B中的类。用在父级工程或聚合工程中。用来做jar包的版本控制。
jar包:通常是开发时要引用通用类,打成jar包便于存放管理。当你使用某些功能时就需要这些jar包的支持,需要导入jar包。
war包:是做好一个web网站后,打成war包部署到服务器。目的是节省资源,提供效率。

解决新创建的项目:报错问题

一、搭建并配置Maven工程

下面的的1-3小步 搭建maven工程方法已经被淘汰了,请看上面的搭建方法。

1、eclipse里面  右键新建 Maven工程,选择 maven-archetype-quickstart

2、如果项目有错误,可以点击项目,右键maven –> update project

3、如果项目缺失 web.xml可以点击项目,右键Properties  找到 Project Facet 取消勾选 Dynamic web,然后重新勾选。【可能勾选后,窗口底部有个配置网站链接,点进去可以自动生成web.xml】这样就会出现 web.xml了。

4、关于maven的 镜像 和 JDK 配置

在整个eclipse的属性配置中,点击maven,会有User Settings 对话框;用来配置用户范围内的maven 属性。为了统一和方便,这里配置了镜像和 指定了jdk环境。【maven 中的 settings 文件,因为eclipse中没有自带,需要自己先下载maven,然后拷贝到相关目录。然后才能  编辑  相关配置】

因为目前的maven配置规则  都是1.0.0版本,所以配置文件都是通用的。【如下所示:】

 xmlns="http://maven.apache.org/SETTINGS/1.0.0

settings配置如下:

配置镜像:

<mirrors>

    <mirror>
      <id>alimaven</id>
      <name>aliyun maven</name>
      <url>http://maven.aliyun.com/nexus/content/groups/public/</url>
      <mirrorOf>central</mirrorOf>        
    </mirror>

 </mirrors>

指定jdk:

<profiles>

<profile>  
    <id>jdk17</id>  
    <activation>  
        <activeByDefault>true</activeByDefault>  
        <jdk>1.7</jdk>  
    </activation>  
    <properties>  
        <maven.compiler.source>1.7</maven.compiler.source>  
        <maven.compiler.target>1.7</maven.compiler.target>  
        <maven.compiler.compilerVersion>1.7</maven.compiler.compilerVersion>  
    </properties>   
</profile>
    <profile>  
    <id>jdk17</id>  
    <activation>  
        <activeByDefault>true</activeByDefault>  
        <jdk>1.7</jdk>  
    </activation>  
    <properties>  
        <maven.compiler.source>1.7</maven.compiler.source>  
        <maven.compiler.target>1.7</maven.compiler.target>  
        <maven.compiler.compilerVersion>1.7</maven.compiler.compilerVersion>  
    </properties>   
</profile>
    
</profiles>

二、引入SSM依赖包

maven项目内的pom.xml配置文件中,可以配置 <dependency>来配置依赖。

特别注意:下面的这个依赖项可以不添加。

 <!-- https://mvnrepository.com/artifact/javax.servlet/javax.servlet-api -->
 <!-- 因为servlet包 在服务器 上是有的,在开发中没有 提供,所以这里 填scope标签,用来通知发布软件时,不需要把这个包打入到项目中。 -->
 <dependency>
 <groupId>javax.servlet</groupId>
 <artifactId>javax.servlet-api</artifactId>
 <version>3.0.1</version>
 <scope>provided</scope>
 </dependency>

因为只要在web项目中的build path中,add library –>server runtime–>Apache tomcat 添加好后,就有了 servlet 依赖了。

下面是具体的在pom.xml中配置<dependency>依赖项的过程:

<project xmlns="http://maven.apache.org/POM/4.0.0" xmlns:xsi="http://www.w3.org/2001/XMLSchema-instance"
	xsi:schemaLocation="http://maven.apache.org/POM/4.0.0 http://maven.apache.org/xsd/maven-4.0.0.xsd">
	<modelVersion>4.0.0</modelVersion>

	<groupId>com</groupId>
	<artifactId>ssm.crud</artifactId>
	<version>0.0.1-SNAPSHOT</version>
	<packaging>war</packaging>

	<name>ssm.crud</name>
	<url>http://maven.apache.org</url>

	<properties>
		<project.build.sourceEncoding>UTF-8</project.build.sourceEncoding>
	</properties>


	<!--引入项目依赖的jar包 -->
	<!-- SpringMVC、Spring -->
	<!-- https://mvnrepository.com/artifact/org.springframework/spring-webmvc -->
	<dependencies>

       <!-- https://mvnrepository.com/artifact/org.apache.logging.log4j/log4j-core -->
       <dependency>
           <groupId>org.apache.logging.log4j</groupId>
           <artifactId>log4j-core</artifactId>
           <version>2.11.1</version>
        </dependency>


	<!--引入pageHelper分页插件 -->
	<!-- https://mvnrepository.com/artifact/com.github.pagehelper/pagehelper -->
        <dependency>
            <groupId>com.github.pagehelper</groupId>
            <artifactId>pagehelper</artifactId>
            <version>5.1.7</version>
        </dependency>

		<!-- MBG -->
		<!-- https://mvnrepository.com/artifact/org.mybatis.generator/mybatis-generator-core -->
		<dependency>
			<groupId>org.mybatis.generator</groupId>
			<artifactId>mybatis-generator-core</artifactId>
			<version>1.3.5</version>
		</dependency>


		<dependency>
			<groupId>org.springframework</groupId>
			<artifactId>spring-webmvc</artifactId>
			<version>4.3.7.RELEASE</version>
		</dependency>

		<!-- 返回json字符串的支持 -->
		<!-- https://mvnrepository.com/artifact/com.fasterxml.jackson.core/jackson-databind -->
		<dependency>
			<groupId>com.fasterxml.jackson.core</groupId>
			<artifactId>jackson-databind</artifactId>
			<version>2.8.8</version>
		</dependency>

		<!--JSR303数据校验支持;tomcat7及以上的服务器, tomcat7以下的服务器:el表达式。额外给服务器的lib包中替换新的标准的el -->
		<!-- https://mvnrepository.com/artifact/org.hibernate/hibernate-validator -->
		<dependency>
			<groupId>org.hibernate</groupId>
			<artifactId>hibernate-validator</artifactId>
			<version>5.4.1.Final</version>
		</dependency>


		<!--Spring-test 单元测试 适配框架,用于在单元测试时,无需初始化就可以使用Spring 容器,及Spring注解 -->
		<!-- https://mvnrepository.com/artifact/org.springframework/spring-test -->
		<dependency>
			<groupId>org.springframework</groupId>
			<artifactId>spring-test</artifactId>
			<version>4.3.7.RELEASE</version>
		</dependency>


		<!-- Spring面向切面编程 -->
		<!-- https://mvnrepository.com/artifact/org.springframework/spring-aspects -->
		<dependency>
			<groupId>org.springframework</groupId>
			<artifactId>spring-aspects</artifactId>
			<version>4.3.7.RELEASE</version>
		</dependency>

		<!--MyBatis -->
		<!-- https://mvnrepository.com/artifact/org.mybatis/mybatis -->
		<dependency>
			<groupId>org.mybatis</groupId>
			<artifactId>mybatis</artifactId>
			<version>3.4.2</version>
		</dependency>
		<!-- MyBatis整合Spring的适配包 -->
		<!-- https://mvnrepository.com/artifact/org.mybatis/mybatis-spring -->
		<dependency>
			<groupId>org.mybatis</groupId>
			<artifactId>mybatis-spring</artifactId>
			<version>1.3.1</version>
		</dependency>

		<!-- 数据库连接池、驱动 -->
		<!-- Spring-Jdbc -->
		<!-- https://mvnrepository.com/artifact/org.springframework/spring-jdbc -->
		<dependency>
			<groupId>org.springframework</groupId>
			<artifactId>spring-jdbc</artifactId>
			<version>4.3.7.RELEASE</version>
		</dependency>
		
		<!-- https://mvnrepository.com/artifact/mysql/mysql-connector-java -->
		<dependency>
			<groupId>mysql</groupId>
			<artifactId>mysql-connector-java</artifactId>
			<version>5.1.41</version>
		</dependency>
		<!-- (jstl,servlet-api,junit) -->
		<!-- https://mvnrepository.com/artifact/jstl/jstl -->
		<dependency>
			<groupId>jstl</groupId>
			<artifactId>jstl</artifactId>
			<version>1.2</version>
		</dependency>
		
		<!-- https://mvnrepository.com/artifact/javax.servlet/javax.servlet-api -->
		<!-- 因为servlet包 在服务器 上是有的,在开发中没有 提供,所以这里 填scope标签,用来通知发布软件时,不需要把这个包打入到项目中。 -->
		<dependency>
			<groupId>javax.servlet</groupId>
			<artifactId>javax.servlet-api</artifactId>
			<version>3.0.1</version>
			<scope>provided</scope>
		</dependency>


        <!--  一开始这里初始化 Junit 版本为3 ,
        当 eclipse 创建测试用例时,我选4版本的用例,发现又添加了Junit4 依赖包
        为了统一,我就在这里 改成 Juin4 依赖包,这样 eclipse创建 单元测试时就不会 重新添加依赖包了 -->
        <!-- https://mvnrepository.com/artifact/junit/junit -->
        <dependency>
            <groupId>junit</groupId>
            <artifactId>junit</artifactId>
            <version>4.12</version>
            <scope>test</scope>
        </dependency>
     

	</dependencies>
</project>

三、引入前端框架

采用bootstrap框架:需要jQuery 支持。
bootstrap框架:包括【js、css、fonts】三个文件夹。

四、Maven项目概览

注意web文件放在 WebContent中,在eclipse中可以正常运行。但是用maven打包时失败了,所以web文件应该放在:src/main/webapp 目录下,这样平时的运行和打包都能成功。详见本系列最后一篇文章。

五、添加src/main/resources 目录

一般maven项目,我们会看到这个目录:src/main/resources ,这个怎么操作呢。我们举例一下:
1、项目右键 build path / configure build path

2、点击 Add Folder

注意:这里我们可以看到src/main/java的输出目录(output folder)是target/classes  ,  src/test/java 的输出目录是target/test-classes  。我们现在要添加的src/main/resources 输出目录也是 target/classes。如果以后需要src/test/resources 那么记得要将输出目录 修改成 target/test-classes

接下来:点击 Create New Folder

接下来:点击 Finish 就OK啦。

六、新建文件夹 的图标问题


mybatis框架整合-SSM简单入门详解

为了方便复习,总结了SSM框架的搭建过程:
用的是eclipse 和tomcat服务器。创建了一个 Dynamic web project。
有关这些基础相关资料,可以查找网络。

一、项目整合概览


二、项目jar包介绍

jar包下载地址:http://central.maven.org/maven2/org/springframework/

其实,source.jar 是用来查看源代码的,javadoc.jar 是用来查看 文档的。这些可以去掉。

1、Spring IOC jar包:

core , content , bean , 在启动服务器 时需要 common log,在加载 容器时 需要 expression(spring 的标签语言),aop模块(面向切面编程)

2、SpringMVC jar包

只要 spring-webmvc.jar 包就行了。如果整合 struts框架,那么spring-webmvc.jar这个就不用了,spring 整合 Struts时 用 Struts 提供的整合 插件

3、jsp页面用jstl标签语言

当在jsp页面使用 jstl标签语言时,需要导入 jstl.jar 包。
比如 <%@taglib prefix="c" uri="http://java.sun.com/jsp/jstl/core" %>

4、数据库问题

mybatis核心包【mybatis.jar 】
mybatis 与spring整合包【mybatis-spring.jar】

mysql数据库驱动包 【mysql-connector.jar】

数据库 解析注解事务 【spring-tx.jar】

<!-- spring IOC 容器配置文件中, 开启基于注解的事务 -->
<tx:annotation-driven transaction-manager="dataSourceTransactionManager"/>

数据源包:根据不同数据源 配置,导入不同包

下面就是 导入 spring-jdbc.jar

<!-- spring IOC 容器配置文件中, 配置数据源 -->
<bean id="dataSource" class="org.springframework.jdbc.datasource.DriverManagerDataSource">
	<property name="driverClassName" value="com.mysql.jdbc.Driver" />
	<!-- http://jingyan.baidu.com/article/b7001fe197a3f60e7282dd8d.html 中文数据库存取乱码问题 -->
	<property name="url" value="jdbc:mysql://127.0.0.1:3306/mybatis?useUnicode=true&amp;characterEncoding=UTF-8" />
	<property name="username" value="root" />
	<property name="password" value="Cool123!" />
</bean>

当然数据库配置文件,可以写在properties文件中,然后用${}引用。比如下面
当然这里的数据源也修改了:所以要用 c3p0.jar 包。

<!-- 引入数据库的配置文件 -->
<context:property-placeholder location="classpath:dbconfig.properties" />
<!-- Spring IOC 容器配置文件中,用来控制数据源 -->
<bean id="dataSource" class="com.mchange.v2.c3p0.ComboPooledDataSource">
	<property name="jdbcUrl" value="${jdbc.url}"></property>
	<property name="driverClass" value="${jdbc.driver}"></property>
	<property name="user" value="${jdbc.username}"></property>
	<property name="password" value="${jdbc.password}"></property>
</bean>

关于数据源的写法,也可以有另一种写法:

<bean id="dataSource" class="org.springframework.jdbc.datasource.DriverManagerDataSource">
	<property name="driverClassName">
		<value>com.mysql.jdbc.Driver</value>
	</property>
	<property name="url">
		<value>jdbc:mysql://127.0.0.1:3306/mybatis?useUnicode=true&amp;characterEncoding=UTF-8
		</value>
	</property>
	<property name="username">
		<value>root</value>
	</property>
	<property name="password">
		<value>Cool123!</value>
	</property>
</bean>

三、数据库搭建

简单举例:

id	last_name    gender	  email      
1	   mike	       0      [email protected]     
2          book        0      [email protected]   
3          tom         1      [email protected]   
4          jerry       1       [email protected]       

四、SSM项目搭建

1、编辑web.xml

文件中添加了:
1、spring-mvc 配置文件【springmvc-servlet.xml】
2、spring-ioc 配置文件【applicationContext.xml】

<?xml version="1.0" encoding="UTF-8"?>
<web-app xmlns:xsi="http://www.w3.org/2001/XMLSchema-instance" xmlns="http://xmlns.jcp.org/xml/ns/javaee" xsi:schemaLocation="http://xmlns.jcp.org/xml/ns/javaee http://xmlns.jcp.org/xml/ns/javaee/web-app_3_1.xsd" id="WebApp_ID" version="3.1">
  <display-name>Mybatis_06_SSM</display-name>
 
 
   <!--Spring配置: needed for ContextLoaderListener -->
	<context-param>
		<param-name>contextConfigLocation</param-name>
		<param-value>classpath:applicationContext.xml</param-value>
	</context-param>

	<!-- Bootstraps the root web application context before servlet initialization -->
	<listener>
		<listener-class>org.springframework.web.context.ContextLoaderListener</listener-class>
	</listener>
	
	<!-- SpringMVC配置 -->
	<!-- The front controller of this Spring Web application, responsible for handling all application requests -->
	<servlet>
		<servlet-name>springmvc</servlet-name>
		<servlet-class>org.springframework.web.servlet.DispatcherServlet</servlet-class>
		<load-on-startup>1</load-on-startup>
	</servlet>

	<!-- Map all requests to the DispatcherServlet for handling -->
	<servlet-mapping>
		<servlet-name>springmvc</servlet-name>
		<url-pattern>/</url-pattern>
	</servlet-mapping>
 

  <welcome-file-list>
    <welcome-file>index.html</welcome-file>
    <welcome-file>index.htm</welcome-file>
    <welcome-file>index.jsp</welcome-file>
  </welcome-file-list>
  
</web-app>

2、配置springmvc-servlet.xml

<?xml version="1.0" encoding="UTF-8"?>
<beans xmlns="http://www.springframework.org/schema/beans"
	xmlns:xsi="http://www.w3.org/2001/XMLSchema-instance"
	xmlns:context="http://www.springframework.org/schema/context"
	xmlns:mvc="http://www.springframework.org/schema/mvc"
	xsi:schemaLocation="http://www.springframework.org/schema/mvc http://www.springframework.org/schema/mvc/spring-mvc-4.0.xsd
		http://www.springframework.org/schema/beans http://www.springframework.org/schema/beans/spring-beans.xsd
		http://www.springframework.org/schema/context http://www.springframework.org/schema/context/spring-context-4.0.xsd">

	<!--SpringMVC只是控制网站跳转逻辑  -->
	<!-- 只扫描控制器 -->
	<context:component-scan base-package="com.test.springmvc" use-default-filters="false">
		<context:include-filter type="annotation" expression="org.springframework.stereotype.Controller"/>
	</context:component-scan>
	
	<!-- 视图解析器 -->
	<bean class="org.springframework.web.servlet.view.InternalResourceViewResolver">
		<property name="prefix" value="/WEB-INF/pages/"></property>
		<property name="suffix" value=".jsp"></property>
	</bean>
	
	<mvc:annotation-driven></mvc:annotation-driven>
	<mvc:default-servlet-handler/>
</beans>

3、编辑请求页面

<%@ page language="java" contentType="text/html; charset=UTF-8"
    pageEncoding="UTF-8"%>
<!DOCTYPE html PUBLIC "-//W3C//DTD HTML 4.01 Transitional//EN" "http://www.w3.org/TR/html4/loose.dtd">
<html>
<head>
<meta http-equiv="Content-Type" content="text/html; charset=UTF-8">
<title>Insert title here</title>
</head>
<body>
<a href="getemps">查询所有员工</a>
</body>
</html>

4、编辑控制器controller层

package com.test.springmvc.controller;

import java.util.List;
import java.util.Map;

import org.springframework.beans.factory.annotation.Autowired;
import org.springframework.stereotype.Controller;
import org.springframework.web.bind.annotation.RequestMapping;

import com.test.springmvc.bean.Employee;
import com.test.springmvc.service.EmployeeService;

@Controller
public class EmployeeController {
	
	@Autowired
	EmployeeService employeeService;
	
	@RequestMapping("/getemps")
	public String emps(Map<String,Object> map){
		List<Employee> emps = employeeService.getEmps();
		map.put("allEmps", emps);
		return "list";
	}

}

5、编辑bean层和显示结果页

Employee.java

package com.test.springmvc.bean;


public class Employee {
	
	
	private Integer id;
	private String lastName;
	private String email;
	private String gender;
	
	public Employee() {
		super();
	}
	

	public Employee(Integer id, String lastName, String email, String gender) {
		super();
		this.id = id;
		this.lastName = lastName;
		this.email = email;
		this.gender = gender;
	}
	

	public Integer getId() {
		return id;
	}
	public void setId(Integer id) {
		this.id = id;
	}
	public String getLastName() {
		return lastName;
	}
	public void setLastName(String lastName) {
		this.lastName = lastName;
	}
	public String getEmail() {
		return email;
	}
	public void setEmail(String email) {
		this.email = email;
	}
	public String getGender() {
		return gender;
	}
	public void setGender(String gender) {
		this.gender = gender;
	}
	
	@Override
	public String toString() {
		return "Employee [id=" + id + ", lastName=" + lastName + ", email="
				+ email + ", gender=" + gender + "]";
	}
	
}

list.jsp

<%@ page language="java" contentType="text/html; charset=UTF-8"
    pageEncoding="UTF-8"%>
<%@taglib prefix="c" uri="http://java.sun.com/jsp/jstl/core" %>
<!DOCTYPE html PUBLIC "-//W3C//DTD HTML 4.01 Transitional//EN" "http://www.w3.org/TR/html4/loose.dtd">
<html>
<head>
<meta http-equiv="Content-Type" content="text/html; charset=UTF-8">
<title>员工列表</title>
</head>
<body>
	<table>
			<tr>
				<td>id</td>
				<td>lastName</td>
				<td>email</td>
				<td>gender</td>
			</tr>
		<c:forEach items="${allEmps }" var="emp">
			<tr>
				<td>${emp.id }</td>
				<td>${emp.lastName }</td>
				<td>${emp.email }</td>
				<td>${emp.gender }</td>
			</tr>
		</c:forEach>
	
	</table>

</body>
</html>

6、编辑Service层和Dao层

EmployeeService.java

package com.test.springmvc.service;

import java.util.List;

import org.apache.ibatis.session.SqlSession;
import org.springframework.beans.factory.annotation.Autowired;
import org.springframework.stereotype.Service;

import com.test.springmvc.bean.Employee;
import com.test.springmvc.dao.EmployeeMapper;

@Service
public class EmployeeService {
	
	@Autowired
	private EmployeeMapper employeeMapper;
	
	@Autowired
	private SqlSession sqlSession;
	
	public List<Employee> getEmps(){
		
		return employeeMapper.getEmps();
	}

}

EmployeeMapper.java

package com.test.springmvc.dao;


import java.util.List;

import com.test.springmvc.bean.Employee;


public interface EmployeeMapper {
	
	public Employee getEmpById(Integer id);
	
	public List<Employee> getEmps();
	

}

7、编辑applicationContext.xml

<?xml version="1.0" encoding="UTF-8"?>
<beans xmlns="http://www.springframework.org/schema/beans"
	xmlns:xsi="http://www.w3.org/2001/XMLSchema-instance"
	xmlns:context="http://www.springframework.org/schema/context"
	xmlns:mybatis-spring="http://mybatis.org/schema/mybatis-spring"
	xmlns:tx="http://www.springframework.org/schema/tx"
	xsi:schemaLocation="http://www.springframework.org/schema/beans http://www.springframework.org/schema/beans/spring-beans.xsd
		http://mybatis.org/schema/mybatis-spring http://mybatis.org/schema/mybatis-spring-1.2.xsd
		http://www.springframework.org/schema/tx http://www.springframework.org/schema/tx/spring-tx-4.0.xsd
		http://www.springframework.org/schema/context http://www.springframework.org/schema/context/spring-context-4.0.xsd">

	<!-- Spring希望管理所有的业务逻辑组件,等。。。 -->
	<context:component-scan base-package="com.test.springmvc">
		<context:exclude-filter type="annotation"
			expression="org.springframework.stereotype.Controller" />
	</context:component-scan>

<!-- 引入数据库的配置文件 -->
<!-- 	
	<context:property-placeholder location="classpath:dbconfig.properties" />
	Spring用来控制业务逻辑。数据源、事务控制、aop
	<bean id="dataSource" class="com.mchange.v2.c3p0.ComboPooledDataSource">
		<property name="jdbcUrl" value="${jdbc.url}"></property>
		<property name="driverClass" value="${jdbc.driver}"></property>
		<property name="user" value="${jdbc.username}"></property>
		<property name="password" value="${jdbc.password}"></property>
	</bean> -->
	
	
	<bean id="dataSource" class="org.springframework.jdbc.datasource.DriverManagerDataSource">
		<property name="driverClassName" value="com.mysql.jdbc.Driver" />
		<!-- http://jingyan.baidu.com/article/b7001fe197a3f60e7282dd8d.html 中文数据库存取乱码问题 -->
		<property name="url" value="jdbc:mysql://127.0.0.1:3306/mybatis?useUnicode=true&amp;characterEncoding=UTF-8" />
		<property name="username" value="root" />
		<property name="password" value="Kitty521!" />
	</bean>
	
	<!-- <bean id="dataSource" class="org.springframework.jdbc.datasource.DriverManagerDataSource">
		<property name="driverClassName">
			<value>com.mysql.jdbc.Driver</value>
		</property>
		<property name="url">
			<value>jdbc:mysql://127.0.0.1:3306/mybatis?useUnicode=true&amp;characterEncoding=UTF-8
			</value>
		</property>
		<property name="username">
			<value>root</value>
		</property>
		<property name="password">
			<value>Kitty521!</value>
		</property>
	</bean> -->
	
	
	<!-- spring事务管理 -->
	<bean id="dataSourceTransactionManager" class="org.springframework.jdbc.datasource.DataSourceTransactionManager">
		<property name="dataSource" ref="dataSource"></property>
	</bean>

	<!-- 开启基于注解的事务 -->
	<tx:annotation-driven transaction-manager="dataSourceTransactionManager"/>
	
	<!-- 
	整合mybatis 
		目的:1、spring管理所有组件。mapper的实现类。
				service==>Dao   @Autowired:自动注入mapper;
			2、spring用来管理事务,spring声明式事务
	-->
	<!--创建出SqlSessionFactory对象  -->
	<bean id="sqlSessionFactoryBean" class="org.mybatis.spring.SqlSessionFactoryBean">
		<property name="dataSource" ref="dataSource"></property>
		<!-- configLocation指定全局配置文件的位置 -->
		<property name="configLocation" value="classpath:mybatis-config.xml"></property>
		<!--mapperLocations: 指定mapper文件的位置-->
		<property name="mapperLocations" value="classpath:mybatis/mapper/*.xml"></property>
	</bean>
	
	
	<!-- 扫描所有的mapper接口的实现,让这些mapper能够自动注入;
	base-package:指定mapper接口的包名
	 -->
	<mybatis-spring:scan base-package="com.test.springmvc.dao"/>
	<!-- <bean class="org.mybatis.spring.mapper.MapperScannerConfigurer">
		<property name="basePackage" value="com.test.springmvc.dao"></property>
	</bean> -->
	
</beans>

8、数据库配置文件和mybatis全局配置文件

dbconfig.properties

jdbc.driver=com.mysql.jdbc.Driver
jdbc.url=jdbc:mysql://localhost:3306/mybatis?allowMultiQueries=true
jdbc.username=root
jdbc.password=Cool123!

orcl.driver=oracle.jdbc.OracleDriver
orcl.url=jdbc:oracle:thin:@localhost:1521:orcl
orcl.username=scott
orcl.password=123456

mybatis-config.xml

<?xml version="1.0" encoding="UTF-8" ?>
<!DOCTYPE configuration
 PUBLIC "-//mybatis.org//DTD Config 3.0//EN"
 "http://mybatis.org/dtd/mybatis-3-config.dtd">
<configuration>
	
    <!--显式的指定每个我们需要更改的配置的值,即使他是默认的。防止版本更新带来的问题  -->
	<settings>
		
		<!-- 开启数据库字段 自动 驼峰大小写转换,比如数据库 last_name 字段 会自动转换 赋值给bean中 的 lastName 属性-->
		<setting name="mapUnderscoreToCamelCase" value="true"/>
		
		<!-- 主要是因为 插入 null 到 oracle会报错,因为插入类型是JdbcType OTHER ,所以这里设置类型 为 NULL  来解决oracle 插入null报错问题-->
		<setting name="jdbcTypeForNull" value="NULL"/>
		
		<!-- 下面两个设置,是为了开启 mybatis的 延迟加载功能 -->
		<setting name="lazyLoadingEnabled" value="true"/>
		<setting name="aggressiveLazyLoading" value="false"/>
		
	</settings>
	
	<!-- 给数据库类型取别名,方便SQL映射文件,可以根据不同类型数据库,来写相应SQL语句 -->
	<databaseIdProvider type="DB_VENDOR">
		<property name="MySQL" value="mysql"/>
		<property name="Oracle" value="oracle"/>
		<property name="SQL Server" value="sqlserver"/>
	</databaseIdProvider>
	
<!-- 已经在 spring ioc 容器中 配置了 sql 映射文件了,这里就不需要了写了,两个地方只要 有一个地方写了SQL映射文件就行
    <mappers>
	<mapper resource="mybatis/mapper/EmployeeMapper.xml" />
	</mappers> -->
	
</configuration>

9、mybatis之SQL映射文件

EmployeeMapper.xml

<?xml version="1.0" encoding="UTF-8" ?>
<!DOCTYPE mapper
 PUBLIC "-//mybatis.org//DTD Mapper 3.0//EN"
 "http://mybatis.org/dtd/mybatis-3-mapper.dtd">
<mapper namespace="com.test.springmvc.dao.EmployeeMapper">

	<!-- public Employee getEmpById(Integer id); -->
	<select id="getEmpById" resultType="com.test.springmvc.bean.Employee">
		select * from tbl_employee where id=#{id}
	</select>
	
	<!--public List<Employee> getEmps();  -->
	<select id="getEmps" resultType="com.test.springmvc.bean.Employee">
		select * from tbl_employee
	</select>
</mapper>


spring整合基础-spring和springMVC父子容器的原理

要想很好理解这三个上下文的关系,需要先熟悉spring是怎样在web容器中启动起来的。spring的启动过程其实就是其IoC容器的启动过程,对于web程序,IoC容器启动过程即是建立上下文的过程。

spring的启动过程:

  1. 首先,对于一个web应用,其部署在web容器中,web容器提供其一个全局的上下文环境,这个上下文就是ServletContext,其为后面的spring IoC容器提供宿主环境;
  2. 其次,在web.xml中会提供有contextLoaderListener。在web容器启动时,会触发容器初始化事件,此时contextLoaderListener会监听到这个事件,其contextInitialized方法会被调用,在这个方法中,spring会初始化一个启动上下文,这个上下文被称为根上下文,即WebApplicationContext,这是一个接口类,确切的说,其实际的实现类是XmlWebApplicationContext。这个就是spring的IoC容器,其对应的Bean定义的配置由web.xml中的context-param标签指定。在这个IoC容器初始化完毕后,spring以WebApplicationContext.ROOTWEBAPPLICATIONCONTEXTATTRIBUTE为属性Key,将其存储到ServletContext中,便于获取;
  3. 再次,contextLoaderListener监听器初始化完毕后,开始初始化web.xml中配置的Servlet,这个servlet可以配置多个,以最常见的DispatcherServlet为例,这个servlet实际上是一个标准的前端控制器,用以转发、匹配、处理每个servlet请求。DispatcherServlet上下文在初始化的时候会建立自己的IoC上下文,用以持有spring mvc相关的bean。在建立DispatcherServlet自己的IoC上下文时,会利用WebApplicationContext.ROOTWEBAPPLICATIONCONTEXTATTRIBUTE先从ServletContext中获取之前的根上下文(即WebApplicationContext)作为自己上下文的parent上下文。有了这个parent上下文之后,再初始化自己持有的上下文。这个DispatcherServlet初始化自己上下文的工作在其initStrategies方法中可以看到,大概的工作就是初始化处理器映射、视图解析等。这个servlet自己持有的上下文默认实现类也是mlWebApplicationContext。初始化完毕后,spring以与servlet的名字相关(此处不是简单的以servlet名为Key,而是通过一些转换,具体可自行查看源码)的属性为属性Key,也将其存到ServletContext中,以便后续使用。这样每个servlet就持有自己的上下文,即拥有自己独立的bean空间,同时各个servlet共享相同的bean,即根上下文(第2步中初始化的上下文)定义的那些bean。

说完了spring上下文的初始化过程,这三个上下文的关系应该就了解了。如还是不太清楚,我就爱莫能助了,只能自行看代码去了。

===============================================================================================================

最近在做项目时牵扯到有关父子上下文的概念。

何为父子上下文呢?

父上下文:

使用listener监听器来加载配置文件,如下:

<listener>   

  <listener-class>org.springframework.web.context.ContextLoaderListener</listener-class>   

</listener>

Spring 会创建一个WebApplicationContext上下文,称为父上下文(父容器),保存在 ServletContext中,key是WebApplicationContext.ROOT_WEB_APPLICATION_CONTEXT_ATTRIBUTE的值。

可以使用Spring提供的工具类取出上下文对象:WebApplicationContextUtils.getWebApplicationContext(ServletContext);

子上下文:

使用Spring MVC 来处理拦截相关的请求时,会配置DispatchServlet:

<servlet>

    <servlet-name>dispatcherServlet</servlet-name>

    <servlet-class>org.springframework.web.servlet.DispatcherServlet

    </servlet-class>

    <init-param>

        <param-name>contextConfigLocation</param-name>

        <param-value>/WEB-INF/applicationContext-mvc.xml</param-value>

    </init-param>

    <load-on-startup>1</load-on-startup>

</servlet>

 
<servlet-mapping>

    <servlet-name>dispatcherServlet</servlet-name>

    <url-pattern>/</url-pattern>

</servlet-mapping>

每个DispatchServlet会有一个自己的上下文,称为子上下文,它也保存在 ServletContext中,key 是”org.springframework.web.servlet.FrameworkServlet.CONTEXT”+Servlet名称。当一 个Request对象产生时,会把这个子上下文对象(WebApplicationContext)保存在Request对象中,key是 DispatcherServlet.class.getName() + “.CONTEXT”。

可以使用工具类取出上下文对象:RequestContextUtils.getWebApplicationContext(request);

父上下文(父容器)和子上下文(子容器)的访问权限:

子上下文可以访问父上下文中的bean,但是父上下文不可以访问子上下文中的bean。

父上下文使用与否

方案一,传统型:

父上下文容器中保存数据源、服务层、DAO层、事务的Bean。

子上下文容器中保存Mvc相关的Action的Bean.

事务控制在服务层。

由于父上下文容器不能访问子上下文容器中内容,事务的Bean在父上下文容器中,无法访问子上下文容器中内容,就无法对子上下文容器中Action进行AOP(事务)。

当然,做为“传统型”方案,也没有必要这要做。


方案二,激进型:

Java世界的“面向接口编程”的思想是正确的,但在增删改查为主业务的系统里,Dao层接口,Dao层实现类,Service层接口,Service层实现类,Action父类,Action。再加上众多的O(vo\po\bo)和jsp页面。写一个小功能 7、8个类就写出来了。 开发者说我就是想接点私活儿,和PHP,ASP抢抢饭碗,但我又是Java程序员。最好的结果是大项目能做好,小项目能做快。所以“激进型”方案就出现了—–没有接口、没有Service层、还可以没有众多的O(vo\po\bo)。那没有Service层事务控制在哪一层?只好上升的Action层。

本文不想说这是不是正确的思想,我想说的是Spring不会限制你这样做。

由于有了父子上下文,你将无法实现这一目标。解决方案是只使用子上下文容器,不要父上下文容器 。所以数据源、服务层、DAO层、事务的Bean、Action的Bean都放在子上下文容器中。就可以实现了,事务(注解事务)就正常工作了。这样才够激进。

总结:不使用listener监听器来加载spring的配置文件,只使用DispatcherServlet来加载spring的配置,不要父子上下文,只使用一个DispatcherServlet,事情就简单了,什么麻烦事儿也没有了。


Java–大项目能做好–按传统方式做,规规矩矩的做,好扩展,好维护。

Java–小项目能做快–按激进方式做,一周时间就可以出一个版本,先上线接受市场(用户)的反馈,再改进,再反馈,时间就是生命(成本)。


来自:https://blog.csdn.net/caomiao2006/article/details/51290494