一、添加terminal新主题
在这篇博客中,我将把Solarized-Dark主题添加到我们的终端。下载好*.terminal然后直接用终端terminal打开就算主题安装好了。在终端的菜单属性栏可以指定主题。
Note: You can download various Themes (.terminal files) from this git repo. Simply open the
*.terminalfile to install it, i.e.right-click on the *.terminal file > “open with" > Terminal
- Go to http://ethanschoonover.com/solarized
- Scroll down and download the Theme (solarized.zip)
- Extract the solarized.zip file
- Open the osx-terminal.app-colors-solarized folder. This folder contains Theme for the terminal.
- Double click “Solarized Dark ansi.terminal” file — This is the specific Theme file for Terminal.app. Note: If you get a warning that this is from an unidentified developer, Right-click on the file and select “Open with” > Terminal option.
- At this point, you have the Theme installed into your Terminal. We just need to make it a default Theme.
- Open Terminal > Preferences > Text and select the “Solarized Dark …” theme and click on “Default”.

二、安装 Powerline
Powerline是一个Python应用程序,是vim的状态行插件,为几个其他应用程序提供状态行和提示,包括zsh,bash,tmux,IPython,Awesome和Qtile。
1、安装Python【mac系统默认已经安装好了】
通过python -V在终端中输入确保Python的版本是2.7.x.
- 如果它不是2.7,请安装Homebrew,允许我们通过运行以下命令从CLI安装各种软件:
/usr/bin/ruby -e "$(curl -fsSL https://raw.githubusercontent.com/Homebrew/install/master/install)" - 运行
brew install python以通过Homebrew安装最新的Python
2、安装pip – Python的包管理器(类似于npm)
通过运行$ sudo easy_install pip 来安装pip。
出现ssl下载错误的话,可以用下面的方法安装pip:
根据网站https://pip.readthedocs.io/en/stable/installing/ 提示:
curl https://bootstrap.pypa.io/get-pip.py -o get-pip.py
sudo python get-pip.py
3、安装 command line developer tools
从App Store上下载Xcode后,默认是不会安装Command Line Tools的。Command Line Tools是Xcode中的一款工具,可以在命令行中运行C程序,同时又为其他软件提供操作系统服务的功能。
Command Line Tools【又叫 XCode Developer CLI tools】are used by Powerline and other apps that manipulate core OSX features. So make sure to install the XCode CLI tools by running the following command.
现在也来学习一下如何安装Command Line Tools:
方法一:Terminal 运行 xcode-select --install 然后点击安装
方法二:登录https://developer.apple.com/download/more/ 然后下载 dmg 安装
坑爹提醒: 网上复制粘贴这个 xcode-select —-install 到终端出现报错,仔细一看命令行居然是 – 和— 两个不同的破折号。
检验是否安装完成:
cooldeMacBook-Pro:~ cool$ xcode-select --install
xcode-select: error: command line tools are already installed, use "Software Update" to install updates
或者:在xcode 中创建 OSX 的Application 项目时有 command line tool 选项。
4、安装Powerline
$ pip install --user powerline-status
添加powerline 后台进程 到bash,用于监控终端并及时作出响应。
(1)pip show powerline-status知道powerline安装目录。
(2)修改环境变量:
export PATH=$PATH:$HOME/Library/Python/2.7/bin
powerline-daemon -q
POWERLINE_BASH_CONTINUATION=1
POWERLINE_BASH_SELECT=1
. /Users/rupa/Library/Python/2.7/lib/python/site-packages/powerline/bindings/bash/powerline.sh

(3)生效环境变量
source ~/.bash_profile
三、 Powerline 与 本地化问题
打开终端后发现:
 File "/System/Library/Frameworks/Python.framework/Versions/2.7/lib/python2.7/locale.py", line 475, in _parse_localename
    raise ValueError, 'unknown locale: %s' % localename
ValueError: unknown locale: UTF-8
查看问题 ‘unknown locale: %s’ % localename
解决办法是:在 .bash_profile 调用powerline之前就先添加上 本地化变量:
export LC_ALL=en_US.UTF-8
export LANG=en_US.UTF-8
我的 .bash_profile 最终配置如下:
### 下面设置的本地化变量  是为了解决powerline 本地化报错问题,变量一定要在powerline运行前调用
export LC_ALL=en_US.UTF-8
export LANG=en_US.UTF-8

export PATH=$PATH:$HOME/Library/Python/2.7/bin
powerline-daemon -q
POWERLINE_BASH_CONTINUATION=1
POWERLINE_BASH_SELECT=1
. /Users/cool/Library/Python/2.7/lib/python/site-packages/powerline/bindings/bash/powerline.sh
四、 安装 Powerline 字体
To install Powerline fonts, simply go to https://github.com/powerline/fonts. There you’ll see a whole bunch of folders. Each one is a font, aka “Patched fonts”.
It is called “Patched fonts” because people have taken regular fonts and have added/patched additional Powerline specific icons and fonts to them.
1、下载整个repo 仓库并解压。
(1)Click on the “Clone or download” button and download the whole repo so you try various fonts.
(2)Unzip the fonts-master.zip
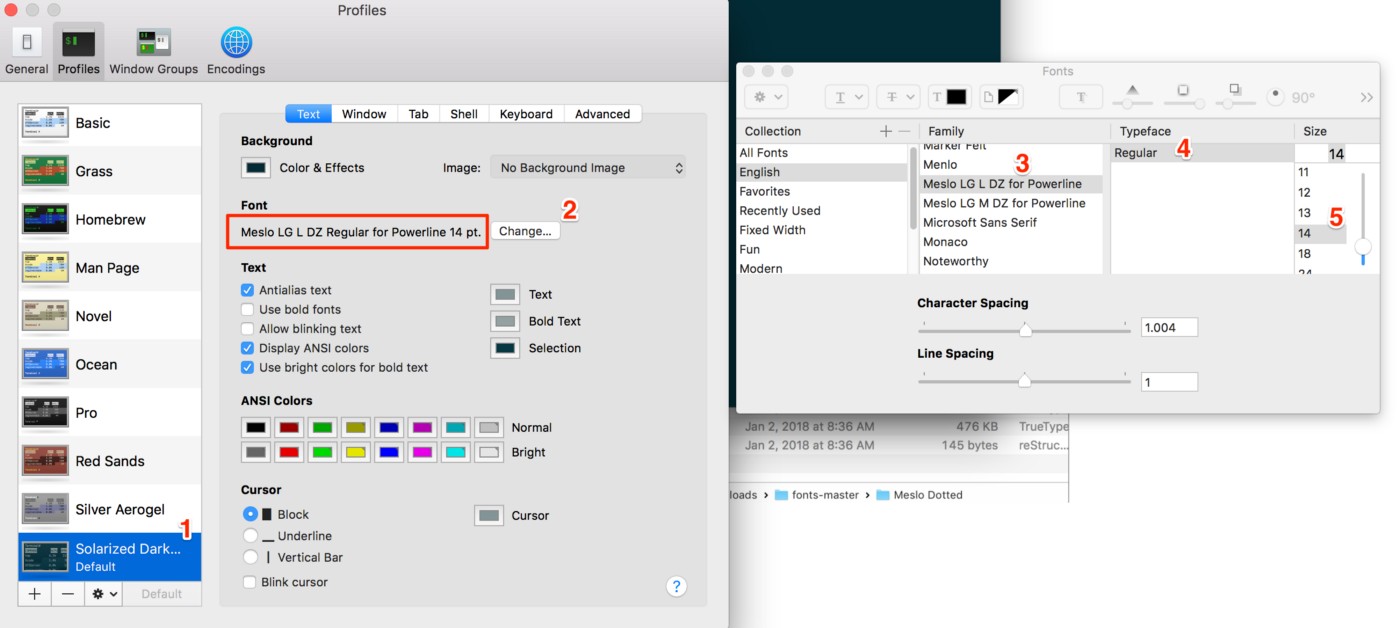
字体安装双击 .ttf 文件就行,然后在终端的属性中进行选择。
Let’s open Meslo dotted fonts folder. It will look like below. You’ll see a whole bunch of .ttf file. Each one of them is a font but some are “bold” version of the font, some are “regular” version and so on.
Simply double-click on the .ttf file and press “Install font” to install the font on your computer.
For our case, let’s install “Meslo LG L DZ Regular for Powerline.ttf” and “Meslo LG L DZ Italic for Powerline.ttf”. This will add a regular and an Italic version of the Meslo font.
五、 安装 powerline的gitstatus插件
1、安装 powerline-gitstatus
pip install --user powerline-gitstatus
Note: “– user” command is required to install it in the user’s profile.
2、配置gitstatus 颜色显示
Add powerline-gitstatus color schemes to Powerline
(1)打开 colorschemes/shell/default.json 文件
${powerline-install-directory}/powerline/config_files/colorschemes/shell/default.json
//For example:
/Users/rupa/Library/Python/2.7/lib/python/site-packages/powerline/config_files/colorschemes/shell/default.json
(2) 添加各gitstatus 状态的颜色配置
{
  "groups": {
    "gitstatus":                 { "fg": "gray8",           "bg": "gray2", "attrs": [] },
    "gitstatus_branch":          { "fg": "gray8",           "bg": "gray2", "attrs": [] },
    "gitstatus_branch_clean":    { "fg": "green",           "bg": "gray2", "attrs": [] },
    "gitstatus_branch_dirty":    { "fg": "gray8",           "bg": "gray2", "attrs": [] },
    "gitstatus_branch_detached": { "fg": "mediumpurple",    "bg": "gray2", "attrs": [] },
    "gitstatus_tag":             { "fg": "darkcyan",        "bg": "gray2", "attrs": [] },
    "gitstatus_behind":          { "fg": "gray10",          "bg": "gray2", "attrs": [] },
    "gitstatus_ahead":           { "fg": "gray10",          "bg": "gray2", "attrs": [] },
    "gitstatus_staged":          { "fg": "green",           "bg": "gray2", "attrs": [] },
    "gitstatus_unmerged":        { "fg": "brightred",       "bg": "gray2", "attrs": [] },
    "gitstatus_changed":         { "fg": "mediumorange",    "bg": "gray2", "attrs": [] },
    "gitstatus_untracked":       { "fg": "brightestorange", "bg": "gray2", "attrs": [] },
    "gitstatus_stashed":         { "fg": "darkblue",        "bg": "gray2", "attrs": [] },
    "gitstatus:divider":         { "fg": "gray8",           "bg": "gray2", "attrs": [] }
  }
}

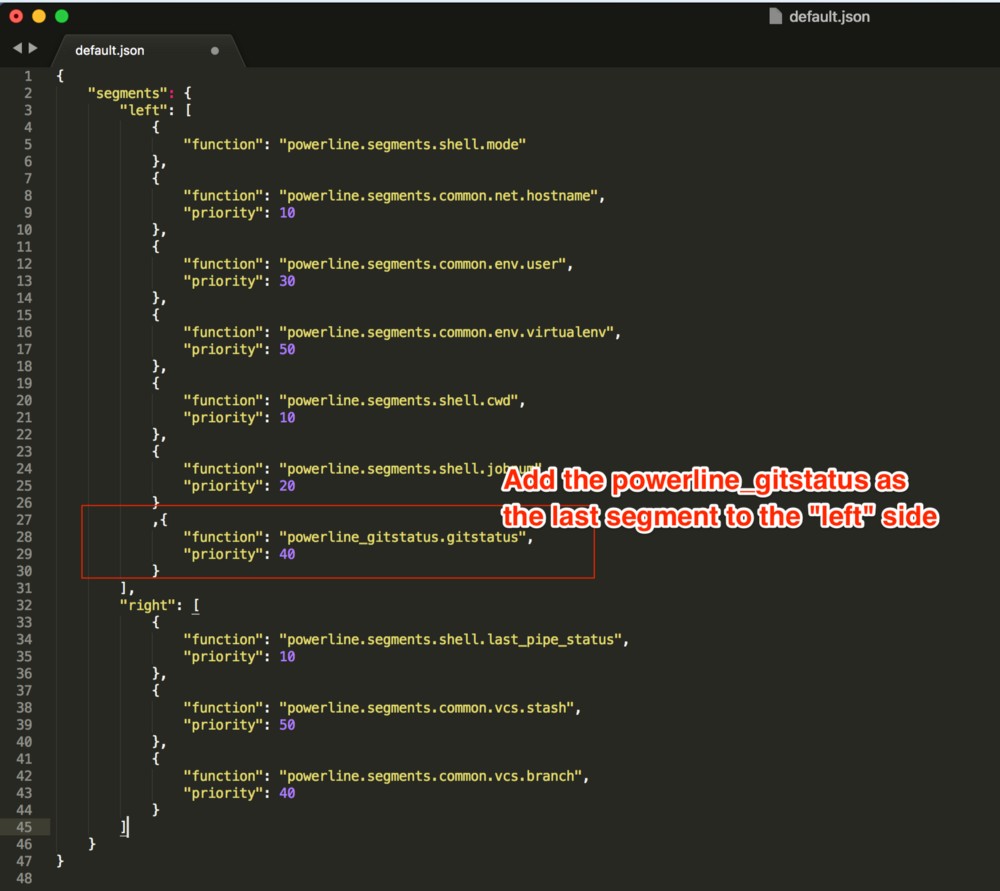
(3)激活gitstatus插件
Open Theme’s default.json file
${powerline-install-directory}/powerline/config_files/themes/shell/default.json
//For example:
/Users/rupa/Library/Python/2.7/lib/python/site-packages/powerline/config_files/themes/shell/default.json
Add the following to the default.json
{
    "function": "powerline_gitstatus.gitstatus",
    "priority": 40
}
(4)重启powerline后台进程
Save the file and run the following: powerline-daemon --replace in the Terminal.
Important Note: Every time you make changes to Powerline’s config, in addition to restarting the Terminal, you’ll also need to restart the daemon to see the changes reflected by running: powerline-daemon —-replace.
(5)重启终端,一切搞定