Blog

mybatis自生成-(1)-配置MBG

一、MyBatis Generator (MBG) 简介

Mybatis Generator是MyBatis和ibatis的代码生成器。主要生成如下:
(1)与表结构匹配的Java POJO(字段名对应属性)【javabean类】
(2)SQL映射XML文件(文件为配置中每个表上的简单CRUD(增删改查)函数生成SQL。)【beanMapper.xml】
(3)符合Spring框架的DAO接口java类【beanMapper.java】


二、配置MBG

1、搭建数据库

tbl_employee表【d_id 是外键 对应 tbl_dept表】

id	last_name    gender	  email       d_id
1	   mike	       0      [email protected]      1
2          book        0      [email protected]    2
3          tom         1      [email protected]    2
4          jerry       1       [email protected]       1

tbl_dept表:

id    dept_name
1      开发部
2      测试部

2、项目需要jar包:

总共需要导入项目的jar包就三个

mybatis.jar
mybatis-generator-core.jar
mysql-connector.jar

3、自动生成代码的配置文件

mbg.xml 【需要放在项目根目录,因为执行代码需要读取匹配配置文件路径】

<?xml version="1.0" encoding="UTF-8"?>
<!DOCTYPE generatorConfiguration
  PUBLIC "-//mybatis.org//DTD MyBatis Generator Configuration 1.0//EN"
  "http://mybatis.org/dtd/mybatis-generator-config_1_0.dtd">
<generatorConfiguration>

	<!-- 
		targetRuntime="MyBatis3Simple":生成简单版的CRUD
		MyBatis3:豪华版	
	 -->
  
  <context id="testTables" targetRuntime="MyBatis3">
		<commentGenerator>
			<!-- 是否去除自动生成的注释 true:是 : false:否 -->
			<property name="suppressAllComments" value="true" />
		</commentGenerator>
		<!--数据库连接的信息:驱动类、连接地址、用户名、密码 -->
  	    <!-- jdbcConnection:指定如何连接到目标数据库 -->
        <jdbcConnection driverClass="com.mysql.jdbc.Driver"
           connectionURL="jdbc:mysql://localhost:3306/mybatis?allowMultiQueries=true"
           userId="root"
           password="Cool123!">
        </jdbcConnection>
	

		<!-- 默认false,把JDBC DECIMAL 和 NUMERIC 类型解析为 Integer,为 true时把JDBC DECIMAL 和
			NUMERIC 类型解析为java.math.BigDecimal -->
		<javaTypeResolver>
			<property name="forceBigDecimals" value="false" />
		</javaTypeResolver>

		<!-- targetProject:生成PO类的位置 -->
		<javaModelGenerator targetPackage="com.mybatis.bean"
			targetProject="./src">
			<!-- enableSubPackages:是否让schema作为包的后缀 -->
			<property name="enableSubPackages" value="false" />
			<!-- 从数据库返回的值被清理前后的空格 -->
			<property name="trimStrings" value="true" />
		</javaModelGenerator>
		
		<!-- targetProject:mapper映射文件生成的位置 -->
		<sqlMapGenerator targetPackage="com.mybatis.mapper"
			targetProject="./conf">
			<!-- enableSubPackages:是否让schema作为包的后缀 -->
			<property name="enableSubPackages" value="false" />
		</sqlMapGenerator>
		
		<!-- targetPackage:mapper接口生成的位置 -->
		<javaClientGenerator type="XMLMAPPER"
			targetPackage="com.mybatis.mapper"
			targetProject="./src">
			<!-- enableSubPackages:是否让schema作为包的后缀 -->
			<property name="enableSubPackages" value="false" />
		</javaClientGenerator>
		
		
		<!-- 指定要逆向分析哪些表:根据表要创建javaBean -->
        <table tableName="tbl_dept" domainObjectName="Department"></table>
        <table tableName="tbl_employee" domainObjectName="Employee"></table>
		
	
	</context>
  
  
</generatorConfiguration>

注意:mbg配置文件中,对各标签有顺序要求。先javaModelGenerator  后 
sqlMapGenerator最后  javaClientGenerator

4、执行代码自动生成文件

新建包 com.mybatis.test,并在下面创建 Junit 测试类  MybatisTest.java

package com.mybatis.test;

import java.io.File;

import java.util.ArrayList;
import java.util.List;

import org.junit.Test;
import org.mybatis.generator.api.MyBatisGenerator;
import org.mybatis.generator.config.Configuration;
import org.mybatis.generator.config.xml.ConfigurationParser;
import org.mybatis.generator.internal.DefaultShellCallback;


public class MybatisTest {

	
	@Test
	public void testMbg() throws Exception {
		List<String> warnings = new ArrayList<String>();
		boolean overwrite = true;
		File configFile = new File("mbg.xml");// mbg.xml为上面创建的配置文件。
		ConfigurationParser cp = new ConfigurationParser(warnings);
		Configuration config = cp.parseConfiguration(configFile);
		DefaultShellCallback callback = new DefaultShellCallback(overwrite);
		MyBatisGenerator myBatisGenerator = new MyBatisGenerator(config, callback, warnings);
		myBatisGenerator.generate(null);

	}

}
生成代码遇到的问题:
1、mbg.xml 必须 放在项目根目录,不能放在 src目录下或者其他目录下。
//因为在自动 生成代码过程中,需要读取 mbg.xml 配置文件,路径需要匹配
File configFile = new File("mbg.xml");// mbg.xml为上面创建的配置文件。
2、报错找不到 : java.time 类,因为这个是java8 的,当前是jdk7代码环境。
java.lang.NoClassDefFoundError: java/time/temporal/TemporalAccessor
at java.lang.Class.forName0(Native Method)
at java.lang.Class.forName(Class.java:278)
at org.mybatis.generator.internal.ObjectFactory.internalClassForName(ObjectFactory.java:142)
at org.mybatis.generator.internal.ObjectFactory.createInternalObject(ObjectFactory.java:178)
3、Mybatis Generator代码不报错,但是没有生成文件

比如:之前是 targetProject=”.\src”  适用于windows,在当前目录的src创建文件。
targetProject=”./src”  适用于 linux ,在当前目录的 src 创建文件。
【Windows 无法识别  ./     同理 linux 也无法识别  .\】

<javaClientGenerator type="XMLMAPPER"
	targetPackage="com.mybatis.mapper"
	targetProject=".\src">
	<!-- enableSubPackages:是否让schema作为包的后缀 -->
	<property name="enableSubPackages" value="false" />
</javaClientGenerator>

MBG 配置目录的时候 targetProject=“./src”  需要知道 是windows环境还是mac环境。主要是 目录设置问题。windows环境:.\    mac环境:./ 

当然目录可以去掉前面./或.\  直接开始写文件夹就行了,这样子 mac和windows都可以运行了。
 

java工具-log4j框架-自动加载原理

log4j,如何“自动加载”?

今天看代码,发现log4j.properties。没有相应的加载代码,但它却生效了,这多神奇!
看进去,org.apache.log4j, LogManager.java,其有一个static方法块:

static {
    // By default we use a DefaultRepositorySelector which always returns 'h'.
    Hierarchy h = new Hierarchy(new RootLogger((Level) Level.DEBUG));
    repositorySelector = new DefaultRepositorySelector(h);

    /** Search for the properties file log4j.properties in the CLASSPATH.  */
    String override =OptionConverter.getSystemProperty(DEFAULT_INIT_OVERRIDE_KEY,
                               null);

    // if there is no default init override, then get the resource
    // specified by the user or the default config file.
    if(override == null || "false".equalsIgnoreCase(override)) {

      String configurationOptionStr = OptionConverter.getSystemProperty(
                              DEFAULT_CONFIGURATION_KEY, 
                              null);

      String configuratorClassName = OptionConverter.getSystemProperty(
                                                   CONFIGURATOR_CLASS_KEY, 
                           null);

      URL url = null;

      // if the user has not specified the log4j.configuration
      // property, we search first for the file "log4j.xml" and then
      // "log4j.properties"
      if(configurationOptionStr == null) {    
    url = Loader.getResource(DEFAULT_XML_CONFIGURATION_FILE);
    if(url == null) {
      url = Loader.getResource(DEFAULT_CONFIGURATION_FILE);
    }
      } else {
    try {
      url = new URL(configurationOptionStr);
    } catch (MalformedURLException ex) {
      // so, resource is not a URL:
      // attempt to get the resource from the class path
      url = Loader.getResource(configurationOptionStr); 
    }    
      }
      
      // If we have a non-null url, then delegate the rest of the
      // configuration to the OptionConverter.selectAndConfigure
      // method.
      if(url != null) {
    LogLog.debug("Using URL ["+url+"] for automatic log4j configuration.");      
    OptionConverter.selectAndConfigure(url, configuratorClassName, 
                       LogManager.getLoggerRepository());
      } else {
    LogLog.debug("Could not find resource: ["+configurationOptionStr+"].");
      }
    }  
  }

换句话说,是什么呢?也就是说:

1. 获取系统属性,看是否用户设置了override。默认是不设置的。
2. 如果确实没有设置,那么尝试找一下,有没有log4j.xml,有则加载。
3. 如果还没有,那么尝试找一下,有没有log4j.properites,有则加载。

其中,2、3里提到的“尝试找一下”,可能是去哪个目录里面找呢?翻译了一下,效果不好,还是上原文清晰 :

Search for resource using the thread context class loader under Java2. If that fails, search for resource using the class loader that loaded this class (Loader). Under JDK 1.1, only the the class loader that loaded this class (Loader) is used.
Try one last time with ClassLoader.getSystemResource(resource), that is is using the system class loader in JDK 1.2 and virtual machine’s built-in class loader in JDK 1.1.

所以,你把log4j.xml或log4j.properties放在这些目录下,那么log4j会“自动去加载”到,不用程序里手工写加载代码了。

但我个人,还是倾向于自己写加载。因为这种“悄悄被人做掉”,一是代码很难理解,二是假如A同学放了一个log4j,B同学又写了一个放在其他目录,这种默认加载机制,不一定哪个生效及生效顺序。这种不确定性,还是自己写两行代码,消灭在摇篮里吧。

来自:http://www.cnblogs.com/alipayhutu/archive/2013/04/18/3028249.html

mybatis框架整合-SSM简单入门详解

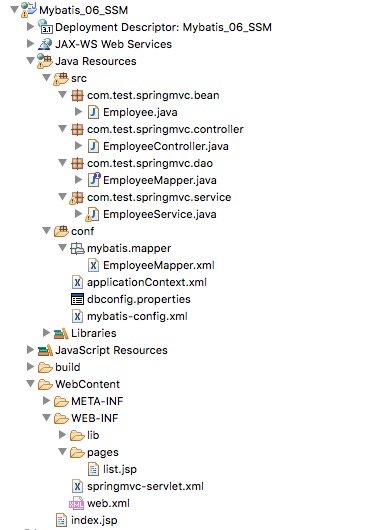
为了方便复习,总结了SSM框架的搭建过程:
用的是eclipse 和tomcat服务器。创建了一个 Dynamic web project。
有关这些基础相关资料,可以查找网络。

一、项目整合概览


二、项目jar包介绍

jar包下载地址:http://central.maven.org/maven2/org/springframework/

其实,source.jar 是用来查看源代码的,javadoc.jar 是用来查看 文档的。这些可以去掉。

1、Spring IOC jar包:

core , content , bean , 在启动服务器 时需要 common log,在加载 容器时 需要 expression(spring 的标签语言),aop模块(面向切面编程)

2、SpringMVC jar包

只要 spring-webmvc.jar 包就行了。如果整合 struts框架,那么spring-webmvc.jar这个就不用了,spring 整合 Struts时 用 Struts 提供的整合 插件

3、jsp页面用jstl标签语言

当在jsp页面使用 jstl标签语言时,需要导入 jstl.jar 包。
比如 <%@taglib prefix="c" uri="http://java.sun.com/jsp/jstl/core" %>

4、数据库问题

mybatis核心包【mybatis.jar 】
mybatis 与spring整合包【mybatis-spring.jar】

mysql数据库驱动包 【mysql-connector.jar】

数据库 解析注解事务 【spring-tx.jar】

<!-- spring IOC 容器配置文件中, 开启基于注解的事务 -->
<tx:annotation-driven transaction-manager="dataSourceTransactionManager"/>

数据源包:根据不同数据源 配置,导入不同包

下面就是 导入 spring-jdbc.jar

<!-- spring IOC 容器配置文件中, 配置数据源 -->
<bean id="dataSource" class="org.springframework.jdbc.datasource.DriverManagerDataSource">
	<property name="driverClassName" value="com.mysql.jdbc.Driver" />
	<!-- http://jingyan.baidu.com/article/b7001fe197a3f60e7282dd8d.html 中文数据库存取乱码问题 -->
	<property name="url" value="jdbc:mysql://127.0.0.1:3306/mybatis?useUnicode=true&amp;characterEncoding=UTF-8" />
	<property name="username" value="root" />
	<property name="password" value="Cool123!" />
</bean>

当然数据库配置文件,可以写在properties文件中,然后用${}引用。比如下面
当然这里的数据源也修改了:所以要用 c3p0.jar 包。

<!-- 引入数据库的配置文件 -->
<context:property-placeholder location="classpath:dbconfig.properties" />
<!-- Spring IOC 容器配置文件中,用来控制数据源 -->
<bean id="dataSource" class="com.mchange.v2.c3p0.ComboPooledDataSource">
	<property name="jdbcUrl" value="${jdbc.url}"></property>
	<property name="driverClass" value="${jdbc.driver}"></property>
	<property name="user" value="${jdbc.username}"></property>
	<property name="password" value="${jdbc.password}"></property>
</bean>

关于数据源的写法,也可以有另一种写法:

<bean id="dataSource" class="org.springframework.jdbc.datasource.DriverManagerDataSource">
	<property name="driverClassName">
		<value>com.mysql.jdbc.Driver</value>
	</property>
	<property name="url">
		<value>jdbc:mysql://127.0.0.1:3306/mybatis?useUnicode=true&amp;characterEncoding=UTF-8
		</value>
	</property>
	<property name="username">
		<value>root</value>
	</property>
	<property name="password">
		<value>Cool123!</value>
	</property>
</bean>

三、数据库搭建

简单举例:

id	last_name    gender	  email      
1	   mike	       0      [email protected]     
2          book        0      [email protected]   
3          tom         1      [email protected]   
4          jerry       1       [email protected]       

四、SSM项目搭建

1、编辑web.xml

文件中添加了:
1、spring-mvc 配置文件【springmvc-servlet.xml】
2、spring-ioc 配置文件【applicationContext.xml】

<?xml version="1.0" encoding="UTF-8"?>
<web-app xmlns:xsi="http://www.w3.org/2001/XMLSchema-instance" xmlns="http://xmlns.jcp.org/xml/ns/javaee" xsi:schemaLocation="http://xmlns.jcp.org/xml/ns/javaee http://xmlns.jcp.org/xml/ns/javaee/web-app_3_1.xsd" id="WebApp_ID" version="3.1">
  <display-name>Mybatis_06_SSM</display-name>
 
 
   <!--Spring配置: needed for ContextLoaderListener -->
	<context-param>
		<param-name>contextConfigLocation</param-name>
		<param-value>classpath:applicationContext.xml</param-value>
	</context-param>

	<!-- Bootstraps the root web application context before servlet initialization -->
	<listener>
		<listener-class>org.springframework.web.context.ContextLoaderListener</listener-class>
	</listener>
	
	<!-- SpringMVC配置 -->
	<!-- The front controller of this Spring Web application, responsible for handling all application requests -->
	<servlet>
		<servlet-name>springmvc</servlet-name>
		<servlet-class>org.springframework.web.servlet.DispatcherServlet</servlet-class>
		<load-on-startup>1</load-on-startup>
	</servlet>

	<!-- Map all requests to the DispatcherServlet for handling -->
	<servlet-mapping>
		<servlet-name>springmvc</servlet-name>
		<url-pattern>/</url-pattern>
	</servlet-mapping>
 

  <welcome-file-list>
    <welcome-file>index.html</welcome-file>
    <welcome-file>index.htm</welcome-file>
    <welcome-file>index.jsp</welcome-file>
  </welcome-file-list>
  
</web-app>

2、配置springmvc-servlet.xml

<?xml version="1.0" encoding="UTF-8"?>
<beans xmlns="http://www.springframework.org/schema/beans"
	xmlns:xsi="http://www.w3.org/2001/XMLSchema-instance"
	xmlns:context="http://www.springframework.org/schema/context"
	xmlns:mvc="http://www.springframework.org/schema/mvc"
	xsi:schemaLocation="http://www.springframework.org/schema/mvc http://www.springframework.org/schema/mvc/spring-mvc-4.0.xsd
		http://www.springframework.org/schema/beans http://www.springframework.org/schema/beans/spring-beans.xsd
		http://www.springframework.org/schema/context http://www.springframework.org/schema/context/spring-context-4.0.xsd">

	<!--SpringMVC只是控制网站跳转逻辑  -->
	<!-- 只扫描控制器 -->
	<context:component-scan base-package="com.test.springmvc" use-default-filters="false">
		<context:include-filter type="annotation" expression="org.springframework.stereotype.Controller"/>
	</context:component-scan>
	
	<!-- 视图解析器 -->
	<bean class="org.springframework.web.servlet.view.InternalResourceViewResolver">
		<property name="prefix" value="/WEB-INF/pages/"></property>
		<property name="suffix" value=".jsp"></property>
	</bean>
	
	<mvc:annotation-driven></mvc:annotation-driven>
	<mvc:default-servlet-handler/>
</beans>

3、编辑请求页面

<%@ page language="java" contentType="text/html; charset=UTF-8"
    pageEncoding="UTF-8"%>
<!DOCTYPE html PUBLIC "-//W3C//DTD HTML 4.01 Transitional//EN" "http://www.w3.org/TR/html4/loose.dtd">
<html>
<head>
<meta http-equiv="Content-Type" content="text/html; charset=UTF-8">
<title>Insert title here</title>
</head>
<body>
<a href="getemps">查询所有员工</a>
</body>
</html>

4、编辑控制器controller层

package com.test.springmvc.controller;

import java.util.List;
import java.util.Map;

import org.springframework.beans.factory.annotation.Autowired;
import org.springframework.stereotype.Controller;
import org.springframework.web.bind.annotation.RequestMapping;

import com.test.springmvc.bean.Employee;
import com.test.springmvc.service.EmployeeService;

@Controller
public class EmployeeController {
	
	@Autowired
	EmployeeService employeeService;
	
	@RequestMapping("/getemps")
	public String emps(Map<String,Object> map){
		List<Employee> emps = employeeService.getEmps();
		map.put("allEmps", emps);
		return "list";
	}

}

5、编辑bean层和显示结果页

Employee.java

package com.test.springmvc.bean;


public class Employee {
	
	
	private Integer id;
	private String lastName;
	private String email;
	private String gender;
	
	public Employee() {
		super();
	}
	

	public Employee(Integer id, String lastName, String email, String gender) {
		super();
		this.id = id;
		this.lastName = lastName;
		this.email = email;
		this.gender = gender;
	}
	

	public Integer getId() {
		return id;
	}
	public void setId(Integer id) {
		this.id = id;
	}
	public String getLastName() {
		return lastName;
	}
	public void setLastName(String lastName) {
		this.lastName = lastName;
	}
	public String getEmail() {
		return email;
	}
	public void setEmail(String email) {
		this.email = email;
	}
	public String getGender() {
		return gender;
	}
	public void setGender(String gender) {
		this.gender = gender;
	}
	
	@Override
	public String toString() {
		return "Employee [id=" + id + ", lastName=" + lastName + ", email="
				+ email + ", gender=" + gender + "]";
	}
	
}

list.jsp

<%@ page language="java" contentType="text/html; charset=UTF-8"
    pageEncoding="UTF-8"%>
<%@taglib prefix="c" uri="http://java.sun.com/jsp/jstl/core" %>
<!DOCTYPE html PUBLIC "-//W3C//DTD HTML 4.01 Transitional//EN" "http://www.w3.org/TR/html4/loose.dtd">
<html>
<head>
<meta http-equiv="Content-Type" content="text/html; charset=UTF-8">
<title>员工列表</title>
</head>
<body>
	<table>
			<tr>
				<td>id</td>
				<td>lastName</td>
				<td>email</td>
				<td>gender</td>
			</tr>
		<c:forEach items="${allEmps }" var="emp">
			<tr>
				<td>${emp.id }</td>
				<td>${emp.lastName }</td>
				<td>${emp.email }</td>
				<td>${emp.gender }</td>
			</tr>
		</c:forEach>
	
	</table>

</body>
</html>

6、编辑Service层和Dao层

EmployeeService.java

package com.test.springmvc.service;

import java.util.List;

import org.apache.ibatis.session.SqlSession;
import org.springframework.beans.factory.annotation.Autowired;
import org.springframework.stereotype.Service;

import com.test.springmvc.bean.Employee;
import com.test.springmvc.dao.EmployeeMapper;

@Service
public class EmployeeService {
	
	@Autowired
	private EmployeeMapper employeeMapper;
	
	@Autowired
	private SqlSession sqlSession;
	
	public List<Employee> getEmps(){
		
		return employeeMapper.getEmps();
	}

}

EmployeeMapper.java

package com.test.springmvc.dao;


import java.util.List;

import com.test.springmvc.bean.Employee;


public interface EmployeeMapper {
	
	public Employee getEmpById(Integer id);
	
	public List<Employee> getEmps();
	

}

7、编辑applicationContext.xml

<?xml version="1.0" encoding="UTF-8"?>
<beans xmlns="http://www.springframework.org/schema/beans"
	xmlns:xsi="http://www.w3.org/2001/XMLSchema-instance"
	xmlns:context="http://www.springframework.org/schema/context"
	xmlns:mybatis-spring="http://mybatis.org/schema/mybatis-spring"
	xmlns:tx="http://www.springframework.org/schema/tx"
	xsi:schemaLocation="http://www.springframework.org/schema/beans http://www.springframework.org/schema/beans/spring-beans.xsd
		http://mybatis.org/schema/mybatis-spring http://mybatis.org/schema/mybatis-spring-1.2.xsd
		http://www.springframework.org/schema/tx http://www.springframework.org/schema/tx/spring-tx-4.0.xsd
		http://www.springframework.org/schema/context http://www.springframework.org/schema/context/spring-context-4.0.xsd">

	<!-- Spring希望管理所有的业务逻辑组件,等。。。 -->
	<context:component-scan base-package="com.test.springmvc">
		<context:exclude-filter type="annotation"
			expression="org.springframework.stereotype.Controller" />
	</context:component-scan>

<!-- 引入数据库的配置文件 -->
<!-- 	
	<context:property-placeholder location="classpath:dbconfig.properties" />
	Spring用来控制业务逻辑。数据源、事务控制、aop
	<bean id="dataSource" class="com.mchange.v2.c3p0.ComboPooledDataSource">
		<property name="jdbcUrl" value="${jdbc.url}"></property>
		<property name="driverClass" value="${jdbc.driver}"></property>
		<property name="user" value="${jdbc.username}"></property>
		<property name="password" value="${jdbc.password}"></property>
	</bean> -->
	
	
	<bean id="dataSource" class="org.springframework.jdbc.datasource.DriverManagerDataSource">
		<property name="driverClassName" value="com.mysql.jdbc.Driver" />
		<!-- http://jingyan.baidu.com/article/b7001fe197a3f60e7282dd8d.html 中文数据库存取乱码问题 -->
		<property name="url" value="jdbc:mysql://127.0.0.1:3306/mybatis?useUnicode=true&amp;characterEncoding=UTF-8" />
		<property name="username" value="root" />
		<property name="password" value="Kitty521!" />
	</bean>
	
	<!-- <bean id="dataSource" class="org.springframework.jdbc.datasource.DriverManagerDataSource">
		<property name="driverClassName">
			<value>com.mysql.jdbc.Driver</value>
		</property>
		<property name="url">
			<value>jdbc:mysql://127.0.0.1:3306/mybatis?useUnicode=true&amp;characterEncoding=UTF-8
			</value>
		</property>
		<property name="username">
			<value>root</value>
		</property>
		<property name="password">
			<value>Kitty521!</value>
		</property>
	</bean> -->
	
	
	<!-- spring事务管理 -->
	<bean id="dataSourceTransactionManager" class="org.springframework.jdbc.datasource.DataSourceTransactionManager">
		<property name="dataSource" ref="dataSource"></property>
	</bean>

	<!-- 开启基于注解的事务 -->
	<tx:annotation-driven transaction-manager="dataSourceTransactionManager"/>
	
	<!-- 
	整合mybatis 
		目的:1、spring管理所有组件。mapper的实现类。
				service==>Dao   @Autowired:自动注入mapper;
			2、spring用来管理事务,spring声明式事务
	-->
	<!--创建出SqlSessionFactory对象  -->
	<bean id="sqlSessionFactoryBean" class="org.mybatis.spring.SqlSessionFactoryBean">
		<property name="dataSource" ref="dataSource"></property>
		<!-- configLocation指定全局配置文件的位置 -->
		<property name="configLocation" value="classpath:mybatis-config.xml"></property>
		<!--mapperLocations: 指定mapper文件的位置-->
		<property name="mapperLocations" value="classpath:mybatis/mapper/*.xml"></property>
	</bean>
	
	
	<!-- 扫描所有的mapper接口的实现,让这些mapper能够自动注入;
	base-package:指定mapper接口的包名
	 -->
	<mybatis-spring:scan base-package="com.test.springmvc.dao"/>
	<!-- <bean class="org.mybatis.spring.mapper.MapperScannerConfigurer">
		<property name="basePackage" value="com.test.springmvc.dao"></property>
	</bean> -->
	
</beans>

8、数据库配置文件和mybatis全局配置文件

dbconfig.properties

jdbc.driver=com.mysql.jdbc.Driver
jdbc.url=jdbc:mysql://localhost:3306/mybatis?allowMultiQueries=true
jdbc.username=root
jdbc.password=Cool123!

orcl.driver=oracle.jdbc.OracleDriver
orcl.url=jdbc:oracle:thin:@localhost:1521:orcl
orcl.username=scott
orcl.password=123456

mybatis-config.xml

<?xml version="1.0" encoding="UTF-8" ?>
<!DOCTYPE configuration
 PUBLIC "-//mybatis.org//DTD Config 3.0//EN"
 "http://mybatis.org/dtd/mybatis-3-config.dtd">
<configuration>
	
    <!--显式的指定每个我们需要更改的配置的值,即使他是默认的。防止版本更新带来的问题  -->
	<settings>
		
		<!-- 开启数据库字段 自动 驼峰大小写转换,比如数据库 last_name 字段 会自动转换 赋值给bean中 的 lastName 属性-->
		<setting name="mapUnderscoreToCamelCase" value="true"/>
		
		<!-- 主要是因为 插入 null 到 oracle会报错,因为插入类型是JdbcType OTHER ,所以这里设置类型 为 NULL  来解决oracle 插入null报错问题-->
		<setting name="jdbcTypeForNull" value="NULL"/>
		
		<!-- 下面两个设置,是为了开启 mybatis的 延迟加载功能 -->
		<setting name="lazyLoadingEnabled" value="true"/>
		<setting name="aggressiveLazyLoading" value="false"/>
		
	</settings>
	
	<!-- 给数据库类型取别名,方便SQL映射文件,可以根据不同类型数据库,来写相应SQL语句 -->
	<databaseIdProvider type="DB_VENDOR">
		<property name="MySQL" value="mysql"/>
		<property name="Oracle" value="oracle"/>
		<property name="SQL Server" value="sqlserver"/>
	</databaseIdProvider>
	
<!-- 已经在 spring ioc 容器中 配置了 sql 映射文件了,这里就不需要了写了,两个地方只要 有一个地方写了SQL映射文件就行
    <mappers>
	<mapper resource="mybatis/mapper/EmployeeMapper.xml" />
	</mappers> -->
	
</configuration>

9、mybatis之SQL映射文件

EmployeeMapper.xml

<?xml version="1.0" encoding="UTF-8" ?>
<!DOCTYPE mapper
 PUBLIC "-//mybatis.org//DTD Mapper 3.0//EN"
 "http://mybatis.org/dtd/mybatis-3-mapper.dtd">
<mapper namespace="com.test.springmvc.dao.EmployeeMapper">

	<!-- public Employee getEmpById(Integer id); -->
	<select id="getEmpById" resultType="com.test.springmvc.bean.Employee">
		select * from tbl_employee where id=#{id}
	</select>
	
	<!--public List<Employee> getEmps();  -->
	<select id="getEmps" resultType="com.test.springmvc.bean.Employee">
		select * from tbl_employee
	</select>
</mapper>


mybatis缓存-(2)-缓存原理与整合第三方缓存管理

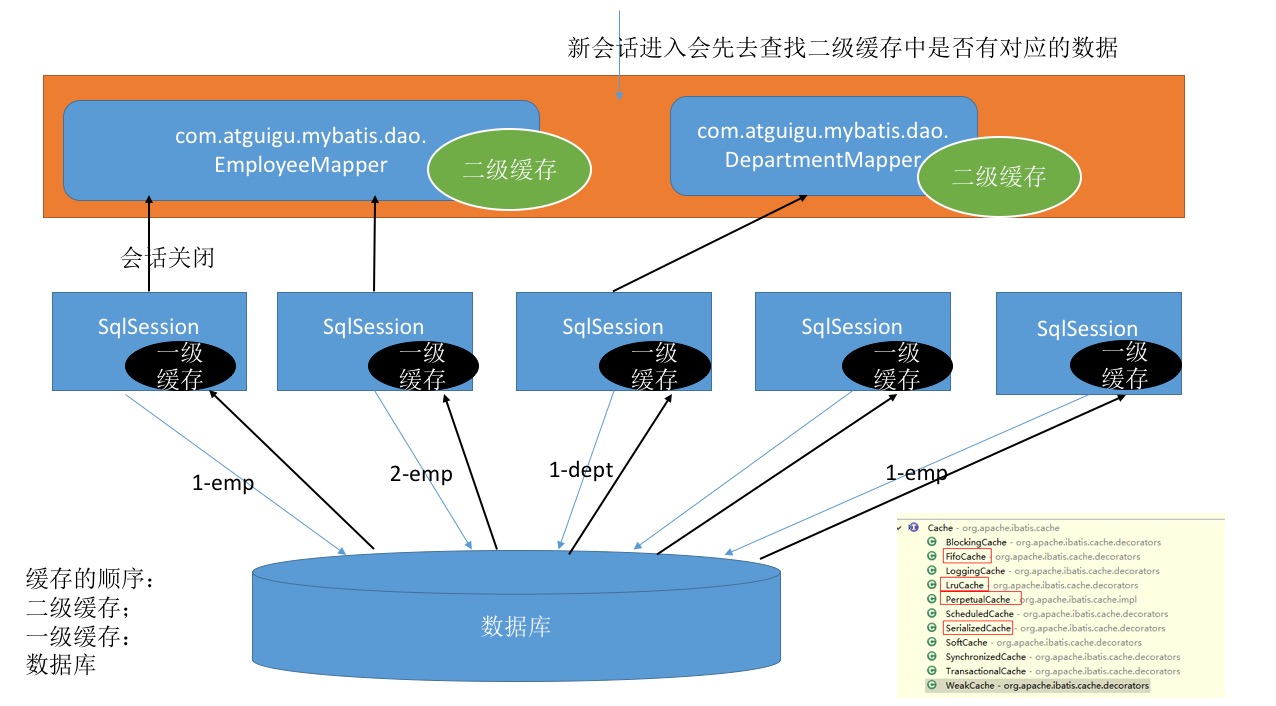
一、缓存原理

二、第三方缓存管理

简单介绍:本质是自定义二级缓存的管理类。

*第三方缓存整合:
1)、导入第三方缓存包即可;
2)、导入与第三方缓存整合的适配包;官方有;
3)、mapper.xml中使用自定义缓存 ,比如 如下
<cache type="org.mybatis.caches.ehcache.EhcacheCache"></cache>

比如:ehcache缓存管理:

1、需要如下jar包,到项目中。

下面三个是:ehcache 缓存管理的核心类
ehcache-core-2.6.8.jar
slf4j-api-1.6.1.jar
slf4j-log4j12-1.6.2.jar

下面是 mybatis 二级缓存 的接口适配类,用于和ehcache 通信。
mybatis-ehcache-1.0.3.jar

2、在map的sql映射文件中,配置 mybatis 二级缓存的 管理类
<cache type="org.mybatis.caches.ehcache.EhcacheCache"></cache>

mybatis缓存-(1)-一级缓存和二级缓存及缓存配置和属性

搭建数据库


对数据库简化,可以看成是这样的数据库:

id	last_name    gender	  email      
1	   mike	       0      [email protected]      
2          book        0      [email protected]   
3          tom         1      [email protected]    
4          jerry       1       [email protected]

一级缓存介绍


之前的学习和设置过程中,都是用的一级缓存了。

 * 一级缓存:(本地缓存):
sqlSession级别的缓存。一级缓存是一直开启的;SqlSession级别的一个Map
与数据库同一次会话期间查询到的数据会放在本地缓存中。
以后如果需要获取相同的数据,直接从缓存中拿,没必要再去查询数据库;

一级缓存失效情况(没有使用到当前一级缓存的情况,效果就是,还需要再向数据库发出查询):
1、sqlSession不同。
2、sqlSession相同,查询条件不同.(当前一级缓存中还没有这个数据)
3、sqlSession相同,两次查询之间执行了增删改操作(这次增删改可能对当前数据有影响)
4、sqlSession相同,手动清除了一级缓存【openSession.clearCache();】(缓存清空)

Junit测试用例:

@Test
public void testFirstLevelCache() throws IOException{
	SqlSessionFactory sqlSessionFactory = getSqlSessionFactory();
	SqlSession openSession = sqlSessionFactory.openSession();
	try{
		EmployeeMapper mapper = openSession.getMapper(EmployeeMapper.class);
		Employee emp01 = mapper.getEmpById(1);
		System.out.println(emp01);
			
		//xxxxx
		//1、sqlSession不同。
		//SqlSession openSession2 = sqlSessionFactory.openSession();
		//EmployeeMapper mapper2 = openSession2.getMapper(EmployeeMapper.class);
			
		//2、sqlSession相同,查询条件不同
			
		//3、sqlSession相同,两次查询之间执行了增删改操作(这次增删改可能对当前数据有影响)
		//mapper.addEmp(new Employee(null, "testCache", "cache", "1"));
		//System.out.println("数据添加成功");
			
		//4、sqlSession相同,手动清除了一级缓存(缓存清空)
		//openSession.clearCache();
			
		Employee emp02 = mapper.getEmpById(1);
		//Employee emp03 = mapper.getEmpById(3);
		System.out.println(emp02);
		//System.out.println(emp03);
		System.out.println(emp01==emp02);
			
		//openSession2.close();
	}finally{
		openSession.close();
	}
}

二级缓存介绍


基本介绍

 * 二级缓存:(全局缓存):基于namespace级别的缓存:一个namespace对应一个二级缓存:
 * 	工作机制:
 * 	1、一个会话,查询一条数据,这个数据就会被放在当前会话的一级缓存中;
 * 	2、如果会话关闭;一级缓存中的数据会被保存到二级缓存中;新的会话查询信息,就可以参照二级缓存中的内容;
 * 	3、sqlSession===EmployeeMapper==>Employee
 * 			  DepartmentMapper===>Department
 * 		不同namespace查出的数据会放在自己对应的缓存中(map)
 * 		效果:数据会从二级缓存中获取
 * 			查出的数据都会被默认先放在一级缓存中。
 * 			只有会话提交或者关闭以后,一级缓存中的数据才会转移到二级缓存中
 * 	使用:
 * 	1)、开启全局二级缓存配置:<setting name="cacheEnabled" value="true"/>
 * 	2)、去mapper.xml中配置使用二级缓存:
 * 				<cache></cache>
 * 	3)、我们的POJO需要实现序列化接口

1、全局配置文件开启二级缓存

<settings>
	<!--显式的指定每个我们需要更改的配置的值,即使他是默认的。防止版本更新带来的问题 -->
	<!-- 开启二级缓存 -->
	<setting name="cacheEnabled" value="true" />
</settings>

2、对javabean进行序列化

package com.mybatis.bean;

import java.io.Serializable;

public class Employee implements Serializable {
	/**
	 * 
	 */
	private static final long serialVersionUID = 1L;
	
	private int id;
	private String lastName;
	private String email;
	private String gender;

	public int getId() {
		return id;
	}

	public void setId(int id) {
		this.id = id;
	}

	public String getLastName() {
		return lastName;
	}

	public void setLastName(String lastName) {
		this.lastName = lastName;
	}

	public String getEmail() {
		return email;
	}

	public void setEmail(String email) {
		this.email = email;
	}

	public String getGender() {
		return gender;
	}

	public void setGender(String gender) {
		this.gender = gender;
	}

	@Override
	public String toString() {
		return "Employee [id=" + id + ", lastName=" + lastName + ", email=" + email + ", gender=" + gender + "]";
	}

}

3、配置SQL映射

<?xml version="1.0" encoding="UTF-8" ?>
<!DOCTYPE mapper
 PUBLIC "-//mybatis.org//DTD Mapper 3.0//EN"
 "http://mybatis.org/dtd/mybatis-3-mapper.dtd">
<mapper namespace="com.mybatis.mapper.EmployeeMapper">

 <cache eviction="FIFO" flushInterval="60000" readOnly="false" size="1024"></cache>
	<!--  
	eviction:缓存的回收策略:
		• LRU – 最近最少使用的:移除最长时间不被使用的对象。
		• FIFO – 先进先出:按对象进入缓存的顺序来移除它们。
		• SOFT – 软引用:移除基于垃圾回收器状态和软引用规则的对象。
		• WEAK – 弱引用:更积极地移除基于垃圾收集器状态和弱引用规则的对象。
		• 默认的是 LRU。
	flushInterval:缓存刷新间隔
		缓存多长时间清空一次,默认不清空,设置一个毫秒值
	readOnly:是否只读:
		true:只读;mybatis认为所有从缓存中获取数据的操作都是只读操作,不会修改数据。
				 mybatis为了加快获取速度,直接就会将数据在缓存中的引用交给用户。不安全,速度快
		false:非只读:mybatis觉得获取的数据可能会被修改。
				mybatis会利用序列化&反序列的技术克隆一份新的数据给你。安全,速度慢
	size:缓存存放多少元素;
	type="":指定自定义缓存的全类名;
			实现Cache接口即可;
	--> 
 
	<select id="getEmpById" resultType="com.mybatis.bean.Employee">
		select id,last_name lastName,email,gender from tbl_employee where id = #{id}
	</select>
	
	
</mapper>

4、Junit测试用例:

@Test
public void testSecondLevelCache() throws IOException{
	SqlSessionFactory sqlSessionFactory = getSqlSessionFactory();
	SqlSession openSession = sqlSessionFactory.openSession();
	SqlSession openSession2 = sqlSessionFactory.openSession();
	try{
		//1、
		EmployeeMapper mapper = openSession.getMapper(EmployeeMapper.class);
		EmployeeMapper mapper2 = openSession2.getMapper(EmployeeMapper.class);
			
		Employee emp01 = mapper.getEmpById(1);
		System.out.println("对象一"+emp01);
			
		openSession.clearCache();//清除了一级缓存,但不会清除二级缓存
			
		openSession.close();
		System.out.println("对象一 关闭");
                
                //即使执行下面这句 居然 也不会 报错 
		//openSession.clearCache();//清除了一级缓存,但不会清除二级缓存
			
                //第二次查询是从二级缓存中拿到的数据,并没有发送新的sql 
                Employee emp02 = mapper2.getEmpById(1);
		System.out.println("对象二"+emp02);
		openSession2.close();
		System.out.println("对象二 关闭");

			
	}finally{
			
	}
}

三、缓存配置和属性


 * 和缓存有关的设置/属性:
 * 1)、cacheEnabled=true:false:关闭缓存(二级缓存关闭)(一级缓存一直可用的)
 * 2)、每个select标签都有useCache="true":
 *         false:不使用缓存(一级缓存依然使用,二级缓存不使用)
 * 3)、【每个增删改标签的:flushCache="true":(一级二级都会清除)】
 * 	  增删改执行完成后就会清楚缓存;
 * 	  测试:flushCache="true":一级缓存就清空了;二级也会被清除;
 * 	  查询标签:flushCache="false":
 * 	  如果flushCache=true;每次查询之后都会清空缓存;缓存是没有被使用的;
 * 4)、sqlSession.clearCache();只是清楚当前session的一级缓存;
 * 5)、localCacheScope:本地缓存作用域:【这个是全局配置文件中的setting】
 *                 1、SESSION(一级缓存);当前会话的所有数据保存在会话缓存中;
 * 		   2、STATEMENT:可以禁用一级缓存;


mybatis动态sql-(7)-内置参数和绑定

1、编辑接口文件方法

//内置参数
public List<Employee> getEmpsTestInnerParameter(Employee employee);

2、编辑全局配置文件,设置databaseId

<?xml version="1.0" encoding="UTF-8" ?>
<!DOCTYPE configuration
 PUBLIC "-//mybatis.org//DTD Config 3.0//EN"
 "http://mybatis.org/dtd/mybatis-3-config.dtd">
<configuration>

	<settings>
		<setting name="mapUnderscoreToCamelCase" value="true" />
	</settings>

	<environments default="development">
		<environment id="development">
			<transactionManager type="JDBC" />
			<dataSource type="POOLED">
				<property name="driver" value="com.mysql.jdbc.Driver" />
				<property name="url" value="jdbc:mysql://localhost:3306/mybatis" />
				<property name="username" value="root" />
				<property name="password" value="Cool123!" />
			</dataSource>
		</environment>
	</environments>

	<databaseIdProvider type="DB_VENDOR">
		<!-- 为不同的数据库厂商起别名 -->
		<property name="MySQL" value="mysql" />
		<property name="Oracle" value="oracle" />
		<property name="SQL Server" value="sqlserver" />
	</databaseIdProvider>


	<!-- 将我们写好的sql映射文件(EmployeeMapper.xml)一定要注册到全局配置文件(mybatis-config.xml)中 
		如果 数据库全局文件 和 子配置文件 不在同一个目录 ,就需要 /目录/目录/.../EmployeeMapper_old.xml -->
	<mappers>

		<!-- 新方法操作mybatis 需要 的配置文件 -->
		<mapper resource="EmployeeMapperDynamicSQL.xml" />
	</mappers>
</configuration>

3、编辑SQL映射文件

<!-- 两个内置参数:
	 不只是方法传递过来的参数可以被用来判断,取值。。。
	 mybatis默认还有两个内置参数:
	 _parameter:代表整个参数
	 	单个参数:_parameter就是这个参数
	 	多个参数:参数会被封装为一个map;_parameter就是代表这个map
	 	
	 _databaseId:如果配置了databaseIdProvider标签。
	 	_databaseId就是代表当前数据库的别名oracle
-->
	  
<!--public List<Employee> getEmpsTestInnerParameter(Employee employee);  -->
 <select id="getEmpsTestInnerParameter" resultType="com.mybatis.bean.Employee">
	  	<!-- bind:可以将OGNL表达式的值绑定到一个变量中,方便后来引用这个变量的值 -->
	  	<bind name="_lastName" value="'%'+lastName+'%'"/>
	  	<if test="_databaseId=='mysql'">
	  		select * from tbl_employee
	  		<if test="_parameter!=null">
	  			where last_name like #{_lastName}
	  		</if>
	  	</if>
	  	<if test="_databaseId=='oracle'">
	  		select * from employees
	  		<if test="_parameter!=null">
	  			where last_name like #{_parameter.lastName}
	  		</if>
	  	</if>
 </select>

一般情况下:绑定不怎么用如  where last_name like #{_lastName}  _lastName是绑定,但是写在代码中,可以更方便的修改 模糊查询。

<bind name="_lastName" value="'%'+lastName+'%'"/>
	  <if test="_databaseId=='mysql'">
	  	select * from tbl_employee
	  	<if test="_parameter!=null">
	  		where last_name like #{_lastName}
	  	</if>
	  </if>

4、编辑Junit测试文件

@Test
public void testInnerParam() throws IOException{
	SqlSessionFactory sqlSessionFactory = getSqlSessionFactory();
	SqlSession openSession = sqlSessionFactory.openSession();
	try{
		EmployeeMapperDynamicSQL mapper = openSession.getMapper(EmployeeMapperDynamicSQL.class);
		Employee employee2 = new Employee();
		employee2.setLastName("e");
		List<Employee> list = mapper.getEmpsTestInnerParameter(employee2);
		for (Employee employee : list) {
			System.out.println(employee);
		}
	}finally{
		openSession.close();
	}
}


mybatis动态sql-(6)-批量插入foreach与sql片段抽取

mysql批量插入与oracle批量插入不同

一、搭建数据库

tbl_employee表【d_id 是外键 对应 tbl_dept表】

id	last_name    gender	  email       d_id
1	   mike	       0      [email protected]      1
2          book        0      [email protected]    2
3          tom         1      [email protected]    2
4          jerry       1       [email protected]       1

tbl_dept表:

id    dept_name
1      开发部
2      测试部

二、编辑javabean

package com.mybatis.bean;

public class Employee {
	private Integer id;
	private String lastName;
	private String email;
	private String gender;
	private Department department;

	
	public Department getDepartment() {
		return department;
	}

	public void setDepartment(Department department) {
		this.department = department;
	}

	public int getId() {
		return id;
	}

	public void setId(int id) {
		this.id = id;
	}

	public String getLastName() {
		return lastName;
	}

	public void setLastName(String lastName) {
		this.lastName = lastName;
	}

	public String getEmail() {
		return email;
	}

	public void setEmail(String email) {
		this.email = email;
	}

	public String getGender() {
		return gender;
	}

	public void setGender(String gender) {
		this.gender = gender;
	}

	@Override
	public String toString() {
		return "Employee [id=" + id + ", lastName=" + lastName + ", email=" + email + ", gender=" + gender + "]";
	}
	
   /*****  关键是 这个地方啊 出了 问题 ****/
	public Employee() {
		super();
	}
	/*****/
	public Employee(Integer id,String lastName, String  email, String gender){
		this.id =id;
		this.lastName =lastName;
		this.email =email;
		this.gender =gender;
		
	}
	
	public Employee(Integer id,String lastName, String  email, String gender,Department dep){
		this.id =id;
		this.lastName =lastName;
		this.email =email;
		this.gender =gender;
		this.department =dep;
	}
	
//  历史教训 ,一开始 没有添加 无参构造函数,而添加了下面这个函数	
//	public Employee(Integer id,String lastName, String  email, String gender,int temp){
//		this.id =id;
//		this.lastName =lastName;
//		this.email =email;
//		this.gender =gender;
//		
//		System.out.println(" id:"+id+" lastName:"+lastName+" email:"+email+" gender:"+gender+" temp:"+temp);
//	}

}
package com.mybatis.bean;

import java.util.List;

public class Department {

	private Integer id;
	private String departmentName;
	private List<Employee> employees;

	public Department() {
		
	}
	
    public Department(int id){
    	this.id = id;
		
	}

	public List<Employee> getEmployees() {
		return employees;
	}

	public void setEmployees(List<Employee> employees) {
		this.employees = employees;
	}

	public Integer getId() {
		return id;
	}

	public void setId(Integer id) {
		this.id = id;
	}

	public String getDepartmentName() {
		return departmentName;
	}

	public void setDepartmentName(String departmentName) {
		this.departmentName = departmentName;
	}

	@Override
	public String toString() {
		return "Department [id=" + id + ", departmentName=" + departmentName + "]";
	}

}


三、编辑junit测试

@Test
public void testBatchSave() throws IOException{
	SqlSessionFactory sqlSessionFactory = getSqlSessionFactory();
	SqlSession openSession = sqlSessionFactory.openSession();
	try{
		EmployeeMapperDynamicSQL mapper = openSession.getMapper(EmployeeMapperDynamicSQL.class);
		List<Employee> emps = new ArrayList<>();
		emps.add(new Employee(null, "smith0x1", "[email protected]", "1" , new Department(1) ));
		emps.add(new Employee(null, "allen0x1", "[email protected]", "0" , new Department(1) ));
		mapper.addEmps(emps);
		openSession.commit();
	}finally{
		openSession.close();
	}
}

四、编辑SQl映射文件

1、mysql 版

 <!--MySQL下批量保存:可以foreach遍历   mysql支持values(),(),()语法-->
<!-- 批量保存 -->
 <!--public void addEmps(@Param("emps")List<Employee> emps);  -->
 <!--MySQL下批量保存:可以foreach遍历   mysql支持values(),(),()语法-->
<insert id="addEmps">
	 insert into tbl_employee(last_name,email,gender,d_id) 
	values
	<foreach collection="emps" item="emp" separator=",">
		(#{emp.lastName},#{emp.email},#{emp.gender},#{emp.department.id})
	</foreach>
 </insert><!--   -->
	 
 <!-- 这种方式需要数据库连接属性allowMultiQueries=true;
	 这种分号分隔多个sql可以用于其他的批量操作(删除,修改) -->
 <!-- <insert id="addEmps">
	 <foreach collection="emps" item="emp" separator=";">
	 	insert into tbl_employee(last_name,email,gender,d_id)
	 	values(#{emp.lastName},#{emp.email},#{emp.gender},#{emp.department.id})
	 </foreach>
 </insert> -->

mysql补充:在mysql配置时,我们可能需要配置 allowMultiQueries=true
jdbc.url=jdbc:mysql://localhost:3306/mybatis?allowMultiQueries=true

若一个sql中通过分号分割(或包含)了多个独立sql的话,如:
select 'hello';select 'world'
就会报如下错:
com.mysql.jdbc.exceptions.jdbc4.MySQLSyntaxErrorException: You have an error in your SQL syntax; check the manual that corresponds to your MySQL server version for the right syntax to use near 'select 'world'' at line 1
	at sun.reflect.NativeConstructorAccessorImpl.newInstance0(Native Method)
	at sun.reflect.NativeConstructorAccessorImpl.newInstance(NativeConstructorAccessorImpl.java:57)

当若显式设置allowMultiQueries为true的话,就可以正常执行不会报错.如下所示:
String url = "jdbc:mysql://localhost:3306?allowMultiQueries=true";

官方文档解释:
allowMultiQueries
Allow the use of ';' to delimit multiple queries during one statement (true/false), defaults to 'false', and does not affect the addBatch() and executeBatch() methods, which instead rely on rewriteBatchStatements.
Default: false
Since version: 3.1.1

2、oracle版

 <!-- Oracle数据库批量保存: 
	 Oracle不支持values(),(),()
	 Oracle支持的批量方式
	 1、多个insert放在begin - end里面
	 	begin
		     insert into employees(employee_id,last_name,email) 
		     values(employees_seq.nextval,'test_001','[email protected]');
		     insert into employees(employee_id,last_name,email) 
		     values(employees_seq.nextval,'test_002','[email protected]');
		end;
	2、利用中间表:
		insert into employees(employee_id,last_name,email)
		   select employees_seq.nextval,lastName,email from(
		          select 'test_a_01' lastName,'test_a_e01' email from dual
		          union
		          select 'test_a_02' lastName,'test_a_e02' email from dual
		          union
		          select 'test_a_03' lastName,'test_a_e03' email from dual
		   )	
	 -->

实际写法:

<insert id="addEmps" databaseId="oracle">
	 <!-- oracle第一种批量方式 -->
	 <!-- <foreach collection="emps" item="emp" open="begin" close="end;">
	 	insert into employees(employee_id,last_name,email) 
		      values(employees_seq.nextval,#{emp.lastName},#{emp.email});
	 </foreach> -->
	 	
	 <!-- oracle第二种批量方式  -->
	 insert into employees(
	 	<!-- 引用外部定义的sql -->
	 	<include refid="insertColumn">
	 		<property name="testColomn" value="abc"/>
	 	</include>
	 )
	 		<foreach collection="emps" item="emp" separator="union"
	 			open="select employees_seq.nextval,lastName,email from("
	 			close=")">
	 			select #{emp.lastName} lastName,#{emp.email} email from dual
	 		</foreach>
 </insert>

特别提醒一下:下面的引用其实就是 待插入的 各个字段啦。

<!-- 引用外部定义的sql -->
	 <include refid="insertColumn">
	 	<property name="testColomn" value="abc"/>
	 </include>

用法说明:不是只能用在批量插入中,也可以用在其他数据操作中,因为只是对SQL片段的抽取。

 <!-- 
	  抽取可重用的sql片段。方便后面引用 
	  1、sql抽取:经常将要查询的列名,或者插入用的列名抽取出来方便引用
	  2、include来引用已经抽取的sql:
	  3、include还可以自定义一些property,sql标签内部就能使用自定义的属性
	  		include-property:取值的正确方式${prop},
	  		#{不能使用这种方式}
          4、employee_id,last_name,email,${prop} 这个oracle插入 其实等价于【当然数据库有没有相应字段是另一回事,在这里只是用来演示】 employee_id,last_name,email,abc
          5、_databaseId 是 mybatis 内置参数,和在 全局配置文件中,标记的数据库 名是 一样的
-->
  <sql id="insertColumn">
	  	<if test="_databaseId=='oracle'">
	  		employee_id,last_name,email,${prop}
	  	</if>
	  	<if test="_databaseId=='mysql'">
	  		last_name,email,gender,d_id
	  	</if>
 </sql>


mybatis动态sql-(5)-遍历查询foreach

一、编写接口方法:

package com.mybatis.mapper;

import java.util.List;
import org.apache.ibatis.annotations.Param;
import com.mybatis.bean.Employee;

public interface EmployeeMapperDynamicSQL {
	
	//查询员工id'在给定集合中的
	public List<Employee> getEmpsByConditionForeach(@Param("ids")List<Integer> ids);

}

 二、编写sql映射文件

<?xml version="1.0" encoding="UTF-8" ?>
<!DOCTYPE mapper
 PUBLIC "-//mybatis.org//DTD Mapper 3.0//EN"
 "http://mybatis.org/dtd/mybatis-3-mapper.dtd">
<mapper namespace="com.mybatis.mapper.EmployeeMapperDynamicSQL">

<!--public List<Employee> getEmpsByConditionForeach(List<Integer> ids);  -->
<select id="getEmpsByConditionForeach" resultType="com.mybatis.bean.Employee">
	 select * from tbl_employee
	 <!--
	 测试用例:
	 select * from tbl_employee where id in (1,2,3)
	 	
	 	collection:指定要遍历的集合:
	 		list类型的参数会特殊处理封装在map中,map的key就叫list
	 	item:将当前遍历出的元素赋值给指定的变量
	 	separator:每个元素之间的分隔符
	 	open:遍历出所有结果拼接一个开始的字符
	 	close:遍历出所有结果拼接一个结束的字符
	 	index:索引。遍历list的时候是index就是索引,item就是当前值
	 		   遍历map的时候index表示的就是map的key,item就是map的值
	 		
	 	#{变量名}就能取出变量的值也就是当前遍历出的元素
	  -->
	 <foreach collection="ids" item="item_id" separator=","
	 	open="where id in(" close=")">
	 	#{item_id}
	 </foreach>
</select>

</mapper>

 三、编写Junit测试

List<Employee> list = mapper.getEmpsByConditionForeach(Arrays.asList(1,2));
     for (Employee emp : list) {
	 System.out.println(emp);
}


mybatis动态sql-(4)-多次条件判断set和trim

当更新数据时,可以用 set 标签 来,来取消 更新语句中 多余的,
last_name=#{lastName}, 
比如上面这句话,如果是最后一个判断子句,那末尾的[,]是要去掉的,所以就需要用set标签了。trim标签之前提到过,功能很多,可以去头和去尾,也可以添加整句头和添加整句尾。

<!--public void updateEmp(Employee employee);  -->
<update id="updateEmp">
	 <!-- Set标签的使用 -->
	 update tbl_employee 
	<set>
		<if test="lastName!=null">
			last_name=#{lastName},
		</if>
		<if test="email!=null">
			email=#{email},
		</if>
		<if test="gender!=null">
			gender=#{gender}
		</if>
	</set>
	where id=#{id} 
<!-- 		
	Trim:更新拼串
	update tbl_employee 
	<trim prefix="set" suffixOverrides=",">
		<if test="lastName!=null">
			last_name=#{lastName},
		</if>
		<if test="email!=null">
			email=#{email},
		</if>
		<if test="gender!=null">
			gender=#{gender}
		</if>
	</trim>
	where id=#{id}  -->
 </update>


mybatis动态sql-(3)-单次条件判断choose

单次判断,就是只进行一次判断。

一、编辑接口文件

import java.util.List;
import org.apache.ibatis.annotations.Param;
import com.mybatis.bean.Employee;

public interface EmployeeMapperDynamicSQL {

       public List<Employee> getEmpsByConditionChoose(Employee employee);

}

二、编辑SQL映射文件

 <!-- public List<Employee> getEmpsByConditionChoose(Employee employee); -->
 <select id="getEmpsByConditionChoose" resultType="com.mybatis.bean.Employee">
	 select * from tbl_employee 
	 <where>
	 	<!-- 如果带了id就用id查,如果带了lastName就用lastName查;只会进入其中一个 -->
	 	<choose>
	 		<when test="id!=null">
	 			id=#{id}
	 		</when>
	 		<when test="lastName!=null">
	 			last_name like #{lastName}
	 		</when>
	 		<when test="email!=null">
	 			email = #{email}
	 		</when>
	 		<otherwise>
	 			gender = 0
	 		</otherwise>
	 	</choose>
	 </where>
 </select>

三、Junit单元测试

EmployeeMapperDynamicSQL mapper = openSession.getMapper(EmployeeMapperDynamicSQL.class);
Employee employee = new Employee(3,"%m%","[email protected]","2");

List<Employee> list = mapper.getEmpsByConditionChoose(employee);
	for(Employee emp :list){
	System.out.println(emp);
	System.out.println(emp.getDepartment());
}