Blog

SSM小项目-(5)-前端交互基于http请求方案

一、后端数据接口

EmployeeController.java

package com.ssm.crud.controller;

import java.util.List;

import org.springframework.beans.factory.annotation.Autowired;
import org.springframework.stereotype.Controller;
import org.springframework.ui.Model;
import org.springframework.web.bind.annotation.RequestMapping;
import org.springframework.web.bind.annotation.RequestParam;

import com.github.pagehelper.PageHelper;
import com.github.pagehelper.PageInfo;
import com.ssm.crud.bean.Employee;
import com.ssm.crud.mapper.EmployeeMapper;
import com.ssm.crud.service.employeeService;

@Controller
public class EmployeeController {

	@Autowired 
	employeeService employeeService;
	
	@Autowired
	EmployeeMapper employeeMapper;
	
	/**
	 * 查询员工数据(分页查询)
	 * 
	 * @return
	 */
	@RequestMapping("/emps")
	public String getEmps( @RequestParam(value = "pn", defaultValue = "1") Integer pn, Model model) {
		
                // 引入PageHelper分页插件
		//设置返回查询结果的排序规律(字段名 排序规律)
		PageHelper.orderBy("emp_id asc");
		// 在查询之前只需要调用,传入页码,以及每页的大小
		PageHelper.startPage(pn, 5);
		// startPage后面紧跟着的这个查询操作就是一个分页查询操作
		List<Employee> emps = employeeService.getAll();
		
		
		// 使用pageInfo包装查询后的结果,只需要将pageInfo交给页面就行了。
		// 封装了详细的分页信息,包括有我们查询出来的数据,传入连续显示的页数
		PageInfo page = new PageInfo(emps, 5);
                //设置返回查询结果的排序规律(字段名 排序规律)
		PageHelper.orderBy("emp_id asc");

		model.addAttribute("pageInfo", page);

		/*****  一开始 EmployeeService 方法中 居然 返回的 null,忘记修改了 坑爹的教训啊 
		System.out.println("当前页码:"+page.getPageNum());
		System.out.println("总记录数:"+page.getTotal());
		System.out.println("每页的记录数:"+page.getPageSize());
		System.out.println("总页码:"+page.getPages());
		System.out.println("是否第一页:"+page.isIsFirstPage());
		System.out.println("连续显示的页码:");
		int[] nums = page.getNavigatepageNums();
		for (int i = 0; i < nums.length; i++) {
			System.out.println(nums[i]);
		}	
		******/
		return "list";
	}
	
}

从上面的数据接口我们可以看出,当http请求比如   /emp?pn=2    就能返回需要的信息了。  

二、编写结果返回页

请求地址:http://localhost:8080/ssm.crud/emps

结果返回:list.jsp  【因为是转发,不会显示结果页的url路径】

<%@ page language="java" contentType="text/html; charset=UTF-8"
	pageEncoding="UTF-8"%>
<%@ taglib prefix="c" uri="http://java.sun.com/jsp/jstl/core"%>
<!DOCTYPE html PUBLIC "-//W3C//DTD HTML 4.01 Transitional//EN" "http://www.w3.org/TR/html4/loose.dtd">
<html>
<head>
<meta http-equiv="Content-Type" content="text/html; charset=UTF-8">
<meta name="viewport"
	content="width=device-width, initial-scale=1, shrink-to-fit=no">

<title>员工列表</title>
<%
	pageContext.setAttribute("APP_PATH", request.getContextPath());
%>
<!-- web路径:
不以/开始的相对路径,找资源,以当前资源的路径为基准,经常容易出问题。
以/开始的相对路径,找资源,以服务器的路径为标准(http://localhost:8080);需要加上项目名
		http://localhost:8080/ssm.crud
 -->
<script type="text/javascript"
	src="${APP_PATH }/static/jquery-1.12.4/jquery.js"></script>
<link
	href="${APP_PATH }/static/bootstrap-4.1.3-dist/css/bootstrap.min.css"
	rel="stylesheet">
<script
	src="${APP_PATH }/static/bootstrap-4.1.3-dist/js/bootstrap.bundle.min.js"></script>

<link
	href="${APP_PATH }/static/font-awesome-3.2.1/css/font-awesome.min.css"
	rel="stylesheet">

</head>

<body>
	<div class="container">
		<!-- 标题 -->
		<div class="col-md-12">
			<h1>SSM-CRUD</h1>
		</div>

		<!-- 按钮 -->
		<div class="row">
			<div class="col-md-4 offset-md-8">
				<button class="btn btn-primary btn-sm">
					<i class="icon-edit icon-large"></i> 编辑
				</button>
				<button class="btn btn-danger btn-sm">
					<i class="icon-trash icon-large"></i> 删除
				</button>
			</div>
		</div>

		<!-- 显示表格数据 -->
		<div class="row">
			<div class="col-md-12">
				<table class="table table-hover">
					<tr>
						<th>#</th>
						<th>empName</th>
						<th>gender</th>
						<th>email</th>
						<th>deptName</th>
						<th>操作</th>
					</tr>
					<c:forEach items="${pageInfo.list}" var="emp">
						<tr>
							<th>${emp.empId}</th>
							<th>${emp.empName }</th>
							<th>${emp.gender == "M" ? "男" : "女"}</th>
							<th>${emp.email}</th>
							<th>${emp.department.deptName}</th>
							<th>
								<button class="btn btn-primary btn-sm">
									<i class="icon-edit icon-large"></i> 编辑
								</button>
								<button class="btn btn-danger btn-sm">
									<i class="icon-trash icon-large"></i> 删除
								</button>
							</th>
						</tr>
					</c:forEach>
				</table>
			</div>
		</div>
		<!-- 显示分页信息 -->
		<div class="row">
			<div class="col-md-6">
				当前第${pageInfo.pageNum}页,总共有${pageInfo.pages}页,总共有${pageInfo.total}记录。
			</div>


			<div class="col-md-6">
				<nav aria-label="Page navigation example">
				<ul class="pagination">
					<li class="page-item"><a class="page-link"
						href="${APP_PATH}/emps?pn=1">首页</a></li>

					<c:if test="${pageInfo.hasPreviousPage}">
						<li class="page-item"><a class="page-link"
							href="${APP_PATH}/emps?pn=${pageInfo.pageNum-1}"
							aria-label="Previous"> <span aria-hidden="true">&laquo;</span><span
								class="sr-only">Previous</span></a></li>
					</c:if>
					<!-- jstl 标签 获取的都是用 .属性  不能用 get属性方法,否则会报错-->
					<c:forEach items="${pageInfo.navigatepageNums}" var="page_Num">
						<c:choose>
							<c:when test="${pageInfo.pageNum == page_Num }">
								<li class="page-item active"><a class="page-link" href="#">${page_Num}</a></li>
							</c:when>
							<c:otherwise>
								<li class="page-item"><a class="page-link"
									href="${APP_PATH}/emps?pn=${page_Num}">${page_Num}</a></li>
							</c:otherwise>
						</c:choose>
					</c:forEach>

					<c:if test="${pageInfo.hasNextPage}">
						<li class="page-item"><a class="page-link"
							href="${APP_PATH}/emps?pn=${pageInfo.pageNum+1}"
							aria-label="Next"> <span aria-hidden="true">&raquo;</span> <span
								class="sr-only">Next</span>
						</a></li>
					</c:if>
					<li class="page-item"><a class="page-link"
						href="${APP_PATH}/emps?pn=${pageInfo.pages }">末页</a></li>
				</ul>
				</nav>
			</div>
		</div>
	</div>


</body>
</html>


SSM小项目-(4)-搭建Bootstrap前端框架

前端框架搭建

一、下载bootsrap框架

本项目采用的是V4版本,V4版本和V3有点不同,V4版本移除了图库。所以我们需要自己导入其他图库。

Bootstrap框架需要 jQuery.js,同时V4版本还需要 Popper.js。Our bootstrap.bundle.js and bootstrap.bundle.min.js include Popper, but not jQuery.

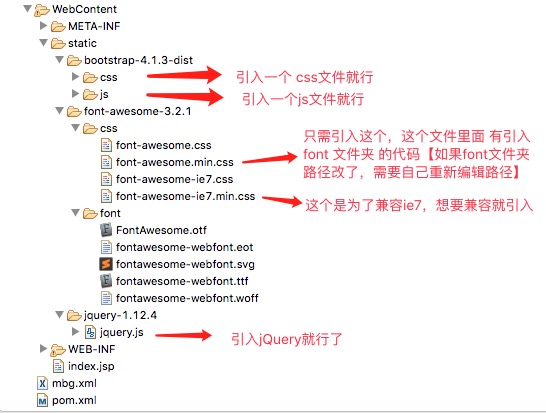
下载 Bootstrap 后,我们可以看到只有两个文件夹,一个是 js文件夹,一个是css文件夹。使用时只需要引入:JQuery.js , bootstrap.bundle.min.js,bootstrap.min.css就可以了。

二、下载图标

Bootstrap doesn’t include an icon library by default, but we have a handful of recommendations for you to choose from. While most icon sets include multiple file formats, we prefer SVG implementations for their improved accessibility and vector support.

Preferred

We’ve tested and used these icon sets ourselves.

More options

While we haven’t tried these out, they do look promising and provide multiple formats—including SVG.

这里以  Font Awesome 举例,此处代码下载 ,此处使用说明 。
Font Awesome 总结来说:就是将下载好的 font 文件夹 拿出来,并从 css 文件夹中拿出 font-awesome.min.css 将这两个拿到 web项目中,并且在  font-awesome.min.css中编辑 font文件夹 所在路径。使用时,只需要引入 font-awesome.min.css 就行了。

我用的是 3.0版本的 Font Awesome,此处下载代码 ,框架引用方式和最新版的相同。只是在代码使用上有所不同:
3.0版本  <i class="icon-camera-retro"></i> 调用照相机图标。
5.4版本 <i class="fas fa-ghost"></i> 调用幽灵图标。

The fa prefix has been deprecated in version 5. The new default is the fas solid style and the fabstyle for brands.

三、前端框架整合概览

四、编写测试网页

index.jsp

[请求地址:http://localhost:8080/ssm.crud/index.jsp]

<%@ page language="java" import="java.util.*"
	contentType="text/html; charset=UTF-8" pageEncoding="UTF-8"%>

<!DOCTYPE html PUBLIC "-//W3C//DTD HTML 4.01 Transitional//EN" "http://www.w3.org/TR/html4/loose.dtd">
<html>
<head>
<meta http-equiv="Content-Type" content="text/html; charset=UTF-8">
<title>Bootstrap 概述</title>
<%
	pageContext.setAttribute("APP_PATH", request.getContextPath());
%>
<!-- web路径:
不以/开始的相对路径,找资源,以当前资源的路径为基准,经常容易出问题。
以/开始的相对路径,找资源,以服务器的路径为标准(http://localhost:8080);需要加上项目名
		http://localhost:8080/crud
 -->
<script type="text/javascript"
	src="${APP_PATH }/static/jquery-1.12.4/jquery.js"></script>
<link
	href="${APP_PATH }/static/bootstrap-4.1.3-dist/css/bootstrap.min.css"
	rel="stylesheet">
<script
	src="${APP_PATH }/static/bootstrap-4.1.3-dist/js/bootstrap.bundle.min.js"></script>

<link
	href="${APP_PATH }/static/font-awesome-3.2.1/css/font-awesome.min.css"
	rel="stylesheet">

</head>
<body>
	<%
		/***  一开始,不写注释,想靠 <!-- -->将jsp跳转标签注释掉,发现没有效果啊,坑爹
		<!-- 
		<jsp:forward page="/emps"></jsp:forward>   
		--> ***/
	%>

	<div class="container">

		<!-- 标题 -->
		<div class="col-md-12">
			<h1>Bootstrap 是行列式布局 ,一行有12列。</h1>
		</div>

		<!-- 按钮 -->
		<div class="row">
			<!-- 布局占了4列,偏移8列 -->
			<div class="col-md-4 offset-md-8 ">
				<div class="bg-info">
					<h5>测试偏移</h5>
				</div>
			</div>
		</div>

		<hr />

		<nav class="navbar navbar-expand-lg navbar-light bg-light"> <a
			class="navbar-brand" href="#">Navbar</a>
		<button class="navbar-toggler" type="button" data-toggle="collapse"
			data-target="#navbarSupportedContent"
			aria-controls="navbarSupportedContent" aria-expanded="false"
			aria-label="Toggle navigation">
			<span class="navbar-toggler-icon"></span>
		</button>

		<div class="collapse navbar-collapse" id="navbarSupportedContent">
			<ul class="navbar-nav mr-auto">
				<li class="nav-item active"><a class="nav-link" href="#">Home
						<span class="sr-only">(current)</span>
				</a></li>
				<li class="nav-item"><a class="nav-link" href="#">Link</a></li>
				<li class="nav-item dropdown"><a
					class="nav-link dropdown-toggle" href="#" id="navbarDropdown"
					role="button" data-toggle="dropdown" aria-haspopup="true"
					aria-expanded="false"> Dropdown </a>
					<div class="dropdown-menu" aria-labelledby="navbarDropdown">
						<a class="dropdown-item" href="#">Action</a> <a
							class="dropdown-item" href="#">Another action</a>
						<div class="dropdown-divider"></div>
						<a class="dropdown-item" href="#">Something else here</a>
					</div></li>
				<li class="nav-item"><a class="nav-link disabled" href="#">Disabled</a>
				</li>
			</ul>
			<form class="form-inline my-2 my-lg-0">
				<input class="form-control mr-sm-2" type="search"
					placeholder="Search" aria-label="Search">
				<button class="btn btn-outline-success my-2 my-sm-0" type="submit">Search</button>
			</form>
		</div>
		</nav>

		<hr />

		<div>
			<h6>右对齐的关键属性是==> margin-left:auto 这样子浏览器会尽可能增加右边距离</h6>
		</div>

		<hr />

		<div class="row">
			<!-- 右对齐的方式,利用了 ml-auto ==> margin-left:auto ,
		     这样子浏览器解析的时候,会尽可能的让布局多占空间的,所以变成右对齐了
		     mr-3 ==> margin-right:3*bootstrap的基本单位。
		     mx-auto ==>代表这个单位对左右两边的距离都是自动的,这个单位在父类看来是居中的。
		      -->
			<div class="ml-auto mr-3">
				<!-- 按钮样式,直接加类就行 -->
				<button class="btn btn-primary btn-sm ">
					<!-- 图标是加载了 font-awesome 的 -->
					<i class="icon-edit icon-large"></i> 编辑
				</button>
				<button class="btn btn-danger btn-sm ">
					<i class="icon-trash icon-large"></i> 删除
				</button>
			</div>


		</div>
		<hr />

		<div class="row">
            <!-- text-center 代表在本对象看来, 自己内部对象是居中的 -->
			<div class="col-md-12  text-center">
				<h5>
					所有的布局组件:如按钮,表单,表格,分页等组件,都有demo,可以直接复制粘贴拿来 <span
						class="badge badge-secondary">修改使用</span>
				</h5>
			</div>

		</div>


		<table class="table table-striped  table-hover">
			<thead>
				<tr>
					<th scope="col">#</th>
					<th scope="col">First</th>
					<th scope="col">Last</th>
					<th scope="col">Handle</th>
				</tr>
			</thead>
			<tbody>
				<tr>
					<th scope="row">1</th>
					<td>Mark</td>
					<td>Otto</td>
					<td>@mdo</td>
				</tr>
				<tr>
					<th scope="row">2</th>
					<td>Jacob</td>
					<td>Thornton</td>
					<td>@fat</td>
				</tr>
				<tr>
					<th scope="row">3</th>
					<td>Mark</td>
					<td>Otto</td>
					<td>@mdo</td>
				</tr>
			</tbody>
		</table>


		<nav aria-label="Page navigation example">
		<ul class="pagination justify-content-end">
			<li class="page-item disabled"><a class="page-link" href="#"
				tabindex="-1">Previous</a></li>
			<li class="page-item"><a class="page-link" href="#">1</a></li>
			<li class="page-item"><a class="page-link" href="#">2</a></li>
			<li class="page-item"><a class="page-link" href="#">3</a></li>
			<li class="page-item"><a class="page-link" href="#">Next</a></li>
		</ul>
	</div>

	<hr />


	<div class="row">

		<div class="col-md-8 mx-auto">
			<div class="bg-info text-center">
				<p >表单对象的校验,首先只要给form对象 添加 was-validated 属性就行,
				此时表单会根据 input的type属性,自动校验,比如是否为空,比如type=email,那么会检查是否是email。
				这些是bootstrap,自己添加的。一般我们不用,我们自己校验,判断 input 合法吧,
				并给input标签 添加 is-invalid 或 is-valid 属性,来表示是否合法。
				表单中的:valid-feedback 和 invalid-feedback 是用来 展示校验结果信息的
				</p>
			</div>
			
			
			<div>
			<form class="needs-validation" novalidate>
			<div class="form-row">
				<div class="col-md-4 mb-3">
					<label for="validationCustom01">First name</label> <input
						type="text" class="form-control" id="validationCustom01"
						placeholder="First name" value="Mark" required>
					<div class="valid-feedback">Looks good!</div>
				</div>
				<div class="col-md-4 mb-3">
					<label for="validationCustom02">Last name</label> <input
						type="text" class="form-control" id="validationCustom02"
						placeholder="Last name" value="Otto" required>
					<div class="valid-feedback">Looks good!</div>
				</div>
				<div class="col-md-4 mb-3">
					<label for="validationCustomUsername">Username</label>
					<div class="input-group">
						<div class="input-group-prepend">
							<span class="input-group-text" id="inputGroupPrepend">@</span>
						</div>
						<input type="text" class="form-control"
							id="validationCustomUsername" placeholder="Username"
							aria-describedby="inputGroupPrepend" required>
						<div class="invalid-feedback">Please choose a username.</div>
					</div>
				</div>
			</div>
			<div class="form-row">
				<div class="col-md-6 mb-3">
					<label for="validationCustom03">City</label> <input type="text"
						class="form-control" id="validationCustom03" placeholder="City"
						required>
					<div class="invalid-feedback">Please provide a valid city.</div>
				</div>
				<div class="col-md-3 mb-3">
					<label for="validationCustom04">State</label> <input type="text"
						class="form-control" id="validationCustom04" placeholder="State"
						required>
					<div class="invalid-feedback">Please provide a valid state.</div>
				</div>
				<div class="col-md-3 mb-3">
					<label for="validationCustom05">Zip</label> <input type="text"
						class="form-control" id="validationCustom05" placeholder="Zip"
						required>
					<div class="invalid-feedback">Please provide a valid zip.</div>
				</div>
			</div>
			<div class="form-group">
				<div class="form-check">
					<input class="form-check-input" type="checkbox" value=""
						id="invalidCheck" required> <label
						class="form-check-label" for="invalidCheck"> Agree to
						terms and conditions </label>
					<div class="invalid-feedback">You must agree before
						submitting.</div>
				</div>
			</div>
			<button class="btn btn-primary" type="submit">Submit form</button>
		</form>
			
			</div>
		</div>
	
	</div>
	
	
	<script>
		// Example starter JavaScript for disabling form submissions if there are invalid fields
		(function() {
			'use strict';
			window.addEventListener('load',
					function() {
						// Fetch all the forms we want to apply custom Bootstrap validation styles to
						var forms = document
								.getElementsByClassName('needs-validation');
						// Loop over them and prevent submission
						var validation = Array.prototype.filter.call(forms,
								function(form) {
									form.addEventListener('submit', function(
											event) {
										if (form.checkValidity() === false) {
											event.preventDefault();
											event.stopPropagation();
										}
										form.classList.add('was-validated');
									}, false);
								});
					}, false);
		})();
	</script>

</body>
</html>


SSM小项目-(3)-模拟网页请求进行后端单元测试

一、加载log4j框架,方便调试

前面的文章已经将SSM环境搭建好了,我们现在开始写过网页,测试一下。
为了测试方便:我们加载log4j框架,用于查看错误日志。【框架需要jar包和配置文件】

pom.xml中配置:

<!-- 这个是 最新版2.x 和 1.x 版本 的配置文件 不兼容 https://mvnrepository.com/artifact/org.apache.logging.log4j/log4j-core 
	<dependency> <groupId>org.apache.logging.log4j</groupId> <artifactId>log4j-core</artifactId> 
	<version>2.11.1</version> </dependency> -->
<!-- https://mvnrepository.com/artifact/log4j/log4j -->
<dependency>
	<groupId>log4j</groupId>
	<artifactId>log4j</artifactId>
	<version>1.2.17</version>
</dependency>

log4j.xml 配置文件

<?xml version="1.0" encoding="UTF-8" ?>
<!DOCTYPE log4j:configuration SYSTEM "log4j.dtd">
 
<log4j:configuration xmlns:log4j="http://jakarta.apache.org/log4j/">
 
 <appender name="STDOUT" class="org.apache.log4j.ConsoleAppender">
   <param name="Encoding" value="UTF-8" />
   <layout class="org.apache.log4j.PatternLayout">
    <param name="ConversionPattern" value="%-5p %d{MM-dd HH:mm:ss,SSS} %m  (%F:%L) \n" />
   </layout>
 </appender>
 <logger name="java.sql">
   <level value="debug" />
 </logger>
 <logger name="org.apache.ibatis">
   <level value="info" />
 </logger>
 <root>
   <level value="debug" />
   <appender-ref ref="STDOUT" />
 </root>
</log4j:configuration>

web工程,只要放在项目根目录就行了,目的是打包后在class文件的根目录中,这样就能自动加载了。如果不想自动加载,则可以将配置文件改个名或者移动到其他目录,并在代码中指明 log4j配置文件 的路径。参看java工具-log4j框架-基本介绍和文件配置及框架加载调用

二、编写测试请求页

index.jsp

<%@ page language="java" contentType="text/html; charset=UTF-8"
    pageEncoding="UTF-8"%>
<jsp:forward page="/emps"></jsp:forward>

一开始写错成了:jsp:fowward 导致报错Invalid standard action 要注意了啊。

三、编写请求处理

EmployeeController.java

package com.ssm.crud.controller;

import java.util.List;

import org.springframework.beans.factory.annotation.Autowired;
import org.springframework.stereotype.Controller;
import org.springframework.ui.Model;
import org.springframework.web.bind.annotation.RequestMapping;
import org.springframework.web.bind.annotation.RequestParam;

import com.github.pagehelper.PageHelper;
import com.github.pagehelper.PageInfo;
import com.ssm.crud.bean.Employee;
import com.ssm.crud.mapper.EmployeeMapper;
import com.ssm.crud.service.employeeService;

@Controller
public class EmployeeController {

	@Autowired 
	employeeService employeeService;
	
	@Autowired
	EmployeeMapper employeeMapper;
	
	/**
	 * 查询员工数据(分页查询)
	 * 
	 * @return
	 */
	@RequestMapping("/emps")
	public String getEmps( @RequestParam(value = "pn", defaultValue = "1") Integer pn, Model model) {
		// 这不是一个分页查询;
		// 引入PageHelper分页插件
		// 在查询之前只需要调用,传入页码,以及每页的大小
		PageHelper.startPage(pn, 5);
		// startPage后面紧跟的这个查询就是一个分页查询
		List<Employee> emps = employeeService.getAll();
		
		
		// 使用pageInfo包装查询后的结果,只需要将pageInfo交给页面就行了。
		// 封装了详细的分页信息,包括有我们查询出来的数据,传入连续显示的页数
		PageInfo page = new PageInfo(emps, 5);
		model.addAttribute("pageInfo", page);

		/*****  一开始 EmployeeService 方法中 居然 返回的 null,忘记修改了 坑爹的教训啊 
		System.out.println("当前页码:"+page.getPageNum());
		System.out.println("总记录数:"+page.getTotal());
		System.out.println("每页的记录数:"+page.getPageSize());
		System.out.println("总页码:"+page.getPages());
		System.out.println("是否第一页:"+page.isIsFirstPage());
		System.out.println("连续显示的页码:");
		int[] nums = page.getNavigatepageNums();
		for (int i = 0; i < nums.length; i++) {
			System.out.println(nums[i]);
		}	
		******/
		return "list";
	}
	
}

EmployeeService.java

package com.ssm.crud.service;

import java.util.List;

import org.springframework.beans.factory.annotation.Autowired;
import org.springframework.stereotype.Service;

import com.ssm.crud.bean.Employee;
import com.ssm.crud.mapper.EmployeeMapper;

@Service
public class employeeService {

	@Autowired
	EmployeeMapper employeeMapper;
	
	public  List<Employee> getAll() {
                // 这个地方坑爹啊,一开始 返回了 null,忘记把 结果返回了
		return employeeMapper.selectByExampleWithDept(null);
		
	}

}

四、编写结果返回页

list.jsp

<%@ page language="java" contentType="text/html; charset=UTF-8"
    pageEncoding="UTF-8"%>
<!DOCTYPE html PUBLIC "-//W3C//DTD HTML 4.01 Transitional//EN" "http://www.w3.org/TR/html4/loose.dtd">
<html>
<head>
<meta http-equiv="Content-Type" content="text/html; charset=UTF-8">
<title>员工列表</title>
</head>
<body>

</body>
</html>

五、模拟网页请求的单元测试

在测试当中,会遇到 校验错误:

INFO  10-13 15:56:27,762 HV000001: Hibernate Validator 5.4.1.Final  (Version.java:30) 
DEBUG 10-13 15:56:27,785 Cannot find javax.persistence.Persistence on classpath. Assuming non JPA 2 environment. All properties will per default be traversable.  (DefaultTraversableResolver.java:70) 
DEBUG 10-13 15:56:27,796 Failed to set up a Bean Validation provider  (OptionalValidatorFactoryBean.java:43) 
javax.validation.ValidationException: HV000183: Unable to initialize 'javax.el.ExpressionFactory'. Check that you have the EL dependencies on the classpath, or use ParameterMessageInterpolator instead
	at 
。。。。。。
org.eclipse.jdt.internal.junit.runner.RemoteTestRunner.main(RemoteTestRunner.java:192)
Caused by: java.lang.NoClassDefFoundError: javax/el/ExpressionFactory
	at org.hibernate.validator.messageinterpolation.ResourceBundleMessageInterpolator.buildExpressionFactory(ResourceBundleMessageInterpolator.java:98)
	... 46 more

看log日志,是缺少 el jar包,于是在pom中添加

<dependency>
	<groupId>javax.el</groupId>
	<artifactId>el-api</artifactId>
	<version>2.2</version>
	<scope>provided</scope>
</dependency>

<dependency>
	<groupId>org.glassfish.web</groupId>
	<artifactId>el-impl</artifactId>
	<version>2.2</version>
	<scope>test</scope>
</dependency>

Juint单元测试:【勘误,现在回来重新说明一下:maven的web工程的网页和资源应该放在webapp目录下,所以下面的file:WebContent/WEB-INF/springMVC-servlet.xml 应该替换成 file:src/main/webapp/WEB-INF/springMVC-servlet.xml

package com.ssm.crud.test;

import static org.junit.Assert.*;

import java.util.List;

import org.apache.log4j.xml.DOMConfigurator;
import org.junit.Before;
import org.junit.Test;
import org.junit.runner.RunWith;
import org.springframework.beans.factory.annotation.Autowired;
import org.springframework.mock.web.MockHttpServletRequest;
import org.springframework.test.context.ContextConfiguration;
import org.springframework.test.context.junit4.SpringJUnit4ClassRunner;
import org.springframework.test.context.web.WebAppConfiguration;
import org.springframework.test.web.servlet.MockMvc;
import org.springframework.test.web.servlet.MvcResult;
import org.springframework.test.web.servlet.request.MockMvcRequestBuilders;
import org.springframework.test.web.servlet.setup.MockMvcBuilders;
import org.springframework.web.context.WebApplicationContext;

import com.github.pagehelper.PageInfo;
import com.ssm.crud.bean.Employee;

/**
 * 使用Spring测试模块提供的测试请求功能,测试curd请求的正确性 Spring4测试的时候,需要servlet3.0的支持
 * 
 * @author lfy
 *    当我构建好Maven的web项目时,我发现 有两个 放 web 文件的 地方,我选择将网页文件放在 WebContent 文件夹中
 *    file:WebContent/WEB-INF/springMVC-servlet.xml 【WebContent下面有网页文件】
 *    file:src/main/webapp/WEB-INF/springMVC-servlet.xml 【src/main/webapp下面什么文件都没有】
 */

//@RunWith这个是 junit-4.jar包 提供的注解, 而 SpringJUnit4ClassRunner.class 是spring-test 提供的类
@RunWith(SpringJUnit4ClassRunner.class)
//@WebAppConfiguration  这个是 spring-test.jar包 提供的注解, 用于根据 web.xml的配置,注入 SpringMVC 容器,使SpringMVC容器不需要创建 ,直接获取就行。
@WebAppConfiguration
//@ContextConfiguration 这个是 spring-test.jar包 提供的注解 , 用于启动 spring容器,方便直接获取spring容器中的bean
@ContextConfiguration(locations = { "classpath:springIOC.xml", "file:WebContent/WEB-INF/springMVC-servlet.xml" })
public class SpringMVCTest {

	
	@Autowired// 传入Springmvc的ioc,因为容器内部的bean可以自动注入,但SpringMVC这个容器不是springIOC中的bean,无法自动注入,所以需要在类前面添加 @WebAppConfiguration ,根据web.xml配置 来注入SpringMVC容器
	WebApplicationContext context;
	
	// 虚拟mvc请求,获取到处理结果。
	MockMvc mockMvc;

	@Before // 表示 每次调用 http请求 都要初始化一下
	public void initMokcMvc() {
		mockMvc = MockMvcBuilders.webAppContextSetup(context).build();
	}

	@Test
	public void testPage() throws Exception {
		
 
		// 模拟请求拿到返回值
		MvcResult result = mockMvc.perform(MockMvcRequestBuilders.get("/emps").param("pn", "3")).andReturn();

		// 请求成功以后,请求域中会有pageInfo;我们可以取出pageInfo进行验证

		MockHttpServletRequest request = result.getRequest();
		PageInfo pi = (PageInfo) request.getAttribute("pageInfo");
		System.out.println("当前页码:" + pi.getPageNum());
		System.out.println("总页码:" + pi.getPages());
		System.out.println("总记录数:" + pi.getTotal());
		System.out.println("在页面需要连续显示的页码");
		int[] nums = pi.getNavigatepageNums();
		for (int i : nums) {
			System.out.println(" " + i);
		}

		// 获取员工数据
		List<Employee> list = pi.getList();
		for (Employee employee : list) {
			System.out.println("ID:" + employee.getEmpId() + "==>Name:" + employee.getEmpName());
		}

	}

}

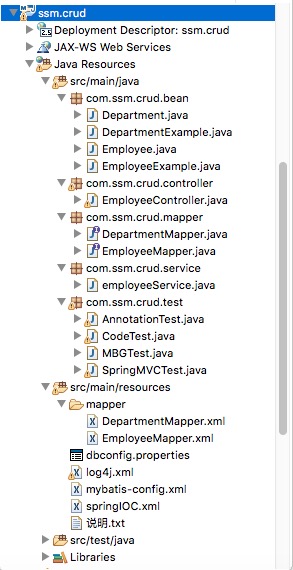
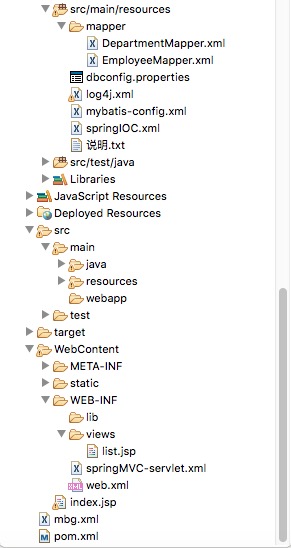
六、当前项目概览

经过后面的测试验证,网页文件放在WebContent目录下是对的,已在服务器上运行成功。(勘误,上面的蓝色字是之前学习时记录的,现在回来勘误,其实不应该放在WebContent目录中,项目第一章配置环境时已经重新说明过了,maven的web工程的网页和资源应该放在webapp目录下)

springmvc踩坑-service文件没有标注且返回值null

在我们自动新建一个服务类时,因为方便,有时会忘记给类添加 @Service注解

甚至忘记 将返回值 添加好。

package com.ssm.crud.service;

import java.util.List;

import org.springframework.beans.factory.annotation.Autowired;
import org.springframework.stereotype.Service;

import com.ssm.crud.bean.Employee;
import com.ssm.crud.mapper.EmployeeMapper;

@Service
public class employeeService {

	@Autowired
	EmployeeMapper employeeMapper;
	
	public  List<Employee> getAll() {
        employeeMapper.selectByExampleWithDept(null);
		return null;
	}//上面这个地方 的返回值 默认是null  而我们需要的操作是 return  employeeMapper.selectByExampleWithDept(null);


}


mybatis踩坑-IncompleteElementException

org.apache.ibatis.builder.IncompleteElementException: Could not find SQL statement to include with refid ‘com.ssm.crud.mapper.EmployeeMapper.WithDept_Column_List

at org.apache.ibatis.builder.xml.XMLIncludeTransformer.findSqlFragment(XMLIncludeTransformer.java:90)

这句话报错的意思是,sql映射文件中:没有定义说明 WithDept_Column_List语句的含义。比如在下面的配置文件中:SQL标签的语句一开始没有写,导致下面的select语句,无法解析导致报错了。

<!--  ****** 自定义的 带部门信息 的两种查询  ******  -->
<sql id="WithDept_Column_List">
  e.emp_id, e.emp_name, e.gender, e.email, e.d_id,d.dept_id,d.dept_name
</sql>

  <select id="selectByPrimaryKeyWithDept" resultMap="WithDeptResultMap">
   	select 
    <include refid="WithDept_Column_List" />
    FROM tbl_emp e
	left join tbl_dept d on e.`d_id`=d.`dept_id`
    where emp_id = #{empId,jdbcType=INTEGER}
  </select>


java踩坑-web后端获取路径的方法差异及注意点

方法一:

String path = Test.class.getResource("/").toString(); 
System.out.println("path = " + path);

此方法在tomcat下面没有问题,可以取到WEB-INF/classes
path = file:/home/ngidm_db2/AS_Tomcat7_0_29/webapps/NGIDM/WEB-INF/classes/
但换weblogic之后,取到的为
path = file:/oracle/weblogic/Oracle/Middleware/Oracle_Home/user_projects/domains/base_domain/
在weblogic下面,没能拿到classes路径。

方法二:

String path2 = Thread.currentThread().getContextClassLoader().getResource("/").getPath();
System.out.println("path2 = " + path2);

在tomcat和weblogic下面均可取到classes路径
path2 = /oracle/weblogic/Oracle/Middleware/user_apps/NGIDM/WEB-INF/classes/
path2 = /home/ngidm_db2/AS_Tomcat7_0_29/webapps/NGIDM/WEB-INF/classes/
故建议大家多使用
Thread.currentThread().getContextClassLoader().getResource("/").getPath();
获取classpath路径,且方法2 取到的classpath不含file:前缀,可以直接使用。
但是方法二,在JDK 7 和JDK8中会报错 返回 null ,所以要稍微改一下:
要么改成:Thread.currentThread().getContextClassLoader().getResource(".").getPath()
要么改成:Thread.currentThread().getContextClassLoader().getResource("").getPath()

eclipse的maven项目补充:

当我用 eclipse 构建 Maven 的Web项目时,然后用Junit 单元测试,调用如下方法获取路径

Thread.currentThread().getContextClassLoader().getResource("").getPath()

获取到的路径是 :xxx/target/test-classes/    而期望的是     xxx/target/classes/  所以有问题。

因为test-classes文件夹内没有存放任何 class 文件,所有class 文件和配置文件都存放在classes文件夹内。所以正在执行的测试类,应该是在 classes 文件夹中。

原因是maven项目的目录问题:src/main/java/目录下的代码会存放到target/classes 文件夹下,src/test/java/目录下的代码会存放到target/test-classes文件夹下。同理:src/main/resources 目录下的文件也会存放到 target/classes 文件夹下。

@Test
	public void testCRUD() throws IOException{
	
        //下面这句话,加载的配置文件路径是   xxx/target/test-classes/log4j.xml  结果 找不到, 因为真正的路径是  xxx/target/classes/log4j.xml  
        //PropertyConfigurator.configure(Thread.currentThread().getContextClassLoader().getResource("").getPath()+"log4j.xml");  
        //因为无法正确加载路径,所以采取了 另一种 路径方法
        String config=System.getProperty("user.dir");//获取程序的当前路径 
        System.out.println("config="+config);
	PropertyConfigurator.configure(config+"/target/classes/log4j.xml");  

 
//     Log4j的 调用方法,版本是 1.X 的,  因为 log4j 2.x 的版本 ,配置文件和调用方法 都变不同了。 
//	Logger logger = Logger.getLogger(MapperTest.class); 
//      // 记录debug级别的信息  
//      logger.error("This is debug message."); 
		
	//1、创建SpringIOC容器  ,这个地方 却可以 正确加载 路径 xxx/target/classes/springIOC.xml
	ApplicationContext ioc = new ClassPathXmlApplicationContext("springIOC.xml");
	//2、从容器中获取mapper
	EmployeeMapper bean = ioc.getBean(EmployeeMapper.class);
		
	System.out.println(bean.selectByPrimaryKey(1));

}


参考自:https://blog.csdn.net/magi1201/article/details/18731581

mysql问题-插入数据库中文乱码

一、数据库中文乱码情况

对于mysql数据库的乱码问题,有两种情况:

1. mysql数据库编码问题(建库时设定)。
2. 连接mysql数据库的url编码设置问题。

对于第一个问题,目前个人发现只能通过重新建库解决,建库的时候,选择UTF-8字符集。我试过修改现有数据库字符集为UFT-8,但是根本不起作用,插入的中文仍然乱码(中文显示成:???)。重建库时选择字符集为UTF-8之后,中文正常显示了。

补充:
第一个问题,可以单独的修改表的字符集,更可以单独的修改字段的字符集。 ALTER TABLE tbl_name DEFAULT CHARACTER SET character_name ALTER TABLE tbl_name CHANGE c_name c_name CHARACTER SET character_name

对于第二个问题,是这样的情况:我建库时设置了数据库默认字符集为UTF-8,通过mysql workbench直接插入中文显示完全正常。但是使用mybaits插入数据时,中文显示成了”???”这样的乱码。但从数据库获取的中文不会乱码。跟踪数据库操作,SQL语句中的中文还是显示正常的,但是插入到mysql数据库后就乱码了,于是判断可能是数据库连接的问题。后来在网上找了下资料,发现确实可以为mysql数据库的连接字符串设置编码方式,如下:

jdbc:mysql://127.0.0.1:3306/test?useUnicode=true&characterEncoding=utf8

添加了useUnicode=true&characterEncoding=utf8参数之后,插入中文就正常了。

添加的作用是:指定字符的编码、解码格式。

例如:假设mysql数据库用的是GBK编码(也可能是其它,例如Ubuntu下就是latin1),而项目数据库用的是utf-8编码。这时候如果添加了useUnicode=true&characterEncoding=UTF-8 ,那么作用有如下两个方面:

1. 存数据时:

数据库在存放项目数据的时候会先用UTF-8格式将数据解码成字节码,然后再将解码后的字节码重新使用GBK编码存放到数据库中。

2.取数据时:

在从数据库中取数据的时候,数据库会先将数据库中的数据按GBK格式解码成字节码,然后再将解码后的字节码重新按UTF-8格式编码数据,最后再将数据返回给客户端。

注意:在xml配置文件中配置数据库utl时,要使用&的转义字符也就是&amp;

  例如:<property name="url" value="jdbc:mysql://localhost:3306/email?useUnicode=true&amp;characterEncoding=UTF-8" />

二、HTML中常用的特殊字符:

1、最常用的字符实体(Character Entities)

显示结果 说明 Entity Name Entity Number
显示一个空格 &nbsp; &#160;
< 小于 &lt; &#60;
> 大于 &gt; &#62;
& &符号 &amp; &#38;
双引号 &quot; &#34;

2、其他常用的字符实体(Character Entities)

显示结果 说明 Entity Name Entity Number
© 版权 &copy; &#169;
® 注册商标 &reg; &#174;
× 乘号 &times; &#215;
÷ 除号 &divide; &#247;

三、mysql url连接属性

Properties and Descriptions
useUnicode

Should the driver use Unicode character encodings when handling strings? Should only be used when the driver can’t determine the character set mapping, or you are trying to ‘force’ the driver to use a character set that MySQL either doesn’t natively support (such as UTF-8), true/false, defaults to ‘true’

Default: true

Since version: 1.1g

characterEncoding

If ‘useUnicode’ is set to true, what character encoding should the driver use when dealing with strings? (defaults is to ‘autodetect’)

Since version: 1.1g


参考:
https://blog.csdn.net/zht666/article/details/8955952
https://blog.csdn.net/afgasdg/article/details/6941712
https://dev.mysql.com/doc/connector-j/5.1/en/connector-j-reference-configuration-properties.html

java工具-log4j框架-基本介绍和文件配置及框架加载调用

一、log4j基本介绍


Log4j是Apache的一个开源项目,通过使用Log4j,我们可以控制日志信息输送的目的地是控制台、文件、GUI组件,甚至是套接口服务器、NT的事件记录器、UNIX Syslog守护进程等;我们也可以控制每一条日志的输出格式;通过定义每一条日志信息的级别,我们能够更加细致地控制日志的生成过程。最令人感兴趣的就是,这些可以通过一个配置文件来灵活地进行配置,而不需要修改应用的代码。
所以简单的来说,Log4j可以理解为一个通过配置文件进行配置的日志操作工具。

log4j框架 需要  log4j.jar 包  和  log4j配置文件。log4j 1.x 版 和log4j 2.x  代码调用和配置文件 都不一样了要注意。本文讲的 代码调用和 文件配置,都是针对1.x 版本来说的。【不是很确定,但应该是1.x 版本】

二、log4j配置文件


1、log4j的配置文件可以有两种类型:

(1)log4j.properties
(2)log4j.xml

log4j文件名和文件路径都可以随意设置,只要在代码中指定好配置文件就行,这样就能加载log4j框架了。【如果配置文件取名为log4j.xml或者log4j.properties,且文件放在根目录(就是可执行二进制class文件的根目录),那么log4j会自动加载配置文件,无需写代码】

2、Log4j配置文件的基本格式如下:

#配置根Logger
log4j.rootLogger = [level] , appenderName1 , appenderName2 , …
#配置日志信息输出目的地Appender
log4j.appender.appenderName  =  fully.qualified.name.of.appender.class 
log4j.appender.appenderName.option1  =  value1 
… 
log4j.appender.appenderName.optionN  =  valueN 
#配置日志信息的格式(布局)
log4j.appender.appenderName.layout  =  fully.qualified.name.of.layout.class 
log4j.appender.appenderName.layout.option1  =  value1 
… 
log4j.appender.appenderName.layout.optionN  =  valueN

3、log4j.properties各部分的格式具体含义:

log4j.rootLogger=INFO,Console,File
#控制台日志
log4j.appender.Console=org.apache.log4j.ConsoleAppender
log4j.appender.Console.Target=System.out
log4j.appender.Console.layout=org.apache.log4j.PatternLayout
log4j.appender.Console.layout.ConversionPattern=[%p][%t][%d{yyyy-MM-dd HH\:mm\:ss}][%C] - %m%n
#普通文件日志
log4j.appender.File=org.apache.log4j.RollingFileAppender
log4j.appender.File.File=logs/ssm.log
log4j.appender.File.MaxFileSize=10MB
#输出日志,如果换成DEBUG表示输出DEBUG以上级别日志
log4j.appender.File.Threshold=ALL
log4j.appender.File.layout=org.apache.log4j.PatternLayout
log4j.appender.File.layout.ConversionPattern=[%p][%t][%d{yyyy-MM-dd HH\:mm\:ss}][%C] - %m%n

首先对于基本格式中的配置根Logger这部分来说
log4j.rootLogger = [level] , appenderName1 , appenderName2 , …
我们的log4j.properties文件相应内容如下:
log4j.rootLogger=INFO,Console,File
其中[level]是日志输出级别分为OFF、FATAL、ERROR、WARN、INFO、DEBUG、ALL或者您定义的级别。Log4j建议只使用四个级别,优先级从高到低分别是ERROR、WARN、INFO、DEBUG。通过在这里定义的级别,您可以控制到应用程序中相应级别的日志信息的开关。比如在这里定义了INFO级别,则应用程序中所有DEBUG级别的日志信息将不被打印出来。
appenderName:就是指定日志信息输出到哪个地方。您可以同时指定多个输出目的地。例如:log4j.rootLogger=INFO,Console,File 配置了2个输出地方,这个名字可以任意(如上面的Console和File),但必须与我们在后面进行的设置名字对应。例如:log4j.appender.Console中的Consolelog4j.appender.File中的File就是对应之前写的名称。

在看接下来配置日志信息输出目的地Appender配置日志信息的格式(布局)的部分。
Appender 为日志输出目的地,Log4j提供的appender有以下几种:

org.apache.log4j.ConsoleAppender(控制台),
org.apache.log4j.FileAppender(文件),
org.apache.log4j.DailyRollingFileAppender(每天产生一个日志文件),
org.apache.log4j.RollingFileAppender(文件大小到达指定尺寸的时候产生一个新的文件),
org.apache.log4j.WriterAppender(将日志信息以流格式发送到任意指定的地方)

Layout为日志输出格式,Log4j提供的layout有以下几种:

org.apache.log4j.HTMLLayout(以HTML表格形式布局),
org.apache.log4j.PatternLayout(可以灵活地指定布局模式),
org.apache.log4j.SimpleLayout(包含日志信息的级别和信息字符串),
org.apache.log4j.TTCCLayout(包含日志产生的时间、线程、类别等等信息)

那么,我们log4j.properties的内容是否不难理解了。

#控制台日志
log4j.appender.Console=org.apache.log4j.ConsoleAppender
log4j.appender.Console.Target=System.out
log4j.appender.Console.layout=org.apache.log4j.PatternLayout
log4j.appender.Console.layout.ConversionPattern=[%p][%t][%d{yyyy-MM-dd HH\:mm\:ss}][%C] - %m%n

appenderName为Console的日志输出目的地为控制台,采用了可以灵活地指定布局模式的格式。
至于其他的格式可以参考文章 配置Log4j

三、log4j框架加载调用


1、本地客户端项目加载log4j

(1)默认配置自动加载

java代码运行时,会在class文件的根目录(包名不是根目录,是class文件的一部分)寻找加载log4j.xml或者log4j.properties。一旦加载完成,就开启log4j功能了。

(2)代码加载(不管是main方法还是junit方法)

本地项目: 初始化log4j的日志配置,指定到src目录下(建议用2)

 //1. 本地项目-属性文件配置
 PropertyConfigurator.configure("src/config/log4j.properties");
 //2. 本地项目-xml文件配置
  DOMConfigurator.configure("src/config/log4j.xml");
 //3. 本地项目-默认配置
  BasicConfigurator.configure();

特别注意:
(1)、DOMConfiguratorPropertyConfigurator是用来加载不同类型的配置文件,别搞错了。

(2)、configure方法:里面的参数  如果是 文件夹 开头,则代表相对目录,这个相对目录是相对工程文件目录来说的,如果是  / 开头,代表根目录。获取路径可以参考java常识-获取路径的方法及注意点

(3)、当配置文件加载好后,log4j框架就已经在运行了,就已经在输出log日志了。

2、Web项目(如SSM)加载log4j

这是一个非常关键的问题,之前讲道我们采用配置Log4j来完成日志部分的操作,但是SSM框架是如何知道这个配置文件的存在并让它起作用呢?

(1)默认配置自动加载

java代码运行时,会在class文件的根目录(包名不是根目录,是class文件的一部分)寻找加载log4j.xml或者log4j.properties。一旦加载完成,就开启log4j功能了。

(2)在web.xml文件配置:

如果配置文件:改成6log4j.xml  ,则在web 可以进行如下配置:

 <context-param>
        <param-name>log4jConfigLocation</param-name>
        <param-value>classpath:6log4j.xml</param-value>
 </context-param>
 <listener>  
      <listener-class>  
           org.springframework.web.util.Log4jConfigListener  
      </listener-class>  
 </listener> 

当然也可以额外添加一个 配置:【不添加也没有关系】

<context-param>  
        <param-name>log4jRefreshInterval</param-name>  
        <param-value>60000</param-value>  
</context-param>

至于上述 log4j的配置,最好放在 org.springframework.web.context.ContextLoader前面。如果放在它后面,那么在加载org.springframework.web.context.ContextLoader这个listener的时会找不到log4j的配置文件,变会出现:

log4j:WARN No appenders could be found for logger (org.springframework.web.context.ContextLoader). 
log4j:WARN Please initialize the log4j system properly.

到了后面:又会继续读取 web.xml 时,又会加载 log4j 的配置了。此时,网站已具有log4j的功能。 

(3)web项目单元测试

本地项目: 初始化log4j的日志配置,指定到src目录下(建议用2)

 //1. 本地项目-属性文件配置
 PropertyConfigurator.configure("src/config/log4j.properties");
 //2. 本地项目-xml文件配置
  DOMConfigurator.configure("src/config/log4j.xml");
 //3. 本地项目-默认配置
  BasicConfigurator.configure();

特别注意:
(1)、DOMConfiguratorPropertyConfigurator是用来加载不同类型的配置文件,别搞错了。

(2)、configure方法:里面的参数  如果是 文件夹 开头,则代表相对目录,这个相对目录是相对工程文件目录来说的, 如果是  / 开头,代表根目录。获取路径可以参考java常识-获取路径的方法及注意点

(3)、当配置文件加载好后,log4j框架就已经在运行了,就已经在输出log日志了。

3、在代码中调用log4j框架

当我们想要打印日志时,可以直接参考下面代码:

Logger logger = Logger.getLogger(JunitTest.class); 
// 记录debug级别的信息  
logger.error("This is debug message.");

4、不同构建器项目的路径获取比较

Java Builder 构建器

package com.test.springmvc.test;

import static org.junit.Assert.*;

import org.apache.log4j.BasicConfigurator;
import org.apache.log4j.Logger;
import org.apache.log4j.PropertyConfigurator;
import org.apache.log4j.xml.DOMConfigurator;
import org.junit.Test;
import org.springframework.context.ApplicationContext;
import org.springframework.context.support.ClassPathXmlApplicationContext;

import com.test.springmvc.dao.EmployeeMapper;


public class JBuilderTest {

	@Test
	public void test() {
		
		/*****
特别注意:
(1)、DOMConfigurator 和 PropertyConfigurator是用来加载不同类型的配置文件,别搞错了。

(2)、configure方法:里面的参数&nbsp; &nbsp;如果是&nbsp; / 开头,代表根目录,如果是 文件夹开头,则代表相对目录,这个相对目录是相对工程文件目录来说的。

(3)、当配置文件加载好后,log4j框架就已经在运行了,就已经在输出log日志了。
		 * ***/
		
//		BasicConfigurator.configure();
//		DOMConfigurator.configure("classpath:6log4j.xml");  //前面这个方法不行 ,后面这个方法也不行  "/classpath:6log4j.xml"  
//		DOMConfigurator.configure("conf/6log4j.xml");  
	DOMConfigurator.configure(Thread.currentThread().getContextClassLoader().getResource(".").getPath()+"6log4j.xml");  
	
//OK	DOMConfigurator.configure(Thread.currentThread().getContextClassLoader().getResource(".").getPath()+"test.log/log4j.xml");  
//	    Logger logger = Logger.getLogger(JunitTest.class); 
//	    // 记录debug级别的信息  
//	    logger.error("This is debug message."); 
		System.out.println(Thread.currentThread().getContextClassLoader().getResource(".").getPath());
	
		//1、创建SpringIOC容器
		ApplicationContext ioc = new ClassPathXmlApplicationContext("applicationContext.xml");
		//2、从容器中获取mapper
		EmployeeMapper bean = ioc.getBean(EmployeeMapper.class);
		
		System.out.println(bean.getEmps());
	}

}

Maven构建器:

package com.ssm.crud.test;

import java.io.IOException;
import org.apache.log4j.PropertyConfigurator;
import org.apache.log4j.xml.DOMConfigurator;
import org.junit.Test;
import org.springframework.context.ApplicationContext;
import org.springframework.context.support.ClassPathXmlApplicationContext;
import com.ssm.crud.mapper.DepartmentMapper;
import com.ssm.crud.mapper.EmployeeMapper;


public class CodeTest {
	
	DepartmentMapper departmentMapper;

	@Test
	public void testCRUD() throws IOException{
		//PropertyConfigurator.configure  与  DOMConfigurator.configure  是不同的,分别用于加载 properties 和 xml 类型的配置文件
		
        //下面这句话,加载的配置文件路径是   xxx/target/test-classes/6log4j.xml  结果 找不到, 因为真正的路径是  xxx/target/classes/6log4j.xml  
//        DOMConfigurator.configure(Thread.currentThread().getContextClassLoader().getResource("").getPath()+"6log4j.xml");  
        //因为无法正确加载路径,所以采取了 另一种 路径方法
        String config=System.getProperty("user.dir");//获取程序的当前路径 
        System.out.println("config="+config);
	    DOMConfigurator.configure(config+"/target/classes/6log4j.xml");  

       //要想 启用log4j 框架  只需要加载log4j配置文件就行 ,上面的代码已经加载 了
//     Log4j的 调用方法,版本是 1.X 的,  因为 log4j 2.x 的版本 ,配置文件和调用方法 都变不同了。 
//	   Logger logger = Logger.getLogger(MapperTest.class); 
//      // 记录debug级别的信息  
//      logger.error("This is debug message."); 
		
	    //1、创建SpringIOC容器  ,这个地方 却可以 正确加载 路径 xxx/target/classes/springIOC.xml
		
		//1、创建SpringIOC容器
		ApplicationContext ioc = new ClassPathXmlApplicationContext("springIOC.xml");
		//2、从容器中获取mapper
		EmployeeMapper bean = ioc.getBean(EmployeeMapper.class);
		
		System.out.println(bean.selectByPrimaryKey(1));
       
		
	}

}


参考:https://www.jianshu.com/p/f256866a2ebe

SSM小项目-(2)-配置整合SSM

有时配置文件会报错,主要是网络读取不到文件的原因。可以先clean project ,然后再重新update project。报错举例:

- schema_reference.4: Failed to read schema document 'http://www.springframework.org/schema/tx/spring- tx-4.3.xsd', because 1) could not find the document; 2) the document could not be read; 3) the root element of the document is not <xsd:schema>.

一、配置Web.xml

<?xml version="1.0" encoding="UTF-8"?>
<web-app xmlns:xsi="http://www.w3.org/2001/XMLSchema-instance"
	xmlns="http://java.sun.com/xml/ns/javaee"
	xsi:schemaLocation="http://java.sun.com/xml/ns/javaee http://java.sun.com/xml/ns/javaee/web-app_2_5.xsd"
	id="WebApp_ID" version="2.5">
	
	<!--1、启动Spring的容器  -->
	<!-- needed for ContextLoaderListener -->
	<context-param>
		<param-name>contextConfigLocation</param-name>
		<param-value>classpath:springIOC.xml</param-value>
	</context-param>

	<!-- Bootstraps the root web application context before servlet initialization -->
	<listener>
		<listener-class>org.springframework.web.context.ContextLoaderListener</listener-class>
	</listener>
	
	<!--2、springmvc的前端控制器,拦截所有请求  -->
	<!-- The front controller of this Spring Web application, responsible for handling all application requests -->
	<servlet>
		<servlet-name>springMVC</servlet-name>
		<servlet-class>org.springframework.web.servlet.DispatcherServlet</servlet-class>
		<load-on-startup>1</load-on-startup>
	</servlet>

	<!-- Map all requests to the DispatcherServlet for handling -->
	<servlet-mapping>
		<servlet-name>springMVC</servlet-name>
		<url-pattern>/</url-pattern>
	</servlet-mapping>
	
	<!-- 3、字符编码过滤器,一定要放在所有过滤器之前 -->
	<filter>
		<filter-name>CharacterEncodingFilter</filter-name>
		<filter-class>org.springframework.web.filter.CharacterEncodingFilter</filter-class>
		<init-param>
			<param-name>encoding</param-name>
			<param-value>utf-8</param-value>
		</init-param>
		<init-param>
			<param-name>forceRequestEncoding</param-name>
			<param-value>true</param-value>
		</init-param>
		<init-param>
			<param-name>forceResponseEncoding</param-name>
			<param-value>true</param-value>
		</init-param>
	</filter>
	<filter-mapping>
		<filter-name>CharacterEncodingFilter</filter-name>
		<url-pattern>/*</url-pattern>
	</filter-mapping>
	
	<!-- 4、使用Rest风格的URI,将页面普通的post请求转为指定的delete或者put请求 -->
	<filter>
		<filter-name>HiddenHttpMethodFilter</filter-name>
		<filter-class>org.springframework.web.filter.HiddenHttpMethodFilter</filter-class>
	</filter>
	<filter-mapping>
		<filter-name>HiddenHttpMethodFilter</filter-name>
		<url-pattern>/*</url-pattern>
	</filter-mapping>
<!-- 5、直接支持put请求的拦截器,即在put请求时将请求体数据封装成map,并让springmvc能够通过request.getParameter(属性名) 来获取数据 -->
	<filter>
		<filter-name>HttpPutFormContentFilter</filter-name>
		<filter-class>org.springframework.web.filter.HttpPutFormContentFilter</filter-class>
	</filter>
	<filter-mapping>
		<filter-name>HttpPutFormContentFilter</filter-name>
		<url-pattern>/*</url-pattern>
	</filter-mapping>
	
</web-app>

二、配置springmvc

与web.xml目录同级下创建,springMVC-servlet.xml ,这是根据web.xml中配置的springMVC 得来的。

<?xml version="1.0" encoding="UTF-8"?>
<beans xmlns="http://www.springframework.org/schema/beans"
	xmlns:xsi="http://www.w3.org/2001/XMLSchema-instance"
	xmlns:context="http://www.springframework.org/schema/context"
	xmlns:mvc="http://www.springframework.org/schema/mvc"
	xsi:schemaLocation="http://www.springframework.org/schema/mvc http://www.springframework.org/schema/mvc/spring-mvc-4.3.xsd
		http://www.springframework.org/schema/beans http://www.springframework.org/schema/beans/spring-beans-3.2.xsd
		http://www.springframework.org/schema/context http://www.springframework.org/schema/context/spring-context-4.3.xsd">

	<!--SpringMVC的配置文件,包含网站跳转逻辑的控制,配置  -->
	<context:component-scan base-package="com.ssm.crud" use-default-filters="false">
		<!--只扫描控制器。  -->
		<context:include-filter type="annotation" expression="org.springframework.stereotype.Controller"/>
	</context:component-scan>
	
	<!--配置视图解析器,方便页面返回  -->
	<bean class="org.springframework.web.servlet.view.InternalResourceViewResolver">
		<property name="prefix" value="/WEB-INF/views/"></property>
		<property name="suffix" value=".jsp"></property>
	</bean>
	
	<!--两个标准配置  -->
	<!-- 将springmvc不能处理的请求交给tomcat -->
	<mvc:default-servlet-handler/>
	<!-- 能支持springmvc更高级的一些功能,JSR303校验,快捷的ajax...映射动态请求 -->
	<mvc:annotation-driven/>

</beans>

三、配置spring容器

因为web.xml已经定义了:spring的容器名是 springIOC,路径是类的根目录。
所以开发的时候,就在src/main/resources  目录下创建 springIOC.xml 配置文件。 

<?xml version="1.0" encoding="UTF-8"?>
<beans xmlns="http://www.springframework.org/schema/beans"
	xmlns:xsi="http://www.w3.org/2001/XMLSchema-instance"
	xmlns:context="http://www.springframework.org/schema/context"
	xmlns:aop="http://www.springframework.org/schema/aop"
	xmlns:tx="http://www.springframework.org/schema/tx"
	xsi:schemaLocation="http://www.springframework.org/schema/aop http://www.springframework.org/schema/aop/spring-aop-4.3.xsd
		http://www.springframework.org/schema/beans http://www.springframework.org/schema/beans/spring-beans-3.2.xsd
		http://www.springframework.org/schema/tx http://www.springframework.org/schema/tx/spring-tx-4.3.xsd
		http://www.springframework.org/schema/context http://www.springframework.org/schema/context/spring-context-4.3.xsd">

	<context:component-scan base-package="com.ssm.crud">
		<context:exclude-filter type="annotation"
			expression="org.springframework.stereotype.Controller" />
	</context:component-scan>

	<!-- Spring的配置文件,这里主要配置和业务逻辑有关的 -->
	<!--=================== 数据源,事务控制,xxx ================-->
	<context:property-placeholder location="classpath:dbconfig.properties" />
	<bean id="pooledDataSource" class="org.springframework.jdbc.datasource.DriverManagerDataSource">
		<property name="url" value="${jdbc.url}" />
		<property name="driverClassName" value="${jdbc.driver}" />
		<property name="username" value="${jdbc.user}" />
		<property name="password" value="${jdbc.password}" />
	</bean>

	<!--================== 配置和MyBatis的整合=============== -->
	<bean id="sqlSessionFactory" class="org.mybatis.spring.SqlSessionFactoryBean">
		<!-- 指定mybatis全局配置文件的位置 -->
		<property name="configLocation" value="classpath:mybatis-config.xml"></property>
		<property name="dataSource" ref="pooledDataSource"></property>
		<!-- 指定mybatis,mapper文件的位置 -->
		<property name="mapperLocations" value="classpath:mapper/*.xml"></property>
	</bean>

	<!-- 配置扫描器,将mybatis接口的实现加入到ioc容器中 -->
	<bean class="org.mybatis.spring.mapper.MapperScannerConfigurer">
		<!--扫描所有dao接口的实现,加入到ioc容器中 -->
		<property name="basePackage" value="com.ssm.crud.mapper"></property>
	</bean>
	
	<!-- 配置一个可以执行批量的sqlSession -->
	<bean id="sqlSession" class="org.mybatis.spring.SqlSessionTemplate">
		<constructor-arg name="sqlSessionFactory" ref="sqlSessionFactory"></constructor-arg>
		<constructor-arg name="executorType" value="BATCH"></constructor-arg>
	</bean>
	<!--=============================================  -->

	<!-- ===============事务控制的配置 ================-->
	<bean id="transactionManager" class="org.springframework.jdbc.datasource.DataSourceTransactionManager">
		<!--控制住数据源  -->
		<property name="dataSource" ref="pooledDataSource"></property>
	</bean>
	<!--开启基于注解的事务,使用xml配置形式的事务(必要主要的都是使用配置式)  -->
	<aop:config>
		<!-- 切入点表达式  固定为:execution()  
		内部参数【 *(代表返回值类型所以)  com.ssm.crud.service..(代表这个包及下面的子包)  *(紧跟前面的这个星号,代表类中的所有方法)  (..)(紧跟前面的这个标记,代表方法里面的参数 任意多)  】-->
		<aop:pointcut expression="execution(* com.ssm.crud.service..*(..))" id="txPoint"/>
		<!-- 配置事务增强  txAdvice:代表事务切入规则  txPoint:代表切入哪些方法 -->
		<aop:advisor advice-ref="txAdvice" pointcut-ref="txPoint"/>
	</aop:config>
	
	<!--配置事务增强,也就是 事务如何切入  -->
	<tx:advice id="txAdvice" transaction-manager="transactionManager">
		<tx:attributes>
			<!-- 所有方法都是事务方法 -->
			<tx:method name="*"/>
			<!--以get开始的所有方法 ,认为都是查询方法,可以调优,写成 read only = true -->
			<tx:method name="get*" read-only="true"/>
		</tx:attributes>
	</tx:advice>
	
	<!-- Spring配置文件的核心点(数据源、与mybatis的整合,事务控制) -->
	
</beans>

四、配置mybatis.xml和数据库属性文件

mybatis-config.xml

<?xml version="1.0" encoding="UTF-8"?>
<!DOCTYPE configuration
  PUBLIC "-//mybatis.org//DTD Config 3.0//EN"
  "http://mybatis.org/dtd/mybatis-3-config.dtd">
<configuration>
	<settings>
		<setting name="mapUnderscoreToCamelCase" value="true"/>
	</settings>
	
	<typeAliases>
		<package name="com.ssm.crud.bean"/>
	</typeAliases>
	

</configuration>

dbconfig.properties

##### 	<!-- http://jingyan.baidu.com/article/b7001fe197a3f60e7282dd8d.html 中文数据库存取乱码问题 ,在 xml文件中 & 要转义成 &amp; 而到了properties中就直接用&就行了 -->
jdbc.url=jdbc:mysql://localhost:3306/ssm_crud?useUnicode=true&characterEncoding=UTF-8
jdbc.driver=com.mysql.jdbc.Driver
jdbc.user=root
jdbc.password=Cool123!

五、搭建数据库

tbl_emp

emp_id     emp_name   gender   email     d_id

tbl_dept

dept_id      dept_name

六、mybatis自动生成代码(MBG)

1、先导入mybatis-generator-core.jar 包。
在pom.xml中,添加依赖【前面已经添加好了】

<!-- MBG -->
<!-- https://mvnrepository.com/artifact/org.mybatis.generator/mybatis-generator-core -->
<dependency>
	<groupId>org.mybatis.generator</groupId>
	<artifactId>mybatis-generator-core</artifactId>
	<version>1.3.5</version>
</dependency>

2、添加 mbg.xml 配置文件

特别提醒:下面的路径写错的话,MBG 就会无法生成,虽然 运行没有报错。

linux系统下:  targetProject=”./src/main/java”
Windows系统下:targetProject=”.\src\main\java”

<?xml version="1.0" encoding="UTF-8"?>
<!DOCTYPE generatorConfiguration
  PUBLIC "-//mybatis.org//DTD MyBatis Generator Configuration 1.0//EN"
  "http://mybatis.org/dtd/mybatis-generator-config_1_0.dtd">
<generatorConfiguration>

	<context id="DB2Tables" targetRuntime="MyBatis3">
		<commentGenerator>
			<property name="suppressAllComments" value="true" />
		</commentGenerator>
		<!-- 配置数据库连接 -->
		<jdbcConnection 
		    driverClass="com.mysql.jdbc.Driver"
			connectionURL="jdbc:mysql://localhost:3306/ssm_crud" 
			userId="root"
			password="Cool123!">
		</jdbcConnection>

		<javaTypeResolver>
			<property name="forceBigDecimals" value="false" />
		</javaTypeResolver>

		<!-- 指定javaBean生成的位置 -->
		<javaModelGenerator 
		    targetPackage="com.ssm.crud.bean"
			targetProject="./src/main/java">
			<property name="enableSubPackages" value="true" />
			<property name="trimStrings" value="true" />
		</javaModelGenerator>

		<!--指定sql映射文件生成的位置 -->
		<sqlMapGenerator 
	    	targetPackage="mapper" 
		    targetProject="./src/main/resources">
			<property name="enableSubPackages" value="true" />
		</sqlMapGenerator>

		<!-- 指定dao接口生成的位置,mapper接口 -->
		<javaClientGenerator 
		    type="XMLMAPPER"
			targetPackage="com.ssm.crud.mapper" 
			targetProject="./src/main/java">
			<property name="enableSubPackages" value="true" />
		</javaClientGenerator>


		<!-- table指定每个表的生成策略 -->
		<table tableName="tbl_emp" domainObjectName="Employee"></table>
		<table tableName="tbl_dept" domainObjectName="Department"></table>
	</context>
</generatorConfiguration>

3、执行生成代码

package com.ssm.crud.test;

import java.io.File;
import java.util.ArrayList;
import java.util.List;

import org.mybatis.generator.api.MyBatisGenerator;
import org.mybatis.generator.config.Configuration;
import org.mybatis.generator.config.xml.ConfigurationParser;
import org.mybatis.generator.internal.DefaultShellCallback;

public class MBGTest {

	public static void main(String[] args) throws Exception {
		List<String> warnings = new ArrayList<String>();
		boolean overwrite = true;
		File configFile = new File("mbg.xml");
		ConfigurationParser cp = new ConfigurationParser(warnings);
		Configuration config = cp.parseConfiguration(configFile);
		DefaultShellCallback callback = new DefaultShellCallback(overwrite);
		MyBatisGenerator myBatisGenerator = new MyBatisGenerator(config,
				callback, warnings);
		myBatisGenerator.generate(null);
		System.out.println("hhh");
	}
}

七、修改mybatis的生成文件实现关联查询

目的是使:查询employee时,能够顺便获取到 department。

1、修改bean

Employee.java

package com.ssm.crud.bean;

public class Employee {
    private Integer empId;

    private String empName;

    private String gender;

    private String email;

    private Integer dId;

    public Integer getEmpId() {
        return empId;
    }

    public void setEmpId(Integer empId) {
        this.empId = empId;
    }

    public String getEmpName() {
        return empName;
    }

    public void setEmpName(String empName) {
        this.empName = empName == null ? null : empName.trim();
    }

    public String getGender() {
        return gender;
    }

    public void setGender(String gender) {
        this.gender = gender == null ? null : gender.trim();
    }

    public String getEmail() {
        return email;
    }

    public void setEmail(String email) {
        this.email = email == null ? null : email.trim();
    }

    public Integer getdId() {
        return dId;
    }

    public void setdId(Integer dId) {
        this.dId = dId;
    }
    
    //添加 Department 属性,用于关联查询
    private Department department;

	public Department getDepartment() {
		return department;
	}

	public void setDepartment(Department department) {
		this.department = department;
	}


	//生成自定义构造器 ,顺便 附带 无参构造器
	public Employee(Integer empId, String empName, String gender, String email, Integer dId) {
		super();
		this.empId = empId;
		this.empName = empName;
		this.gender = gender;
		this.email = email;
		this.dId = dId;
	}

	public Employee() {
		super();
	}
	
	
}

Department.java

package com.ssm.crud.bean;

public class Department {
    private Integer deptId;

    private String deptName;

    public Integer getDeptId() {
        return deptId;
    }

    public void setDeptId(Integer deptId) {
        this.deptId = deptId;
    }

    public String getDeptName() {
        return deptName;
    }

    public void setDeptName(String deptName) {
        this.deptName = deptName == null ? null : deptName.trim();
    }

    
    //创建构造器时,一定要带上 无参构造器,出于mybatis的 赋值原因
	public Department(Integer deptId, String deptName) {
		super();
		this.deptId = deptId;
		this.deptName = deptName;
	}
    
    public Department(){
    	
    }
}

2、修改Dao接口文件

package com.ssm.crud.mapper;

import com.ssm.crud.bean.Employee;
import com.ssm.crud.bean.EmployeeExample;
import java.util.List;
import org.apache.ibatis.annotations.Param;

public interface EmployeeMapper {
    long countByExample(EmployeeExample example);

    int deleteByExample(EmployeeExample example);

    int deleteByPrimaryKey(Integer empId);

    int insert(Employee record);

    int insertSelective(Employee record);

    List<Employee> selectByExample(EmployeeExample example);

    Employee selectByPrimaryKey(Integer empId);

    int updateByExampleSelective(@Param("record") Employee record, @Param("example") EmployeeExample example);

    int updateByExample(@Param("record") Employee record, @Param("example") EmployeeExample example);

    int updateByPrimaryKeySelective(Employee record);

    int updateByPrimaryKey(Employee record);
    
    
    // 为了 提供 关联查询,自己添加的 两个接口 方法
    List<Employee> selectByExampleWithDept(EmployeeExample example);
    Employee selectByPrimaryKeyWithDept(Integer empId);
}

3、修改sql映射文件

<?xml version="1.0" encoding="UTF-8"?>
<!DOCTYPE mapper PUBLIC "-//mybatis.org//DTD Mapper 3.0//EN" "http://mybatis.org/dtd/mybatis-3-mapper.dtd">
<mapper namespace="com.ssm.crud.mapper.EmployeeMapper">
  <resultMap id="BaseResultMap" type="com.ssm.crud.bean.Employee">
    <id column="emp_id" jdbcType="INTEGER" property="empId" />
    <result column="emp_name" jdbcType="VARCHAR" property="empName" />
    <result column="gender" jdbcType="CHAR" property="gender" />
    <result column="email" jdbcType="VARCHAR" property="email" />
    <result column="d_id" jdbcType="INTEGER" property="dId" />
  </resultMap>
  <sql id="Example_Where_Clause">
    <where>
      <foreach collection="oredCriteria" item="criteria" separator="or">
        <if test="criteria.valid">
          <trim prefix="(" prefixOverrides="and" suffix=")">
            <foreach collection="criteria.criteria" item="criterion">
              <choose>
                <when test="criterion.noValue">
                  and ${criterion.condition}
                </when>
                <when test="criterion.singleValue">
                  and ${criterion.condition} #{criterion.value}
                </when>
                <when test="criterion.betweenValue">
                  and ${criterion.condition} #{criterion.value} and #{criterion.secondValue}
                </when>
                <when test="criterion.listValue">
                  and ${criterion.condition}
                  <foreach close=")" collection="criterion.value" item="listItem" open="(" separator=",">
                    #{listItem}
                  </foreach>
                </when>
              </choose>
            </foreach>
          </trim>
        </if>
      </foreach>
    </where>
  </sql>
  <sql id="Update_By_Example_Where_Clause">
    <where>
      <foreach collection="example.oredCriteria" item="criteria" separator="or">
        <if test="criteria.valid">
          <trim prefix="(" prefixOverrides="and" suffix=")">
            <foreach collection="criteria.criteria" item="criterion">
              <choose>
                <when test="criterion.noValue">
                  and ${criterion.condition}
                </when>
                <when test="criterion.singleValue">
                  and ${criterion.condition} #{criterion.value}
                </when>
                <when test="criterion.betweenValue">
                  and ${criterion.condition} #{criterion.value} and #{criterion.secondValue}
                </when>
                <when test="criterion.listValue">
                  and ${criterion.condition}
                  <foreach close=")" collection="criterion.value" item="listItem" open="(" separator=",">
                    #{listItem}
                  </foreach>
                </when>
              </choose>
            </foreach>
          </trim>
        </if>
      </foreach>
    </where>
  </sql>
  <sql id="Base_Column_List">
    emp_id, emp_name, gender, email, d_id
  </sql>
  
  <!-- 自动创建的是 查询员工不带部门信息的 -->
  <select id="selectByExample" parameterType="com.ssm.crud.bean.EmployeeExample" resultMap="BaseResultMap">
    select
    <if test="distinct">
      distinct
    </if>
    <include refid="Base_Column_List" />
    from tbl_emp
    <if test="_parameter != null">
      <include refid="Example_Where_Clause" />
    </if>
    <if test="orderByClause != null">
      order by ${orderByClause}
    </if>
  </select>
  <select id="selectByPrimaryKey" parameterType="java.lang.Integer" resultMap="BaseResultMap">
    select 
    <include refid="Base_Column_List" />
    from tbl_emp
    where emp_id = #{empId,jdbcType=INTEGER}
  </select>
  <delete id="deleteByPrimaryKey" parameterType="java.lang.Integer">
    delete from tbl_emp
    where emp_id = #{empId,jdbcType=INTEGER}
  </delete>
  <delete id="deleteByExample" parameterType="com.ssm.crud.bean.EmployeeExample">
    delete from tbl_emp
    <if test="_parameter != null">
      <include refid="Example_Where_Clause" />
    </if>
  </delete>
  <insert id="insert" parameterType="com.ssm.crud.bean.Employee">
    insert into tbl_emp (emp_id, emp_name, gender, 
      email, d_id)
    values (#{empId,jdbcType=INTEGER}, #{empName,jdbcType=VARCHAR}, #{gender,jdbcType=CHAR}, 
      #{email,jdbcType=VARCHAR}, #{dId,jdbcType=INTEGER})
  </insert>
  <insert id="insertSelective" parameterType="com.ssm.crud.bean.Employee">
    insert into tbl_emp
    <trim prefix="(" suffix=")" suffixOverrides=",">
      <if test="empId != null">
        emp_id,
      </if>
      <if test="empName != null">
        emp_name,
      </if>
      <if test="gender != null">
        gender,
      </if>
      <if test="email != null">
        email,
      </if>
      <if test="dId != null">
        d_id,
      </if>
    </trim>
    <trim prefix="values (" suffix=")" suffixOverrides=",">
      <if test="empId != null">
        #{empId,jdbcType=INTEGER},
      </if>
      <if test="empName != null">
        #{empName,jdbcType=VARCHAR},
      </if>
      <if test="gender != null">
        #{gender,jdbcType=CHAR},
      </if>
      <if test="email != null">
        #{email,jdbcType=VARCHAR},
      </if>
      <if test="dId != null">
        #{dId,jdbcType=INTEGER},
      </if>
    </trim>
  </insert>
  <select id="countByExample" parameterType="com.ssm.crud.bean.EmployeeExample" resultType="java.lang.Long">
    select count(*) from tbl_emp
    <if test="_parameter != null">
      <include refid="Example_Where_Clause" />
    </if>
  </select>
  <update id="updateByExampleSelective" parameterType="map">
    update tbl_emp
    <set>
      <if test="record.empId != null">
        emp_id = #{record.empId,jdbcType=INTEGER},
      </if>
      <if test="record.empName != null">
        emp_name = #{record.empName,jdbcType=VARCHAR},
      </if>
      <if test="record.gender != null">
        gender = #{record.gender,jdbcType=CHAR},
      </if>
      <if test="record.email != null">
        email = #{record.email,jdbcType=VARCHAR},
      </if>
      <if test="record.dId != null">
        d_id = #{record.dId,jdbcType=INTEGER},
      </if>
    </set>
    <if test="_parameter != null">
      <include refid="Update_By_Example_Where_Clause" />
    </if>
  </update>
  <update id="updateByExample" parameterType="map">
    update tbl_emp
    set emp_id = #{record.empId,jdbcType=INTEGER},
      emp_name = #{record.empName,jdbcType=VARCHAR},
      gender = #{record.gender,jdbcType=CHAR},
      email = #{record.email,jdbcType=VARCHAR},
      d_id = #{record.dId,jdbcType=INTEGER}
    <if test="_parameter != null">
      <include refid="Update_By_Example_Where_Clause" />
    </if>
  </update>
  <update id="updateByPrimaryKeySelective" parameterType="com.ssm.crud.bean.Employee">
    update tbl_emp
    <set>
      <if test="empName != null">
        emp_name = #{empName,jdbcType=VARCHAR},
      </if>
      <if test="gender != null">
        gender = #{gender,jdbcType=CHAR},
      </if>
      <if test="email != null">
        email = #{email,jdbcType=VARCHAR},
      </if>
      <if test="dId != null">
        d_id = #{dId,jdbcType=INTEGER},
      </if>
    </set>
    where emp_id = #{empId,jdbcType=INTEGER}
  </update>
  <update id="updateByPrimaryKey" parameterType="com.ssm.crud.bean.Employee">
    update tbl_emp
    set emp_name = #{empName,jdbcType=VARCHAR},
      gender = #{gender,jdbcType=CHAR},
      email = #{email,jdbcType=VARCHAR},
      d_id = #{dId,jdbcType=INTEGER}
    where emp_id = #{empId,jdbcType=INTEGER}
  </update>
  
  
   <!--  ****** 自定义的 带部门信息 的两种查询  ******  -->
   <sql id="WithDept_Column_List">
  	e.emp_id, e.emp_name, e.gender, e.email, e.d_id,d.dept_id,d.dept_name
  </sql>
   <!--   List<Employee> selectByExampleWithDept(EmployeeExample example);
    Employee selectByPrimaryKeyWithDept(Integer empId); 
    -->
 <resultMap type="com.ssm.crud.bean.Employee" id="WithDeptResultMap">
  	<id column="emp_id" jdbcType="INTEGER" property="empId" />
    <result column="emp_name" jdbcType="VARCHAR" property="empName" />
    <result column="gender" jdbcType="CHAR" property="gender" />
    <result column="email" jdbcType="VARCHAR" property="email" />
    <result column="d_id" jdbcType="INTEGER" property="dId" />
    <!-- 指定联合查询出的部门字段的封装 -->
    <association property="department" javaType="com.ssm.crud.bean.Department">
    	<id column="dept_id" property="deptId"/>
    	<result column="dept_name" property="deptName"/>
    </association>
  </resultMap>
   <!-- 查询员工同时带部门信息 -->
  <select id="selectByExampleWithDept" resultMap="WithDeptResultMap">
	   select
	    <if test="distinct">
	      distinct
	    </if>
	    <include refid="WithDept_Column_List" />
		FROM tbl_emp e
		left join tbl_dept d on e.`d_id`=d.`dept_id`
	    <if test="_parameter != null">
	      <include refid="Example_Where_Clause" />
	    </if>
	    <if test="orderByClause != null">
	      order by ${orderByClause}
	    </if>
  </select>
  <select id="selectByPrimaryKeyWithDept" resultMap="WithDeptResultMap">
   	select 
    <include refid="WithDept_Column_List" />
    FROM tbl_emp e
	left join tbl_dept d on e.`d_id`=d.`dept_id`
    where emp_id = #{empId,jdbcType=INTEGER}
  </select>
  
  
</mapper>

八、Junit单元测试

需要在Maven中的pom.xml中,导入 junit.jar 包。

  <!--  一开始这里初始化 Junit 版本为3 ,
        当 eclipse 创建测试用例时,我选4版本的用例,发现又添加了Junit4 依赖包
        为了统一,我就在这里 改成 Juin4 依赖包,这样 eclipse创建 单元测试时就不会 重新添加依赖包了 -->
        <!-- https://mvnrepository.com/artifact/junit/junit -->
        <dependency>
            <groupId>junit</groupId>
            <artifactId>junit</artifactId>
            <version>4.12</version>
            <scope>test</scope>
        </dependency>

方法一:代码加载spring容器

package com.ssm.crud.test;

import java.io.IOException;
import org.junit.Test;
import org.springframework.context.ApplicationContext;
import org.springframework.context.support.ClassPathXmlApplicationContext;
import com.ssm.crud.mapper.DepartmentMapper;
import com.ssm.crud.mapper.EmployeeMapper;


public class CodeTest {
	
	DepartmentMapper departmentMapper;

	@Test
	public void testCRUD() throws IOException{

	    //1、创建SpringIOC容器  ,这个地方 却可以 正确加载 路径 xxx/target/classes/springIOC.xml
		
		//1、创建SpringIOC容器
		ApplicationContext ioc = new ClassPathXmlApplicationContext("springIOC.xml");
		//2、从容器中获取mapper
		EmployeeMapper bean = ioc.getBean(EmployeeMapper.class);
		
		System.out.println(bean.selectByPrimaryKey(1));
       		
	}

}

方法二:自动加载spring容器

需要在Maven的pom.xml中导入 spring-test.jar 包。

<!--Spring-test 单元测试 适配框架,用于在单元测试时,无需初始化就可以使用Spring 容器,及Spring注解 -->
<!-- https://mvnrepository.com/artifact/org.springframework/spring-test -->
<dependency>
	<groupId>org.springframework</groupId>
	<artifactId>spring-test</artifactId>
	<version>4.3.7.RELEASE</version>
</dependency>
package com.ssm.crud.test;

import java.io.IOException;

import org.apache.ibatis.session.SqlSession;
import org.junit.Test;
import org.junit.runner.RunWith;
import org.springframework.beans.factory.annotation.Autowired;
import org.springframework.test.context.ContextConfiguration;
import org.springframework.test.context.junit4.SpringJUnit4ClassRunner;

import com.ssm.crud.mapper.DepartmentMapper;
import com.ssm.crud.mapper.EmployeeMapper;


/**
 * 测试dao层的工作
 * @author lfy
 *推荐Spring的项目就可以使用Spring的单元测试,可以自动注入我们需要的组件
 *1、导入SpringTest模块
 *2、@ContextConfiguration指定Spring配置文件的位置
 *3、直接autowired要使用的组件即可
 */

//@RunWith这个是 junit-4.jar包 提供的注解, 而 SpringJUnit4ClassRunner.class 是spring-test 提供的类
@RunWith(SpringJUnit4ClassRunner.class)

//@ContextConfiguration 这个是 spring-test.jar包 提供的注解 , 用于启动 spring容器,方便直接获取spring容器中的bean
@ContextConfiguration(locations={"classpath:springIOC.xml"})
public class AnnotationTest {
	
	
	@Autowired
	DepartmentMapper departmentMapper;
	
	@Autowired
	EmployeeMapper employeeMapper;
	
	@Autowired
	SqlSession sqlSession;
	

	/**
	 * 测试DepartmentMapper
	 */

	@Test
	public void testCRUD() throws IOException{
	    

          System.out.println(employeeMapper.selectByPrimaryKey(1));


		//1、插入几个部门
		departmentMapper.insertSelective(new Department(null, "开发部"));
		departmentMapper.insertSelective(new Department(null, "测试部"));
		
		//2、生成员工数据,测试员工插入
		employeeMapper.insertSelective(new Employee(null, "Jerry", "M", "[email protected]", 1));
		
		//3、批量插入多个员工;批量,使用可以执行批量操作的sqlSession。
		
//		for(){
//			employeeMapper.insertSelective(new Employee(null, , "M", "[email protected]", 1));
//		}
		EmployeeMapper mapper = sqlSession.getMapper(EmployeeMapper.class);
		for(int i = 0;i<1000;i++){
			String uid = UUID.randomUUID().toString().substring(0,5)+i;
			mapper.insertSelective(new Employee(null,uid, "M", uid+"@atguigu.com", 1));
		}
		System.out.println("批量完成");


	}

}

ps:关于加载log4j,也可以采用如下方法

public class JUnit4ClassRunner extends SpringJUnit4ClassRunner {
    static {
      try {
        // classpath 是 二进制 class文件 的执行根路径
        Log4jConfigurer.initLogging("classpath:log4j.xml");
      } catch (FileNotFoundException ex) {
        System.err.println("Cannot Initialize log4j");
      }
    }
    public JUnit4ClassRunner(Class<?> clazz) throws InitializationError {
      super(clazz);
    }
  }
@RunWith(JUnit4ClassRunner.class)
@ContextConfiguration(locations = "classpath:springIOC.xml")

public class AnnotationTest {
    ...
}

Junit加载spring的runner(SpringJUnit4ClassRunner)要优先于spring加载log4j【log4j的自动默认加载功能】,因此采用普通方法,无法实现spring先加载log4j后被Junit加载。所以我们需要新建JUnit4ClassRunner类,修改SpringJUnit4ClassRunner加载log4j的策略。这样加载log4j就会优先于加载spring了。

数据库单元测试通过以后,就可以开始写web页面了。