最新方法搭建maven工程

特别注意:以下这一大块文字是后期修改勘误的,maven工程新建时应该选择:webapp项目,这样后面就会自动出现,web-xml文件和目录了。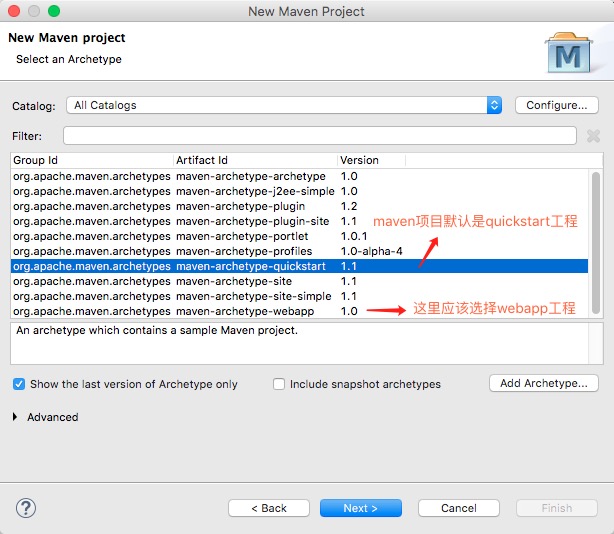
本文章下面的配置使系统自动生成WebContent目录,其实这个操作不需要,可以直接删除WebContent目录,然后运行maven clean,maven update project 来重建web 目录 ,修复项目错误,因为maven的web工程自带了src/main/webapp/WEB-INF/web.xml,以后所有的web文件都可以直接放到web-app目录中。
此外我这里默认生成的webapp/WEB-INF/web.xml 是2.3版本的。
<!DOCTYPE web-app PUBLIC
 "-//Sun Microsystems, Inc.//DTD Web Application 2.3//EN"
 "http://java.sun.com/dtd/web-app_2_3.dtd" >

<web-app>
  <display-name>Archetype Created Web Application</display-name>
</web-app>
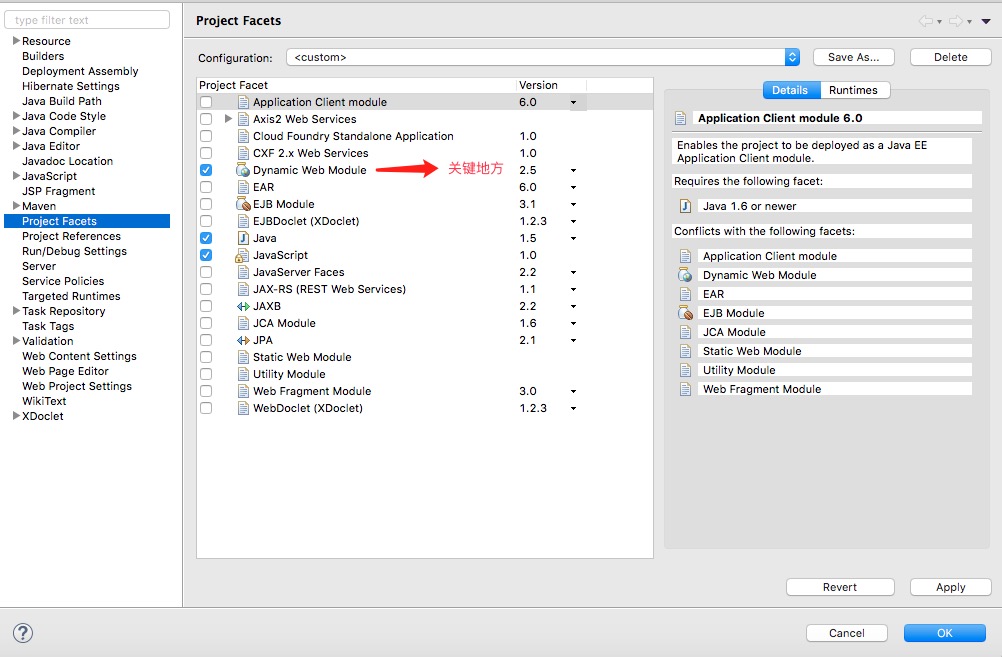
如果要修改的话,可以参看下文中的 可以点击项目,右键Properties 找到 Project Facet , 找到 Dynamic web 可以选择 3.1 版本,点击保存。但是因为bug,好像修改不了web.xml的里面的版本号。怎么办:
第一步:找到项目文件夹:有一个隐藏文件夹 .setting
查看隐藏文件夹下的文件:

org.eclipse.core.resources.prefs
org.eclipse.jdt.core.prefs
org.eclipse.m2e.core.prefs
org.eclipse.wst.common.component
org.eclipse.wst.common.project.facet.core.xml
org.eclipse.wst.jsdt.ui.superType.container
org.eclipse.wst.jsdt.ui.superType.name
org.eclipse.wst.validation.prefs

需要修改的文件是 org.eclipse.wst.common.project.facet.core.xml

<?xml version="1.0" encoding="UTF-8"?>
<faceted-project>
  <fixed facet="wst.jsdt.web"/>
  <installed facet="java" version="1.7"/>
  <installed facet="jst.web" version="2.3"/>
  <installed facet="wst.jsdt.web" version="1.0"/>
</faceted-project>

将它改成:

<?xml version="1.0" encoding="UTF-8"?>
<faceted-project>
  <fixed facet="wst.jsdt.web"/>
  <installed facet="java" version="1.7"/>
  <installed facet="jst.web" version="3.1"/>
  <installed facet="wst.jsdt.web" version="1.0"/>
</faceted-project>
第二步:在web.xml中,用3.1的版本信息,替换掉2.3的版本信息。
<?xml version="1.0" encoding="UTF-8"?>
<web-app xmlns:xsi="http://www.w3.org/2001/XMLSchema-instance" xmlns="http://xmlns.jcp.org/xml/ns/javaee" xsi:schemaLocation="http://xmlns.jcp.org/xml/ns/javaee http://xmlns.jcp.org/xml/ns/javaee/web-app_3_1.xsd" id="WebApp_ID" version="3.1">
  <display-name>Archetype Created Web Application</display-name>

</web-app>
参考自:创建maven项目是其中的group id和artifact id怎么填写
groupid和artifactId被统称为“坐标”是为了保证项目唯一性而提出的,如果你要把你项目弄到maven本地仓库去,你想要找到你的项目就必须根据这两个id去查找。
groupId一般分为多个段,这里我只说两段,第一段为域,第二段为公司名称。域又分为org、com、cn等等许多,其中org为非营利组织,com为商业组织。举个apache公司的tomcat项目例子:这个项目的groupId是org.apache,它的域是org(因为tomcat是非营利项目),公司名称是apache,artigactId是tomcat。
比如我创建一个项目,我一般会将groupId设置为cn.pq,cn表示域为中国,pq是我个人姓名缩写,artifactId设置为testProj,表示你这个项目的名称是testProj,依照这个设置,你的包结构最好是cn.pq.testProj打头的,如果有个StudentPeng,它的全路径就是cn.pq.testProj.StudentPeng
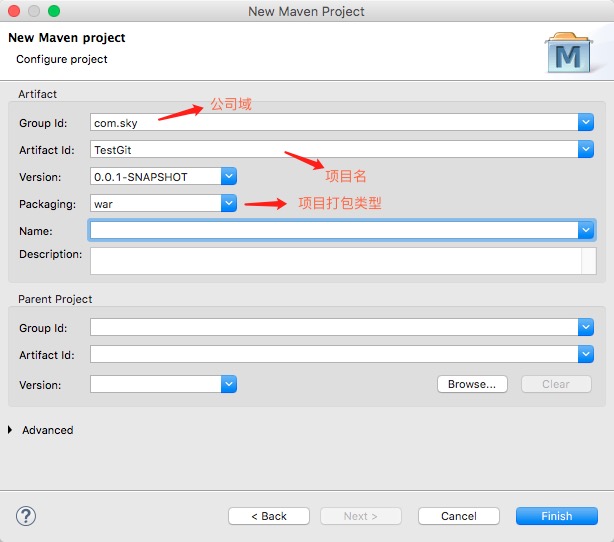
参考自:maven中packing类型 jar、war、pom 的区别
pom是maven依赖文件
jar是java普通项目打包
war是java web项目打包
pom:打出来可以作为其他项目的maven依赖,在工程A中添加工程B的pom,A就可以使用B中的类。用在父级工程或聚合工程中。用来做jar包的版本控制。
jar包:通常是开发时要引用通用类,打成jar包便于存放管理。当你使用某些功能时就需要这些jar包的支持,需要导入jar包。
war包:是做好一个web网站后,打成war包部署到服务器。目的是节省资源,提供效率。
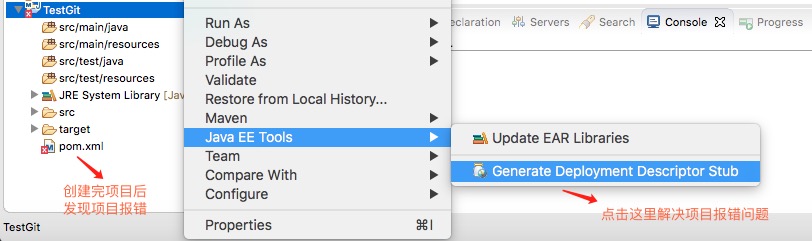
解决新创建的项目:报错问题
一、搭建并配置Maven工程
下面的的1-3小步 搭建maven工程方法已经被淘汰了,请看上面的搭建方法。
1、eclipse里面 右键新建 Maven工程,选择 maven-archetype-quickstart

2、如果项目有错误,可以点击项目,右键maven –> update project
3、如果项目缺失 web.xml可以点击项目,右键Properties 找到 Project Facet 取消勾选 Dynamic web,然后重新勾选。【可能勾选后,窗口底部有个配置网站链接,点进去可以自动生成web.xml】这样就会出现 web.xml了。
4、关于maven的 镜像 和 JDK 配置
在整个eclipse的属性配置中,点击maven,会有User Settings 对话框;用来配置用户范围内的maven 属性。为了统一和方便,这里配置了镜像和 指定了jdk环境。【maven 中的 settings 文件,因为eclipse中没有自带,需要自己先下载maven,然后拷贝到相关目录。然后才能 编辑 相关配置】

因为目前的maven配置规则 都是1.0.0版本,所以配置文件都是通用的。【如下所示:】
xmlns="http://maven.apache.org/SETTINGS/1.0.0
settings配置如下:
配置镜像:
<mirrors>

    <mirror>
      <id>alimaven</id>
      <name>aliyun maven</name>
      <url>http://maven.aliyun.com/nexus/content/groups/public/</url>
      <mirrorOf>central</mirrorOf>
    </mirror>

 </mirrors>
指定jdk:
<profiles>

<profile>
    <id>jdk17</id>
    <activation>
        <activeByDefault>true</activeByDefault>
        <jdk>1.7</jdk>
    </activation>
    <properties>
        <maven.compiler.source>1.7</maven.compiler.source>
        <maven.compiler.target>1.7</maven.compiler.target>
        <maven.compiler.compilerVersion>1.7</maven.compiler.compilerVersion>
    </properties>
</profile>
    <profile>
    <id>jdk17</id>
    <activation>
        <activeByDefault>true</activeByDefault>
        <jdk>1.7</jdk>
    </activation>
    <properties>
        <maven.compiler.source>1.7</maven.compiler.source>
        <maven.compiler.target>1.7</maven.compiler.target>
        <maven.compiler.compilerVersion>1.7</maven.compiler.compilerVersion>
    </properties>
</profile>

</profiles>
二、引入SSM依赖包
maven项目内的pom.xml配置文件中,可以配置 <dependency>来配置依赖。
特别注意:下面的这个依赖项可以不添加。
 <!-- https://mvnrepository.com/artifact/javax.servlet/javax.servlet-api -->
 <!-- 因为servlet包 在服务器 上是有的,在开发中没有 提供,所以这里 填scope标签,用来通知发布软件时,不需要把这个包打入到项目中。 -->
 <dependency>
 <groupId>javax.servlet</groupId>
 <artifactId>javax.servlet-api</artifactId>
 <version>3.0.1</version>
 <scope>provided</scope>
 </dependency>
因为只要在web项目中的build path中,add library –>server runtime–>Apache tomcat 添加好后,就有了 servlet 依赖了。
下面是具体的在pom.xml中配置<dependency>依赖项的过程:
<project xmlns="http://maven.apache.org/POM/4.0.0" xmlns:xsi="http://www.w3.org/2001/XMLSchema-instance"
	xsi:schemaLocation="http://maven.apache.org/POM/4.0.0 http://maven.apache.org/xsd/maven-4.0.0.xsd">
	<modelVersion>4.0.0</modelVersion>

	<groupId>com</groupId>
	<artifactId>ssm.crud</artifactId>
	<version>0.0.1-SNAPSHOT</version>
	<packaging>war</packaging>

	<name>ssm.crud</name>
	<url>http://maven.apache.org</url>

	<properties>
		<project.build.sourceEncoding>UTF-8</project.build.sourceEncoding>
	</properties>


	<!--引入项目依赖的jar包 -->
	<!-- SpringMVC、Spring -->
	<!-- https://mvnrepository.com/artifact/org.springframework/spring-webmvc -->
	<dependencies>

       <!-- https://mvnrepository.com/artifact/org.apache.logging.log4j/log4j-core -->
       <dependency>
           <groupId>org.apache.logging.log4j</groupId>
           <artifactId>log4j-core</artifactId>
           <version>2.11.1</version>
        </dependency>


	<!--引入pageHelper分页插件 -->
	<!-- https://mvnrepository.com/artifact/com.github.pagehelper/pagehelper -->
        <dependency>
            <groupId>com.github.pagehelper</groupId>
            <artifactId>pagehelper</artifactId>
            <version>5.1.7</version>
        </dependency>

		<!-- MBG -->
		<!-- https://mvnrepository.com/artifact/org.mybatis.generator/mybatis-generator-core -->
		<dependency>
			<groupId>org.mybatis.generator</groupId>
			<artifactId>mybatis-generator-core</artifactId>
			<version>1.3.5</version>
		</dependency>


		<dependency>
			<groupId>org.springframework</groupId>
			<artifactId>spring-webmvc</artifactId>
			<version>4.3.7.RELEASE</version>
		</dependency>

		<!-- 返回json字符串的支持 -->
		<!-- https://mvnrepository.com/artifact/com.fasterxml.jackson.core/jackson-databind -->
		<dependency>
			<groupId>com.fasterxml.jackson.core</groupId>
			<artifactId>jackson-databind</artifactId>
			<version>2.8.8</version>
		</dependency>

		<!--JSR303数据校验支持;tomcat7及以上的服务器, tomcat7以下的服务器:el表达式。额外给服务器的lib包中替换新的标准的el -->
		<!-- https://mvnrepository.com/artifact/org.hibernate/hibernate-validator -->
		<dependency>
			<groupId>org.hibernate</groupId>
			<artifactId>hibernate-validator</artifactId>
			<version>5.4.1.Final</version>
		</dependency>


		<!--Spring-test 单元测试 适配框架,用于在单元测试时,无需初始化就可以使用Spring 容器,及Spring注解 -->
		<!-- https://mvnrepository.com/artifact/org.springframework/spring-test -->
		<dependency>
			<groupId>org.springframework</groupId>
			<artifactId>spring-test</artifactId>
			<version>4.3.7.RELEASE</version>
		</dependency>


		<!-- Spring面向切面编程 -->
		<!-- https://mvnrepository.com/artifact/org.springframework/spring-aspects -->
		<dependency>
			<groupId>org.springframework</groupId>
			<artifactId>spring-aspects</artifactId>
			<version>4.3.7.RELEASE</version>
		</dependency>

		<!--MyBatis -->
		<!-- https://mvnrepository.com/artifact/org.mybatis/mybatis -->
		<dependency>
			<groupId>org.mybatis</groupId>
			<artifactId>mybatis</artifactId>
			<version>3.4.2</version>
		</dependency>
		<!-- MyBatis整合Spring的适配包 -->
		<!-- https://mvnrepository.com/artifact/org.mybatis/mybatis-spring -->
		<dependency>
			<groupId>org.mybatis</groupId>
			<artifactId>mybatis-spring</artifactId>
			<version>1.3.1</version>
		</dependency>

		<!-- 数据库连接池、驱动 -->
		<!-- Spring-Jdbc -->
		<!-- https://mvnrepository.com/artifact/org.springframework/spring-jdbc -->
		<dependency>
			<groupId>org.springframework</groupId>
			<artifactId>spring-jdbc</artifactId>
			<version>4.3.7.RELEASE</version>
		</dependency>

		<!-- https://mvnrepository.com/artifact/mysql/mysql-connector-java -->
		<dependency>
			<groupId>mysql</groupId>
			<artifactId>mysql-connector-java</artifactId>
			<version>5.1.41</version>
		</dependency>
		<!-- (jstl,servlet-api,junit) -->
		<!-- https://mvnrepository.com/artifact/jstl/jstl -->
		<dependency>
			<groupId>jstl</groupId>
			<artifactId>jstl</artifactId>
			<version>1.2</version>
		</dependency>

		<!-- https://mvnrepository.com/artifact/javax.servlet/javax.servlet-api -->
		<!-- 因为servlet包 在服务器 上是有的,在开发中没有 提供,所以这里 填scope标签,用来通知发布软件时,不需要把这个包打入到项目中。 -->
		<dependency>
			<groupId>javax.servlet</groupId>
			<artifactId>javax.servlet-api</artifactId>
			<version>3.0.1</version>
			<scope>provided</scope>
		</dependency>


        <!--  一开始这里初始化 Junit 版本为3 ,
        当 eclipse 创建测试用例时,我选4版本的用例,发现又添加了Junit4 依赖包
        为了统一,我就在这里 改成 Juin4 依赖包,这样 eclipse创建 单元测试时就不会 重新添加依赖包了 -->
        <!-- https://mvnrepository.com/artifact/junit/junit -->
        <dependency>
            <groupId>junit</groupId>
            <artifactId>junit</artifactId>
            <version>4.12</version>
            <scope>test</scope>
        </dependency>


	</dependencies>
</project>
三、引入前端框架
采用bootstrap框架:需要jQuery 支持。
bootstrap框架:包括【js、css、fonts】三个文件夹。
四、Maven项目概览
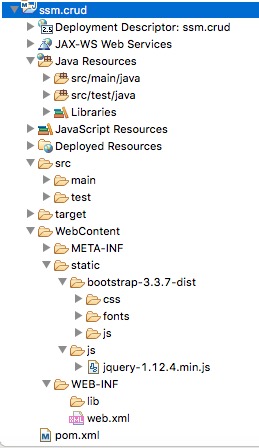
注意web文件放在 WebContent中,在eclipse中可以正常运行。但是用maven打包时失败了,所以web文件应该放在:src/main/webapp 目录下,这样平时的运行和打包都能成功。详见本系列最后一篇文章。
五、添加src/main/resources 目录
一般maven项目,我们会看到这个目录:src/main/resources ,这个怎么操作呢。我们举例一下:
1、项目右键 build path / configure build path
2、点击 Add Folder
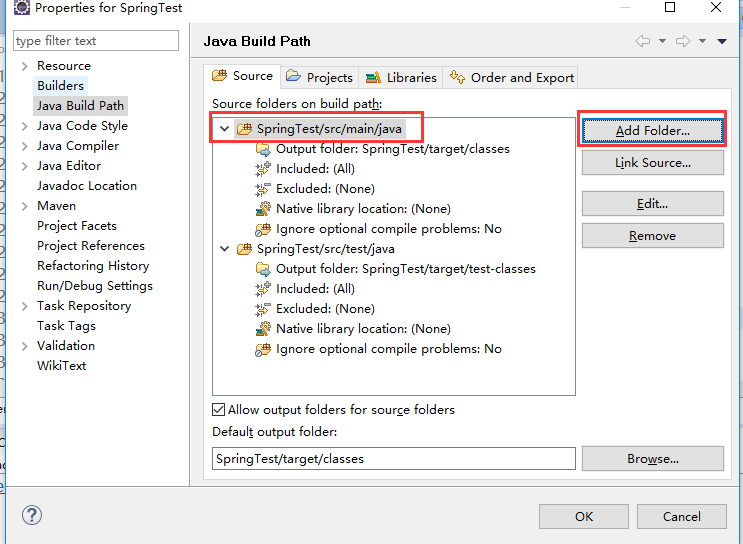
注意:这里我们可以看到src/main/java的输出目录(output folder)是target/classes , src/test/java 的输出目录是target/test-classes 。我们现在要添加的src/main/resources 输出目录也是 target/classes。如果以后需要src/test/resources 那么记得要将输出目录 修改成 target/test-classes
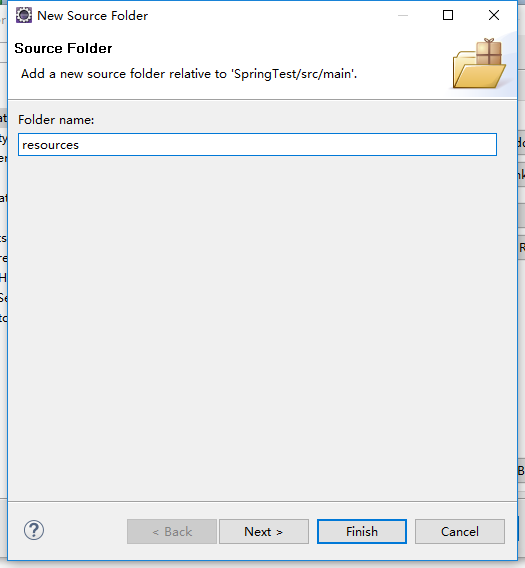
接下来:点击 Create New Folder
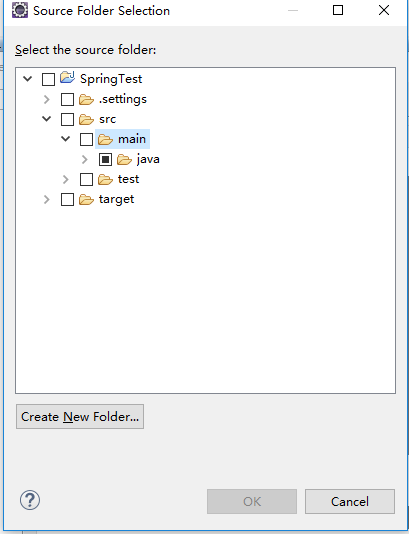
接下来:点击 Finish 就OK啦。
六、新建文件夹 的图标问题
