引言
我身边大部分朋友是使用JAVA的,他们都对树莓派有不少兴趣,所以我干脆也探索一下如何使用JAVA来操作树莓派的GPIO接口,并写此文给想尝试树莓派的JAVA程序员参考。
Pi4j简要说明

要使用JAVA操作树莓派的GPIO,要借助一个第三方库:PI4J。以下是PI4J的官方说明:
This project is intended to provide a friendly object-oriented I/O API and implementation libraries for Java Programmers to access the full I/O capabilities of the Raspberry Pi platform. This project abstracts the low-level native integration and interrupt monitoring to enable Java programmers to focus on implementing their application business logic.
Pi4j是依赖wiringpi封装而成的,不仅能操作GPIO,还能使用I2C协议和SPI协议与硬件设备进行交互。
安装
安装PI4J之前,你需要先在树莓派里面安装两样东西:
最新版的Raspbian系统貌似已经默认安装这两样东西了的。
安装PI4J有两种方式:
- 方式一(推荐),执行以下命令即可安装完成:
curl -s get.pi4j.com | sudo bash
- 方式二,下载安装包来安装,下载地址为http://get.pi4j.com/download/pi4j-1.1.deb,下载完毕后执行以下命令,即可完成安装:
sudo dpkg -i pi4j-1.1.deb
安装之后,PI4J的库放在以下目录:
/opt/pi4j/lib
如果你想更新PI4J,可以执行以下命令:
sudo apt-get install pi4j
或者
pi4j --update
如果想要卸载PI4J,可以执行以下命令
sudo apt-get remove pi4j 或 pi4j --uninstall
完全卸载方式:
curl -s get.pi4j.com/uninstall | sudo bash
PI4J的官方demo
安装PI4J之后,就应该尽快入门PI4J了,而学习PI4J最好的办法就是一边看着官方demo,一边动手写代码。
如果你按照上面的方式安装PI4J,那么官方文档在以下目录:
/opt/pi4j/examples
进入该目录,执行以下命令,可编译源代码:
sudo /opt/pi4j/examples/build
编译之后,你可以随意运行某个demo,比如这里运行BlinkGpioExample,那么执行以下命令:
./run BlinkGpioExample
demo简要解析
毕竟大家都是新手,光有代码恐怕还不能困惑,所以这里就拿一个例子讲解一下代码,方便大家入门。
在讲解之前,大家除了准备树莓派,还要先自备好led灯,以及一个开关按钮(某宝上搜有很多),因为大多的官方例子里都使用到。
好了,大家先看看两个图,这两个图表示这树莓派2(树莓派3点此)上的针脚。也就是我们所说的GPIO。
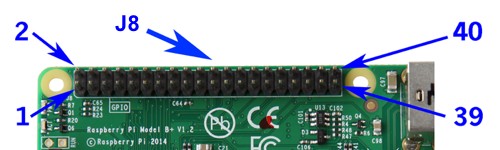
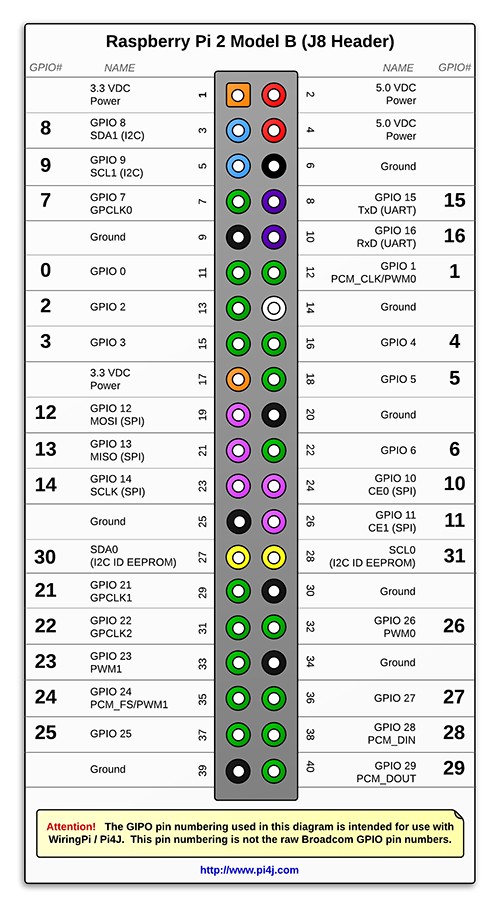
图一是真实树莓派的针脚图,图一的箭头1,箭头2指向图二顶头的两个针脚。这里需要注意的是,图二两边的粗体数字,这是PI4J的针脚编号。
好了,我们开始看代码,打开/opt/pi4j/examples/ControlGpioExample.java:
/*
 * #%L
 * **********************************************************************
 * ORGANIZATION  :  Pi4J
 * PROJECT       :  Pi4J :: Java Examples
 * FILENAME      :  ControlGpioExample.java
 *
 * This file is part of the Pi4J project. More information about
 * this project can be found here:  http://www.pi4j.com/
 * **********************************************************************
 */
import com.pi4j.io.gpio.GpioController;
import com.pi4j.io.gpio.GpioFactory;
import com.pi4j.io.gpio.GpioPinDigitalOutput;
import com.pi4j.io.gpio.PinState;
import com.pi4j.io.gpio.RaspiPin;

/**
 * This example code demonstrates how to perform simple state
 * control of a GPIO pin on the Raspberry Pi.
 *
 * @author Robert Savage
 */
public class ControlGpioExample {

    public static void main(String[] args) throws InterruptedException {

        System.out.println("<--Pi4J--> GPIO Control Example ... started.");

        // create gpio controller
        final GpioController gpio = GpioFactory.getInstance();

        // provision gpio pin #01 as an output pin and turn on
        final GpioPinDigitalOutput pin = gpio.provisionDigitalOutputPin(RaspiPin.GPIO_01, "MyLED", PinState.HIGH);

        // set shutdown state for this pin
        pin.setShutdownOptions(true, PinState.LOW);

        System.out.println("--> GPIO state should be: ON");

        Thread.sleep(5000);

        // turn off gpio pin #01
        pin.low();
        System.out.println("--> GPIO state should be: OFF");

        Thread.sleep(5000);

        // toggle the current state of gpio pin #01 (should turn on)
        pin.toggle();
        System.out.println("--> GPIO state should be: ON");

        Thread.sleep(5000);

        // toggle the current state of gpio pin #01  (should turn off)
        pin.toggle();
        System.out.println("--> GPIO state should be: OFF");

        Thread.sleep(5000);

        // turn on gpio pin #01 for 1 second and then off
        System.out.println("--> GPIO state should be: ON for only 1 second");
        pin.pulse(1000, true); // set second argument to 'true' use a blocking call

        // stop all GPIO activity/threads by shutting down the GPIO controller
        // (this method will forcefully shutdown all GPIO monitoring threads and scheduled tasks)
        gpio.shutdown();

        System.out.println("Exiting ControlGpioExample");
    }
}
连接图
要查看上面代码的运行效果,需要按照如下图所示接入LED灯:

执行
连接之后,执行命令:
./run ControlGpioExample
输出
这个例子的LED输出应该是这样的:

Turn ON for 5 seconds

Turn OFF for 5 seconds
Turn ON for 5 seconds
Turn OFF for 5 seconds
Turn ON for 1 second
Turn OFF
更多的例子解析,可以直接看PI4J的官方网站,非常详细。官方网站:http://pi4j.com/index.html
开发maven环境
这里简要说一下maven开发环境。毕竟如果真要做一些好东西出来,自然少不了用maven来管理项目。
在树莓派上安装maven,参考官方文档:http://maven.apache.org/install.html
PI4J的maven配置是:
<dependency>
    <groupId>com.pi4j</groupId>
    <artifactId>pi4j-core</artifactId>
    <version>1.1</version>
</dependency>
我的树莓派学习项目github地址:https://github.com/dasheng523/pi
我会一直学习,并加入一些模块的驱动开发代码。有兴趣的同学可以加入进来一起玩转树莓派。
转载自:http://blog.hyesheng.com/2016-09-07-raspberry03/